

 Section Widget
 Categories Widget (Show All)
 . The next thing to do is have your battery evaluated. If the battery is old (over 5 years) and/or looks bad, then it might be a good idea to just replace anyhow. Aside from loose or corroded battery terminals, worn starter contacts is by far the most common cause of intermittent starter activation.
 The starter and solenoid are included in one assembly. The starter is constantly supplied with 12v directly from the battery via the large cable. In order for the starter to engage, it needs 12vdc delivered to it via the small trigger wire. Troubleshooting this circuit can be easy IF (and that's a big IF) the problem can be readily duplicated. Of course this problem is usually intermittent, and this makes troubleshooting aggravating (because chances are it won't act up when you want it to). If by chance you can make it act up for testing, then you've got it made. Using a volt meter check for power at the small starter wire while somebody tries to crank. Warning: make sure van is in park with emergency brake set. Ramps are good, but if you are using jacks, make sure the van is secure on jack stands before climbing under! If there is 10vdc or more at this point when somebody is trying to crank but you only get a click, then the problem is in the starter and the next step is to remove the starter. If however there is less than 10vdc your problem is in the starter circuit and you can skip the part of removing the starter.
For the sake of this article, I'm going to assume you won't be able to duplicate the problem for testing and we'll move right along to the "inspect and repair" part.
What causes the typical Toyota starter problem is uneven contact wear. Due to the polarity of DC current, most of the wear occurs on only one contact (the battery cable side) while the other (starter motor side) remains mostly untouched. When one contact becomes smaller than the other, electrical contact becomes intermittent and may or may not make a complete electrical connection (with the solenoid disc) when you try to start. When this happens (usually at or around 100k miles) you will hear a click at the starter, but little else. Multiple attempts to start will usually get the job done, but after a while, even that trick stops working. At that point, some owners will resort to banging the starter with a hammer, rock, or anything else they can find while another person tries to crank
 . Yes, that actually works, but considering all that hassle, I say fix the damn thing and be done with it
  . I'm not saying this is your problem, but if your van has over 100k miles, and you don't know the history on the starter, then this is a good place to start.
 Getting the starter off is pretty easy so I'm not going to get into great detail on that. If you have basic tools and basic mechanical skills then you will figure it out. The one thing I will say regarding starter removal is: DISCONNECT THE BATTERY 1ST!!! Because it's no fun to perform accidental welding with battery cables
.Once you get the starter out and on the bench, remove the 3 screws on the solenoid housing and remove the cover. Here is what you will see inside:
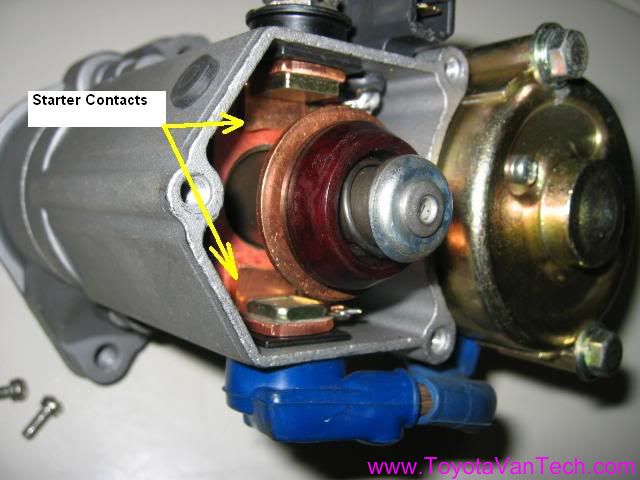
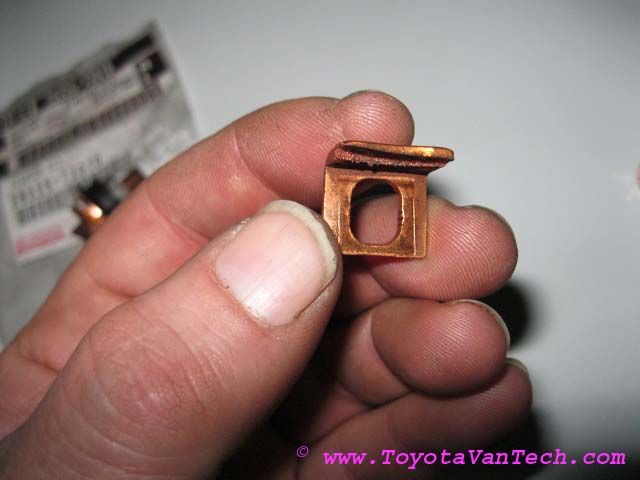
It's the contact on the top that wears out. Here is what a problem one looks like:
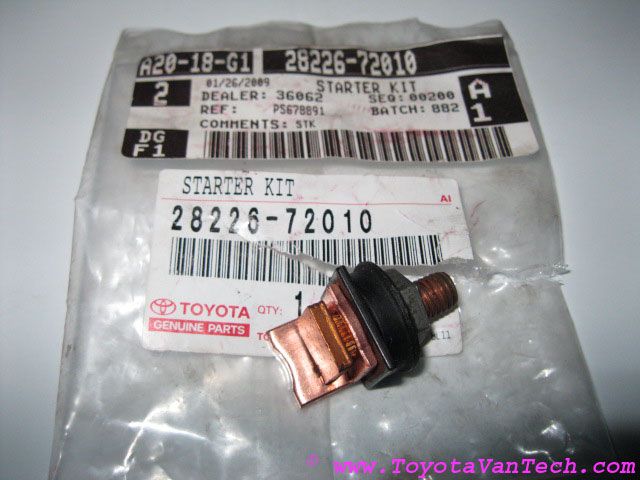
Toyota sells a kit for about $10 - $15 that will fix the worn contact problem. It's Toyota part #28226-72010. It comes with one contact, a post, a nut, an o-ring, and the plastic insulator piece.
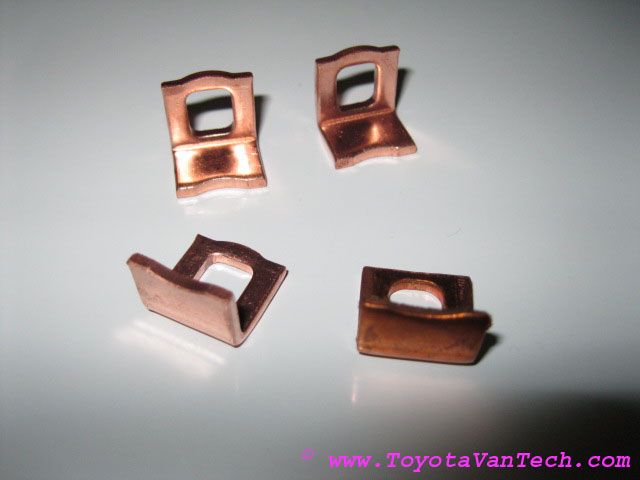
You should get the Toyota kit if your stud or or any of the other included parts are messed up, but typically all you really need is the contact. I found a guy on eBay that sells just the contacts for about $4 each. The advertised shipping is a little high, but if you select 1st class mail when you pay the shipping is actually quite reasonable. Since this is a common failure on the Toyota starters, I always keep a few of these around. Here is a picture of the eBay contacts:
Here is a link to an auction: http://cgi.ebay.com/ws/eBayISAPI.dll...m=350567609042
If this listing is gone or sold out, just do a search for "Denso starter contacts" and you should get several hits. There is another Denso contact that looks the same as ours, but won't fit correctly, so just be sure to get the one with the 8mm hole (the ones that won't fit correctly have 10mm holes).
If you don't want to wait for shipping, some Toyota dealers and most auto electric shops will sell just the contacts without the hardware. Some shops have them but don't want to waste their time selling these small individual parts. If they have them and the guy working the counter is friendly, it's likely he will sell to you for about $5 each. Some guys will just give you one for a smile
 . If you get them that way you'll probably need to bring an old one in for correct match-up.
Okay, so if you do all this and there's still a problem....... That sucks! but it's an old vehicle so consider it as routine maintenance
 . Chances are it was getting close anyhow and the last thing you need is multiple problems to troubleshoot at the same time.
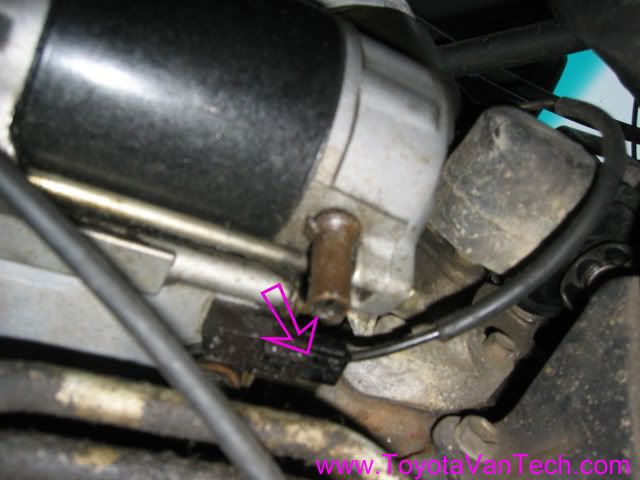
 If the problem ends up being in the starter circuit, the good news it's a pretty basic circuit and only a few things can go wrong. I marked up the electrical schematic below with red so you can see the path of the small starter wire circuit. I also took some pics and marked the potential problem spots with the purple arrows. If you look at the schematic, you will see it starts at the battery and ends up at the starter. I doubt you have a problem with the 1st 2 fusible links shown because problems here would create other more serious problems elsewhere.
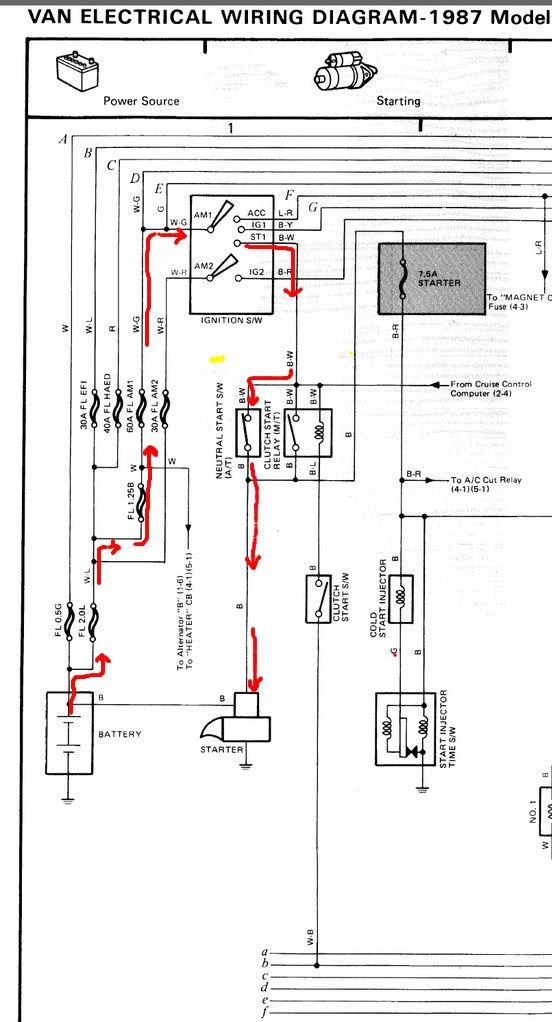
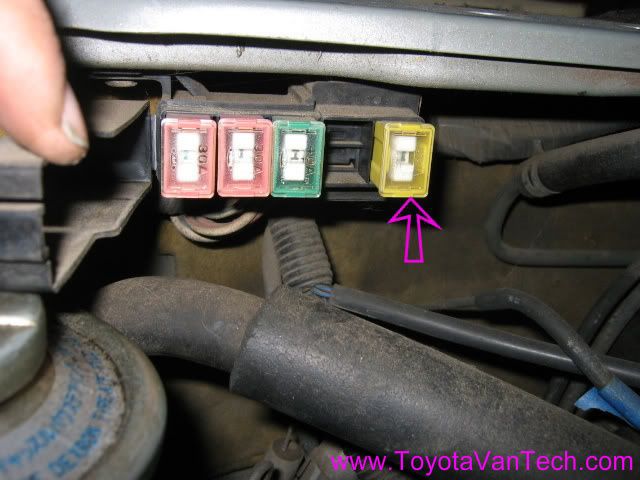
The 1st potential problem area after the battery would be the spot marked 60A FL AM1. What they are referring to is the yellow fuseible link in the fuse box behind your power steering reservoir pictured here. I doubt this is your problem (for the same reasons I doubt it would be the other 2 fusible links), but you should at least take a quick look to make sure there are no burn marks or corrosion.
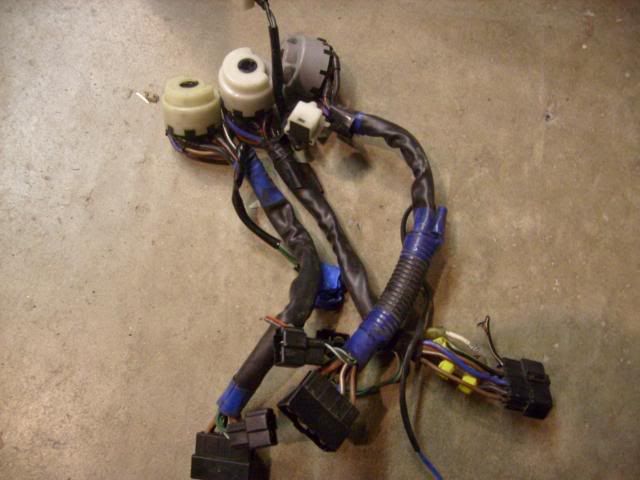
The next stop on the way to the starter is your ignition switch. On an old van, this could likely be your problem. To give you an idea what it looks like, here is a picture of some used ones removed from the steering column:
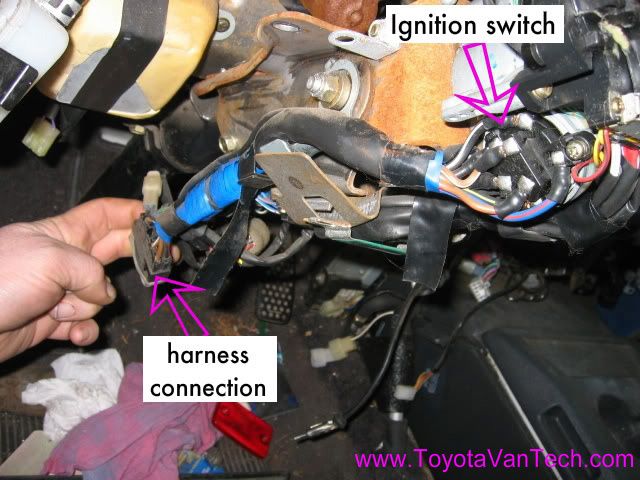
Loose, corroded, or burned pins inside this connection are a potential problem so pull this plug and inspect inside. Pay particular attention to the white/green wire in the #4 position (comes from the AM1 Fusible link). The black/white wire in the #1 position is also an important one to scrutinize as it goes from the ignition switch to the neutral start switch. FWIW, the contacts inside the switch are much more likely than the connector to be the problem. Here is a picture to show you it's position in the van:
If by chance you're able to duplicate the problem for testing, now would be a good time to test the ignition switch. For testing, take the black lead of your meter and ground it to the chassis. Now touch the red lead to the solder joint on the back of the switch (the one that corresponds to the white/green harness wire). Note: when identifying wires, don't trust color coding on the component (as these may vary). Use the harness side to identify your circuit. In cases where harness color varies from component color you'll need to make a note of that when identifying the correct solder joint.
With your meter in place, try to crank the van and record voltage. Now touch the red meter lead to the solder joint that corresponds with the black/white harness wire. Try to start again and record voltage. When compared the 2 voltage readings should be no more than 1vdc apart (preferably less than .5v). If there is an excessive volt drop here then congratulations! You just diagnosed a bad ignition switch! If it tested good then it's time to move on to the neutral start switch.
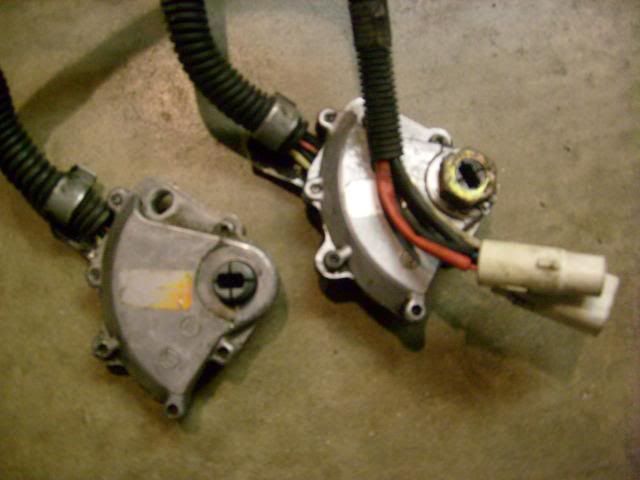
Here are some used & homeless neutral start switches:
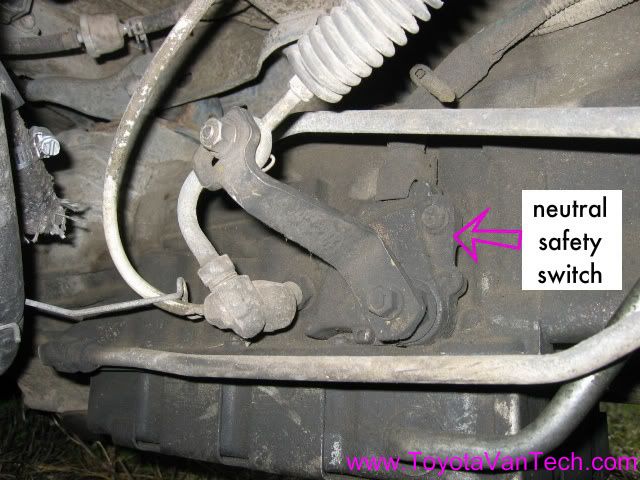
Here is one in it's natural habitat (PS transmission under the van):
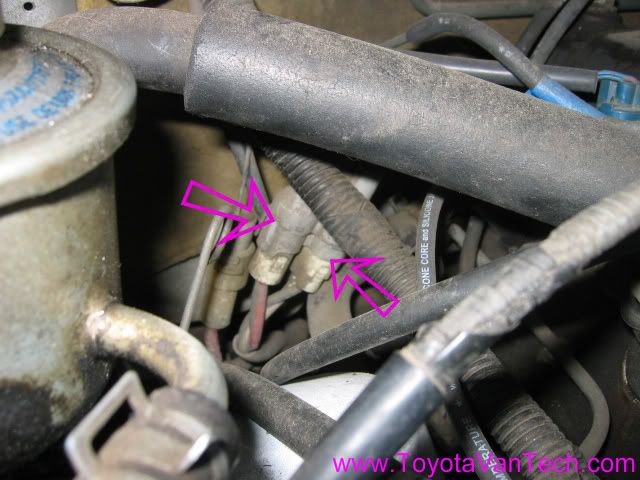
Okay, so the neutral safety switch could be the problem here, but so could the connection point for it. The next picture shows the position of the 2 harness plugs on your van. Disconnect and inspect inside these 2 plugs for burns or corrosion. (note: this is accessible through your power steering reservoir access panel)
If these look good & assuming you're able to duplicate the problem for testing, hook these back up and test here for voltage drops during cranking (you'll probably need a helper for this one). Same rule applies on voltage drops.
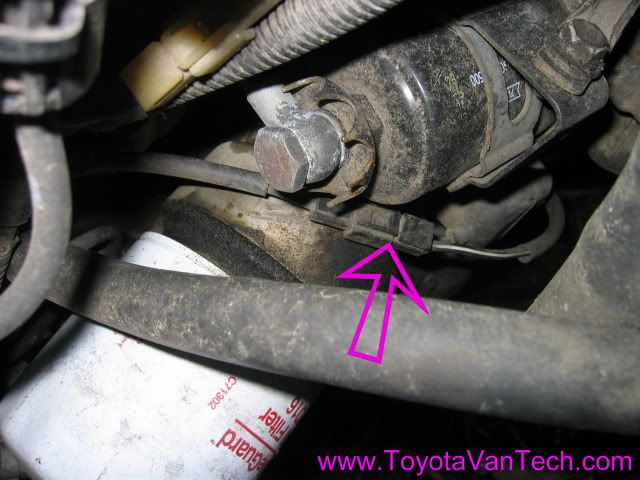
Okay, the next connection in route to the starter is right between the oil filter and the fuel filter. Check this one too:
And of course, the final connection here could also be the culprit.
All of the above things need to be in good working order. If any one or more of the above items has a bad or questionable connection, then it should be addressed. If your inspection reveals nothing, but you still occasionally have the problem (assuming you cannot duplicate the problem for testing), the next step is to start replacing parts. If you get to this stage, I would begin with the ignition switch. If that doesn't help move on to the neutral start switch.
If by chance you're lucky enough to be able to duplicate problem for testing, check voltage at the starter while a helper tries to crank. You should check voltage to both main starter cable and trigger wire. If you see less than 10vdc any time during testing you should go back to the battery and verify it has more than 12vdc. If you are seeing low voltage in the circuit & the battery is over 12vdc, then back-track to battery checking various points along the way. Once you have found the place the voltage drops, you have found the problem.
Also, as mentioned earlier, I can't stress enough the importance of checking the big battery cables on both ends.........this includes the chassis ground connection and the big post on the starter. Make sure all connections are clean and tight. Good luck. Tim
PS: If your van has a 5 speed transmission, you won't have a neutral safety switch, but don't forget to check the clutch start relay and the clutch start switch.
Update 4/22/15: There are now starter kits readily available on eBay or Amazon for a reasonable price. The kit includes both contacts and a new plunger. Considering the low price of these parts verses the labor involved, I am now recommending putting a kit in your starter. Here's a link: http://www.amazon.com/Solenoid-Rebui...ger+toyota+van
vBulletin Message