• Cleaning the Throttle Body

    The throttle body is a pretty simple component but after years of service the internal passages can become clogged/dirty & the TPS (Throttle Position Sensor) begins to fail. For these reasons I recommend cleaning the throttle body and replacing the TPS on any van with 150k or more miles. Here's my method of disassembling, cleaning, and adjustment.

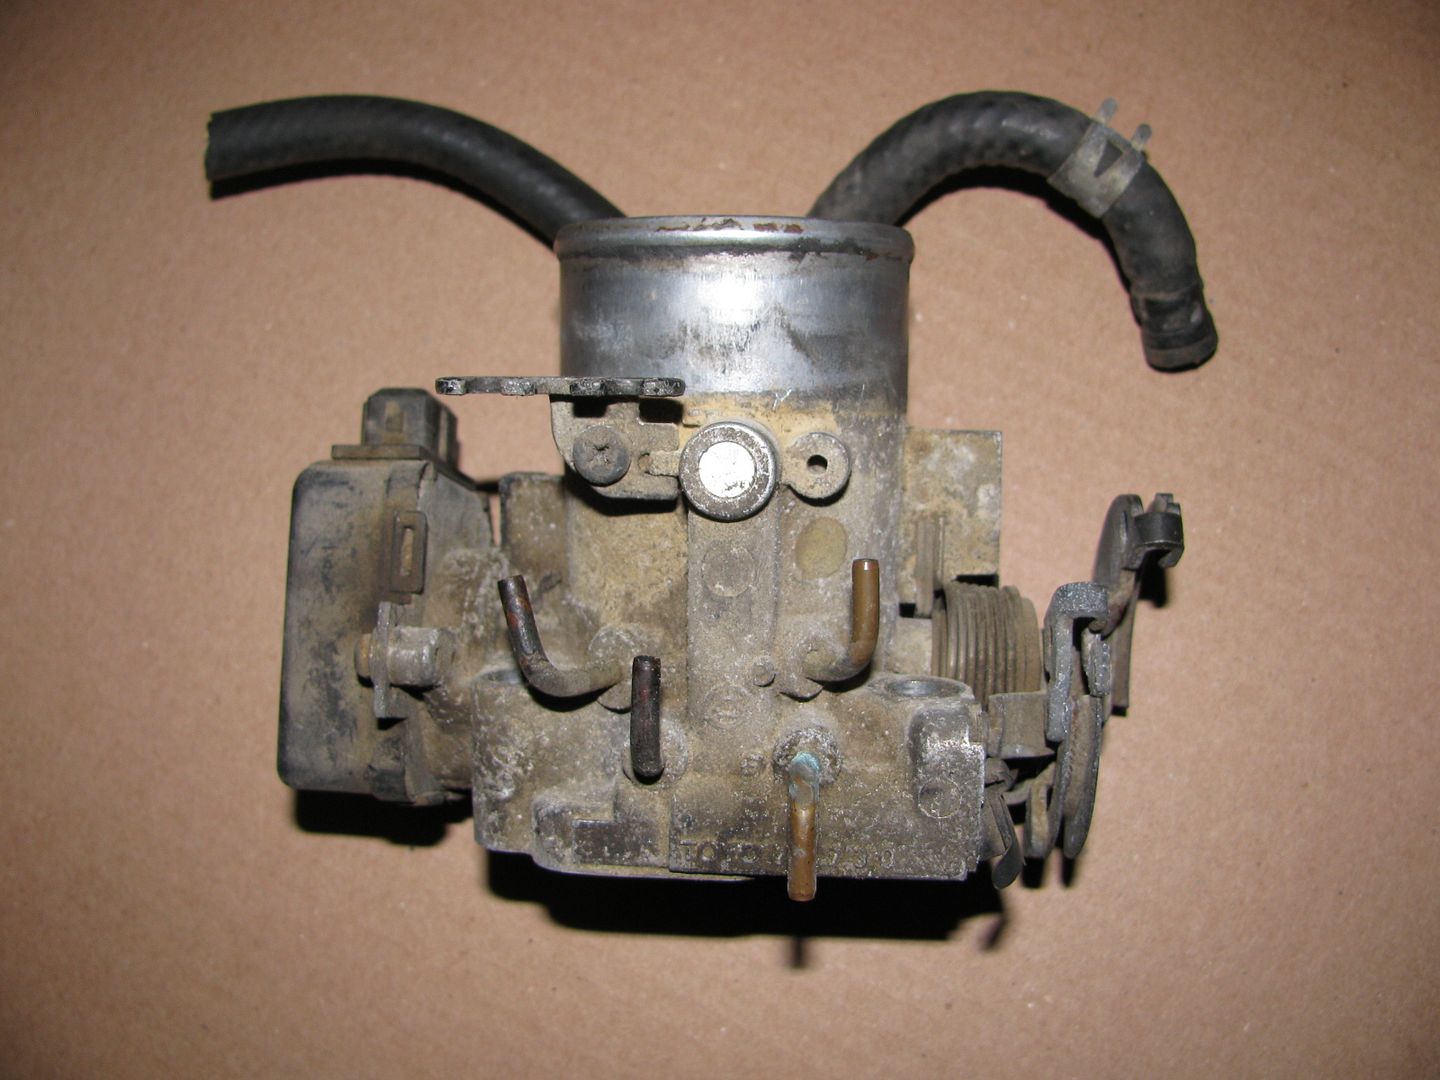
    This is a throttle body I pulled from a parts van. It will take a couple days soaking in Chem-Dip, so I can drive my van while this is being worked on, then I can swap it out with the one on my daily driver when it's ready.


    Chem-Dip is a pretty harsh cleaning chemical. So harsh that it will eat rubber & plastic parts. Before soaking the throttle body in this it must be disassembled. Toyota didn't intend for these throttle bodies to be easily disassembled, but I have worked out a way to get the job done. The 1st challenge is the screws holding the butterfly to the throttle shaft. After installation Toyota crushed the threaded ends of these screws against the side of the shaft. To make matters worse, they used an unusual screw size (M3.5 X 0.6). So unless you plan on drilling & re-tapping the throttle shaft (to accept a more common screw size), you will need to save & re-use these.


    Use a Dremel with a metal cutting fiberglass/abrasive wheel to carefully grind the crushed portion of the screws off. Don't stop until they are flush with the shaft. It will save you time later to also make an identifying scratch in the butterfly so you can orient it the same way when it's time to go back together.


    While you have your Dremel out grind some slots to allow removal of the idle adjust screw cover.


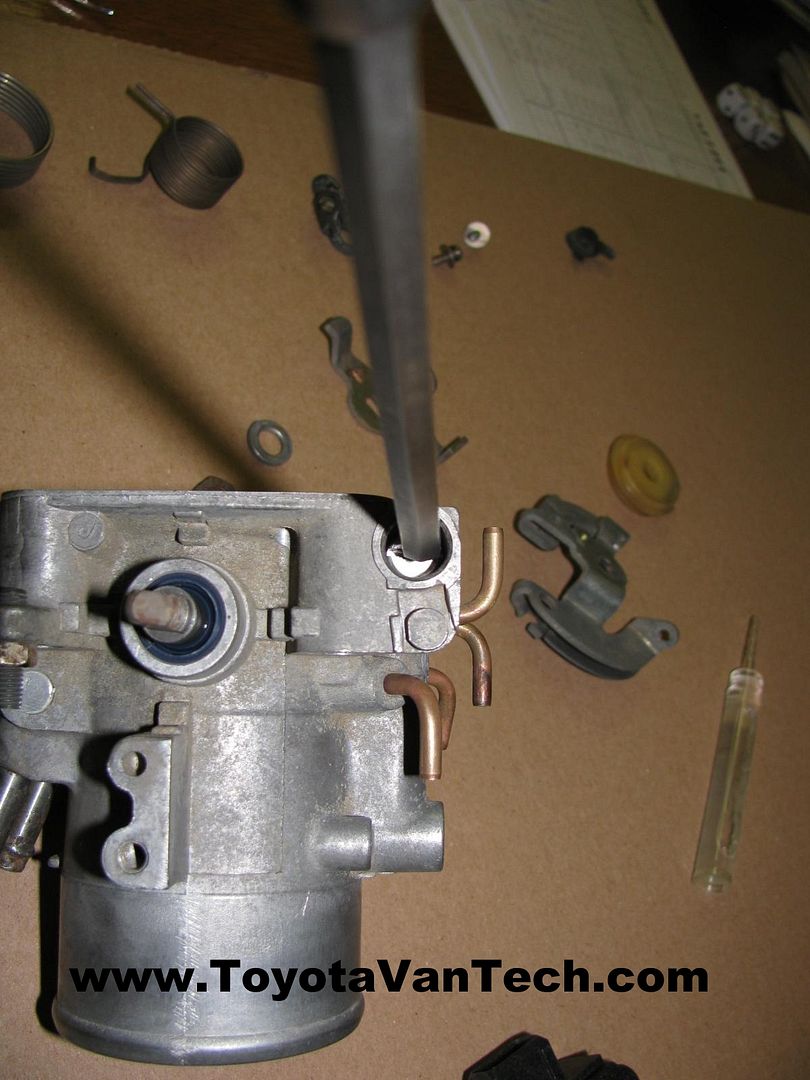
    Now it's time to remove the TPS........just two screws and it pulls straight off the shaft.


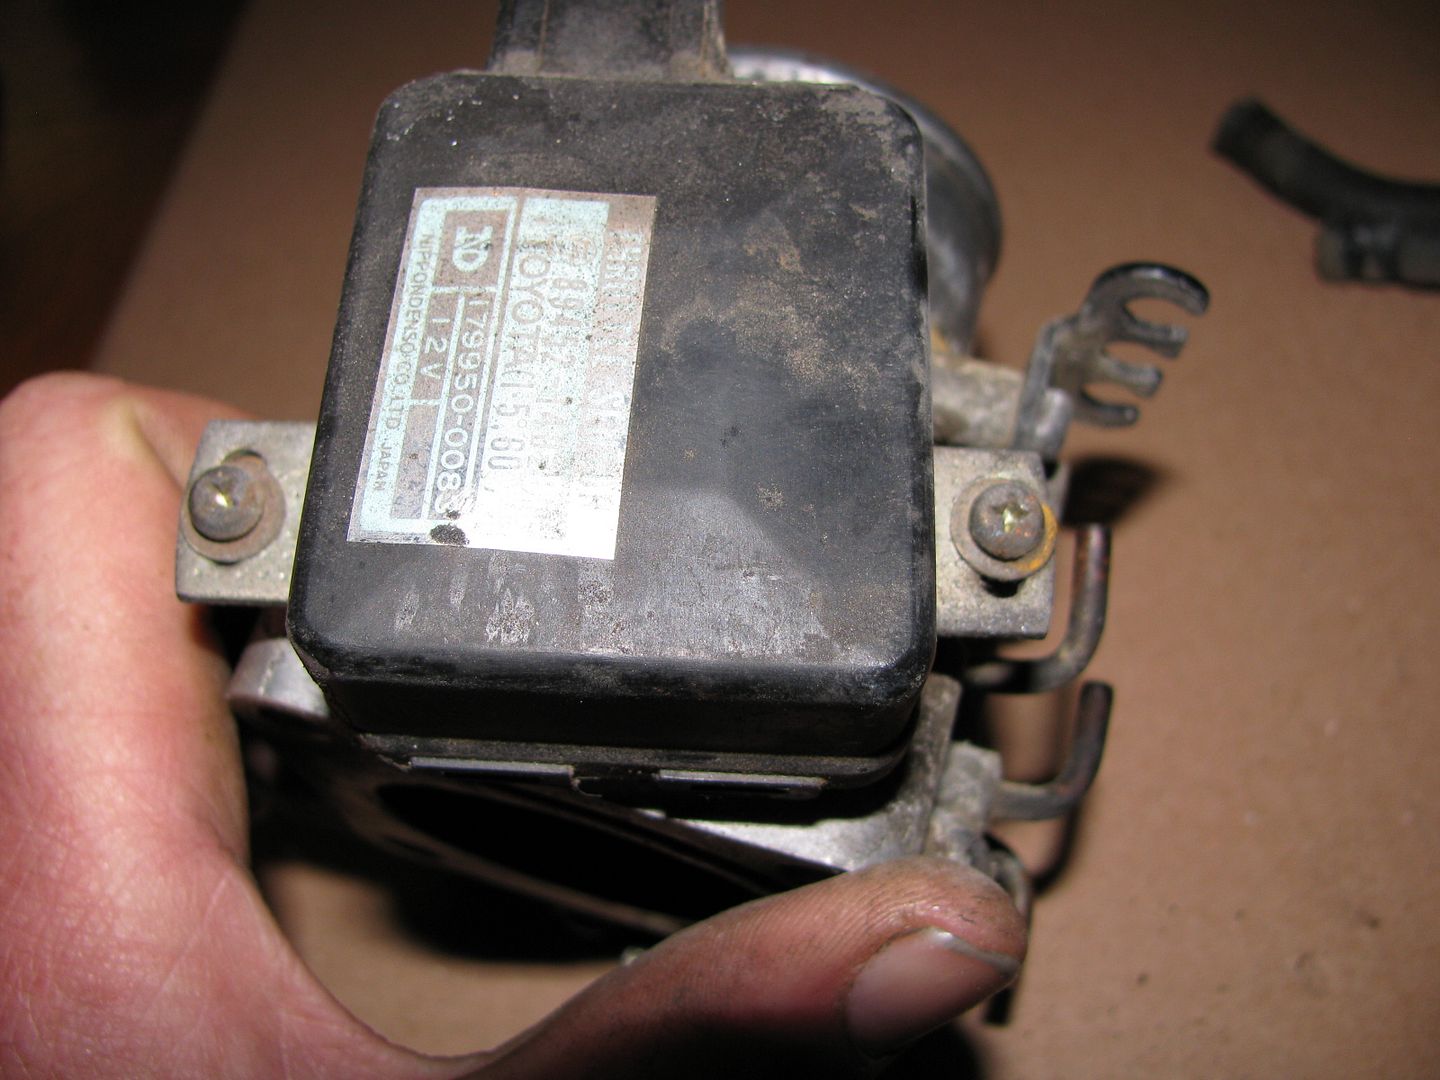
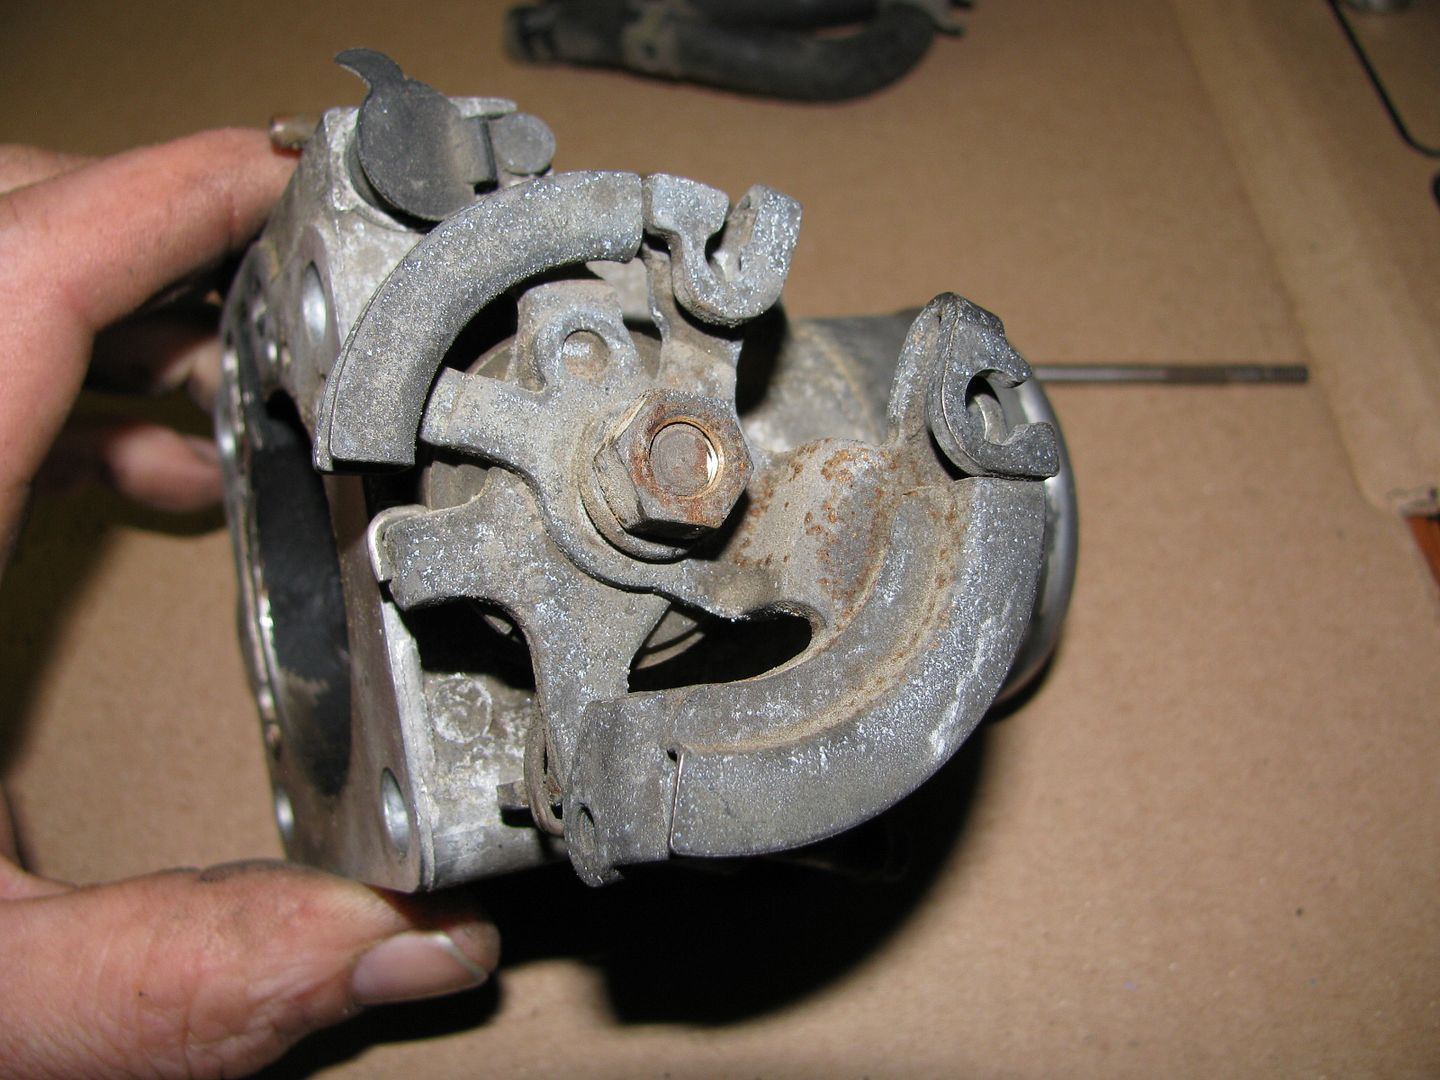
    Next remove the nut, the cable guide, throttle return spring, and other associated parts from the throttle shaft. Take a picture or make notes so you can put this back the same way later.


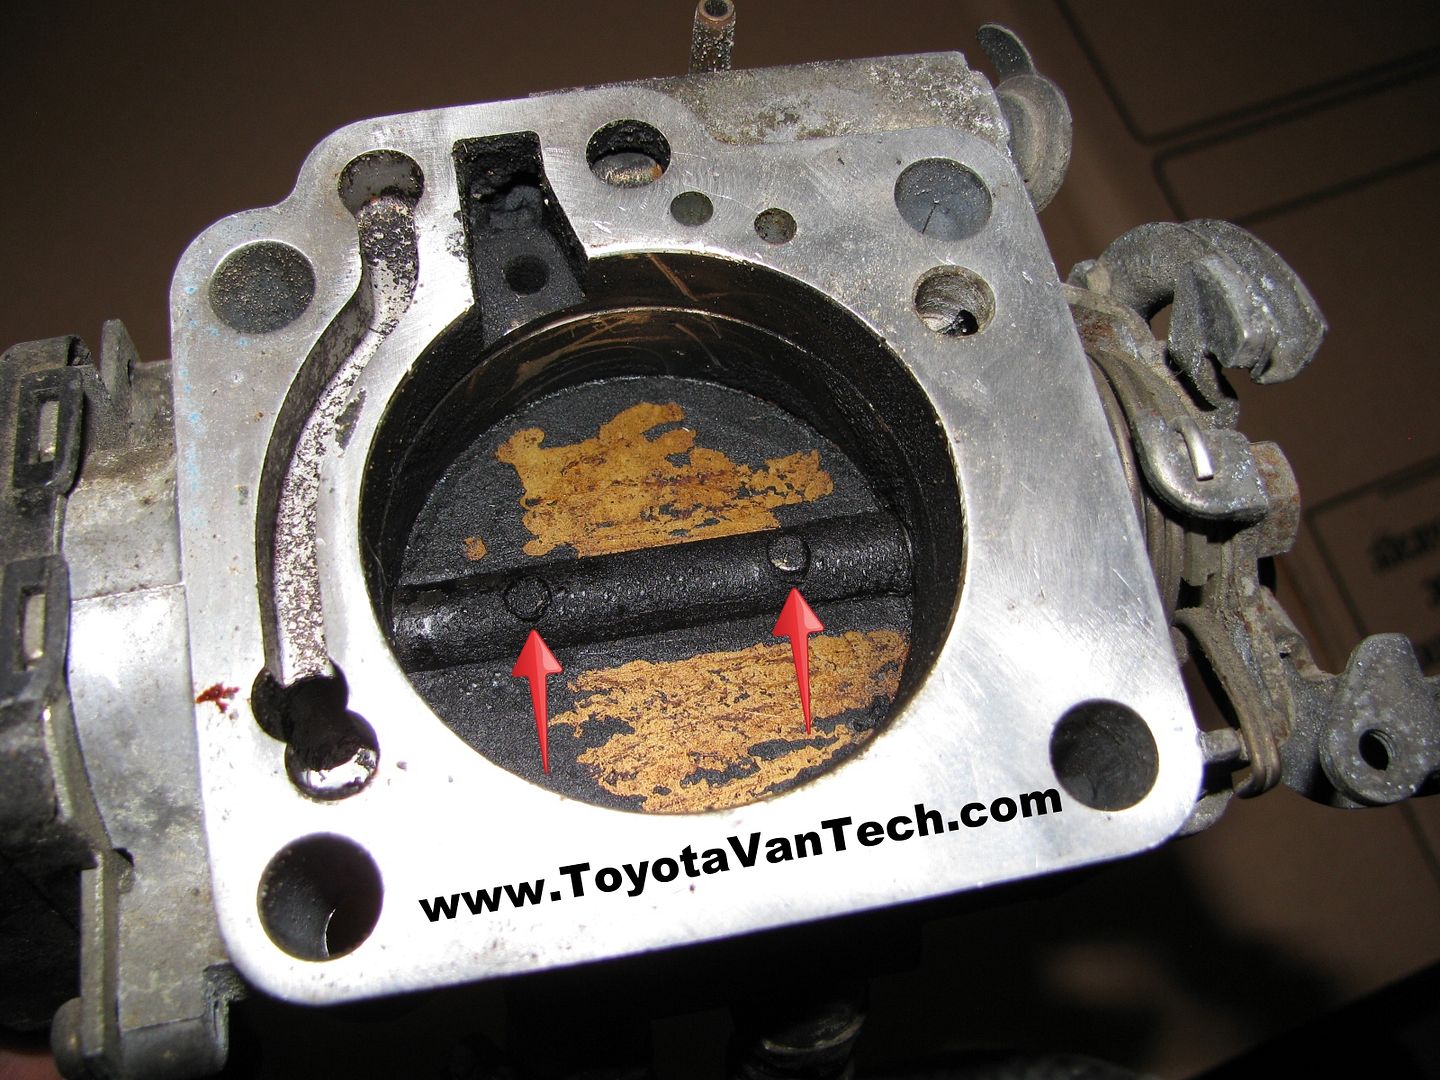
    Now the 3.5mm screws can be removed from the shaft & the butterfly can be removed. Note: These screws are a bit "soft" so be sure to use a high quality #2 Phillips screwdriver bit & make sure the tip is in good condition. Bear down hard on the screws when you rotate. You will only get one shot at this & these screw heads strip out easy. Sometimes the crushed threads extend up in the shaft area a bit so occasionally these screws are hard to remove. Remember when I said "you'll only get one shot at this"?...........well I might have lied just a little . That was to get your attention so you'd try your best! . Sometimes even when you do everything right the heads still strip 
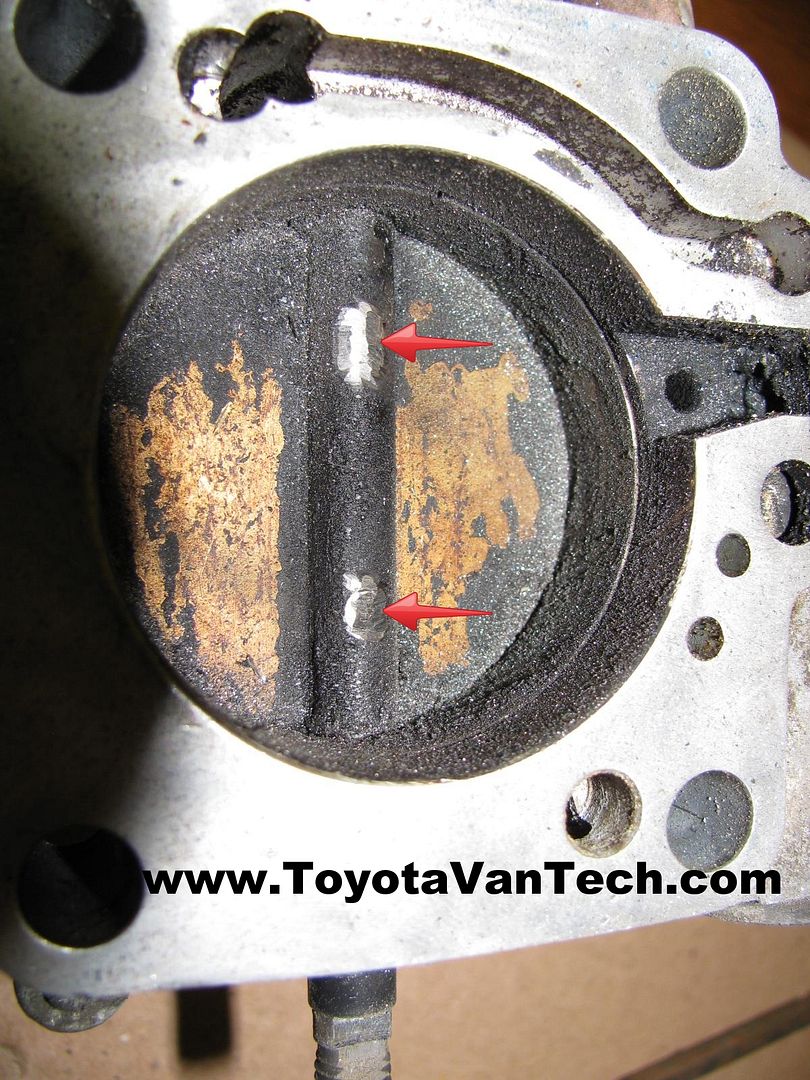
. When this happens use your Dremel to make the Phillips heads into slot tips. Remember, you will still want to re-use these & this is your last shot..........unless you drill and tap for new screws........so be careful and do a good job. After the screws are out remove the butterfly.


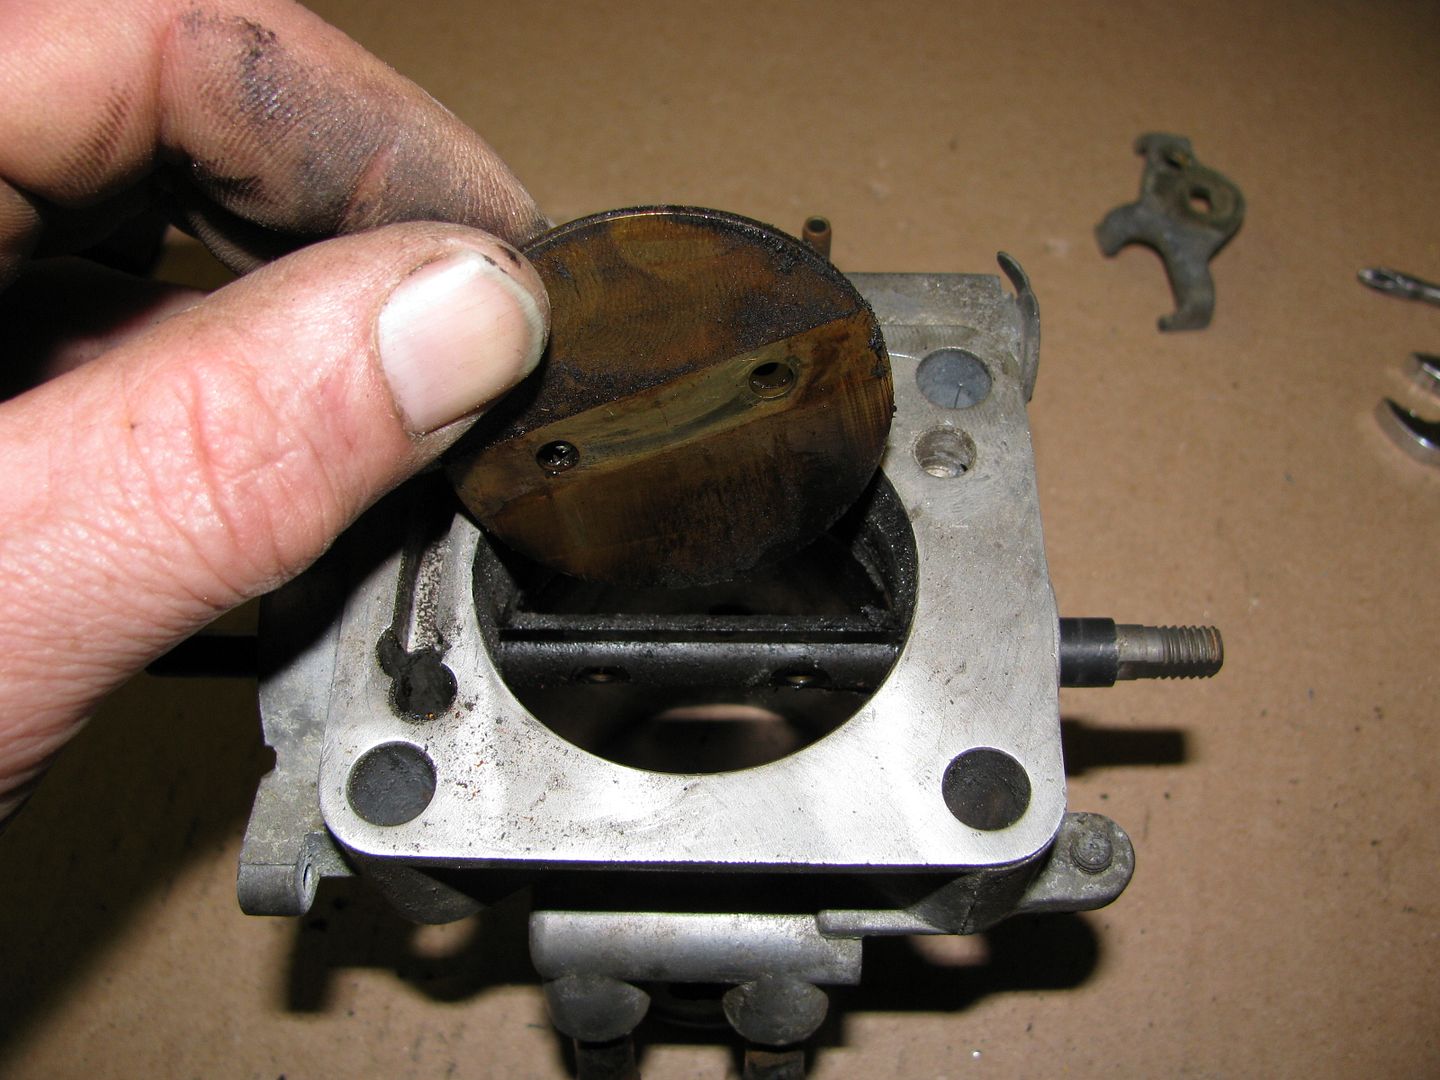
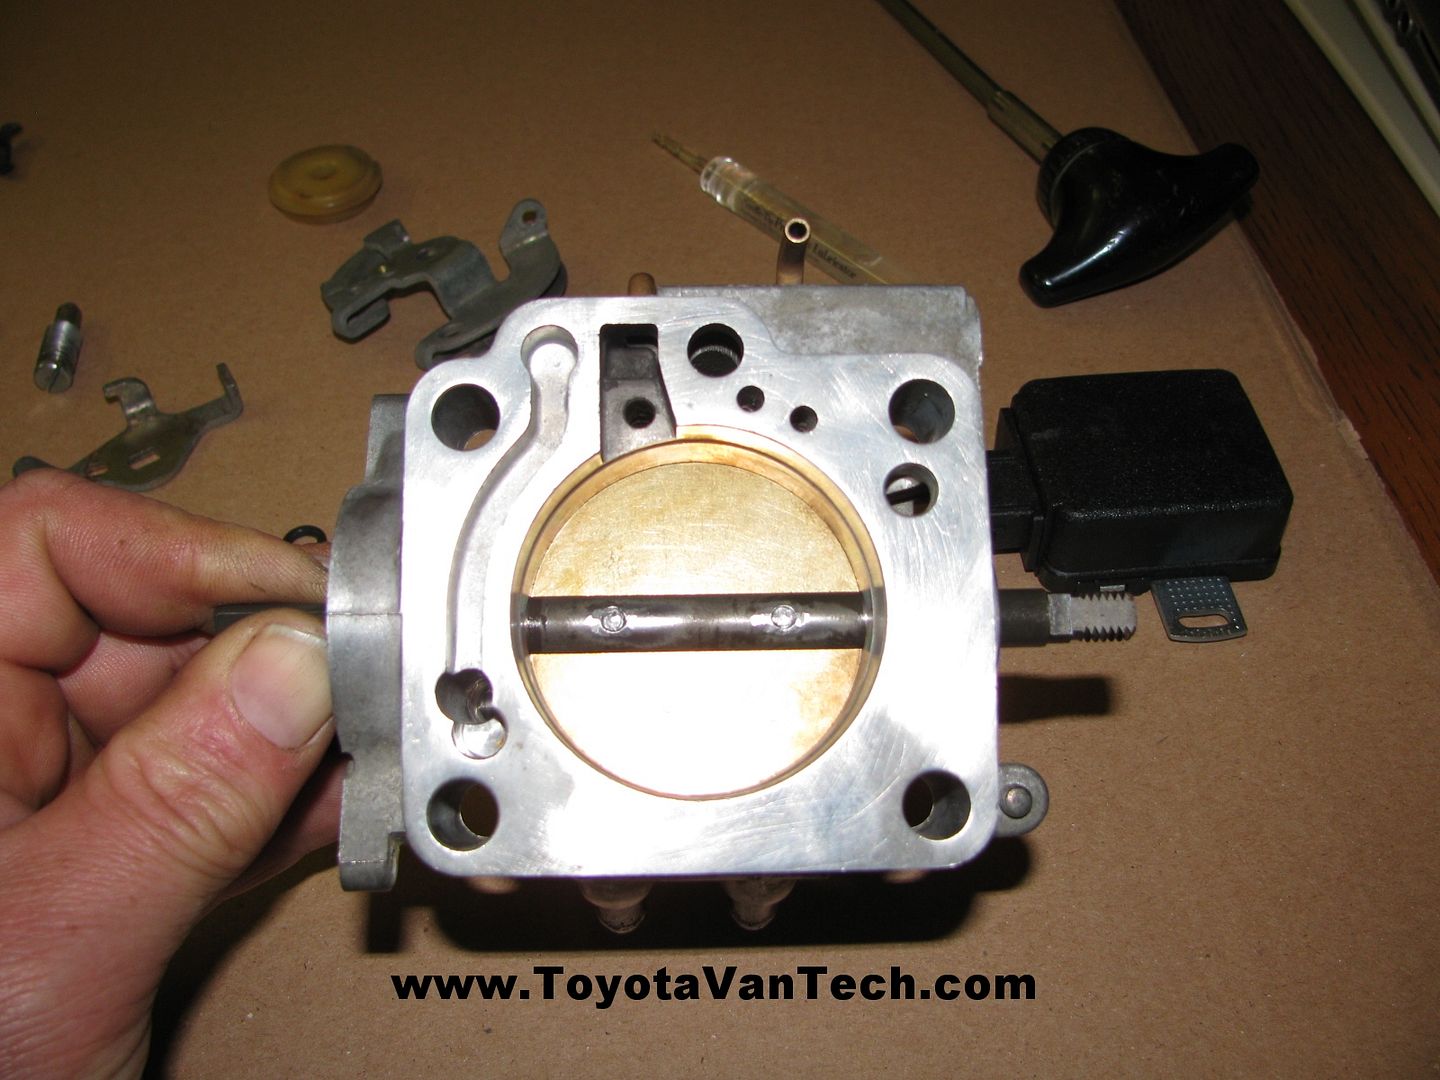
    Now the throttle shaft can be removed.


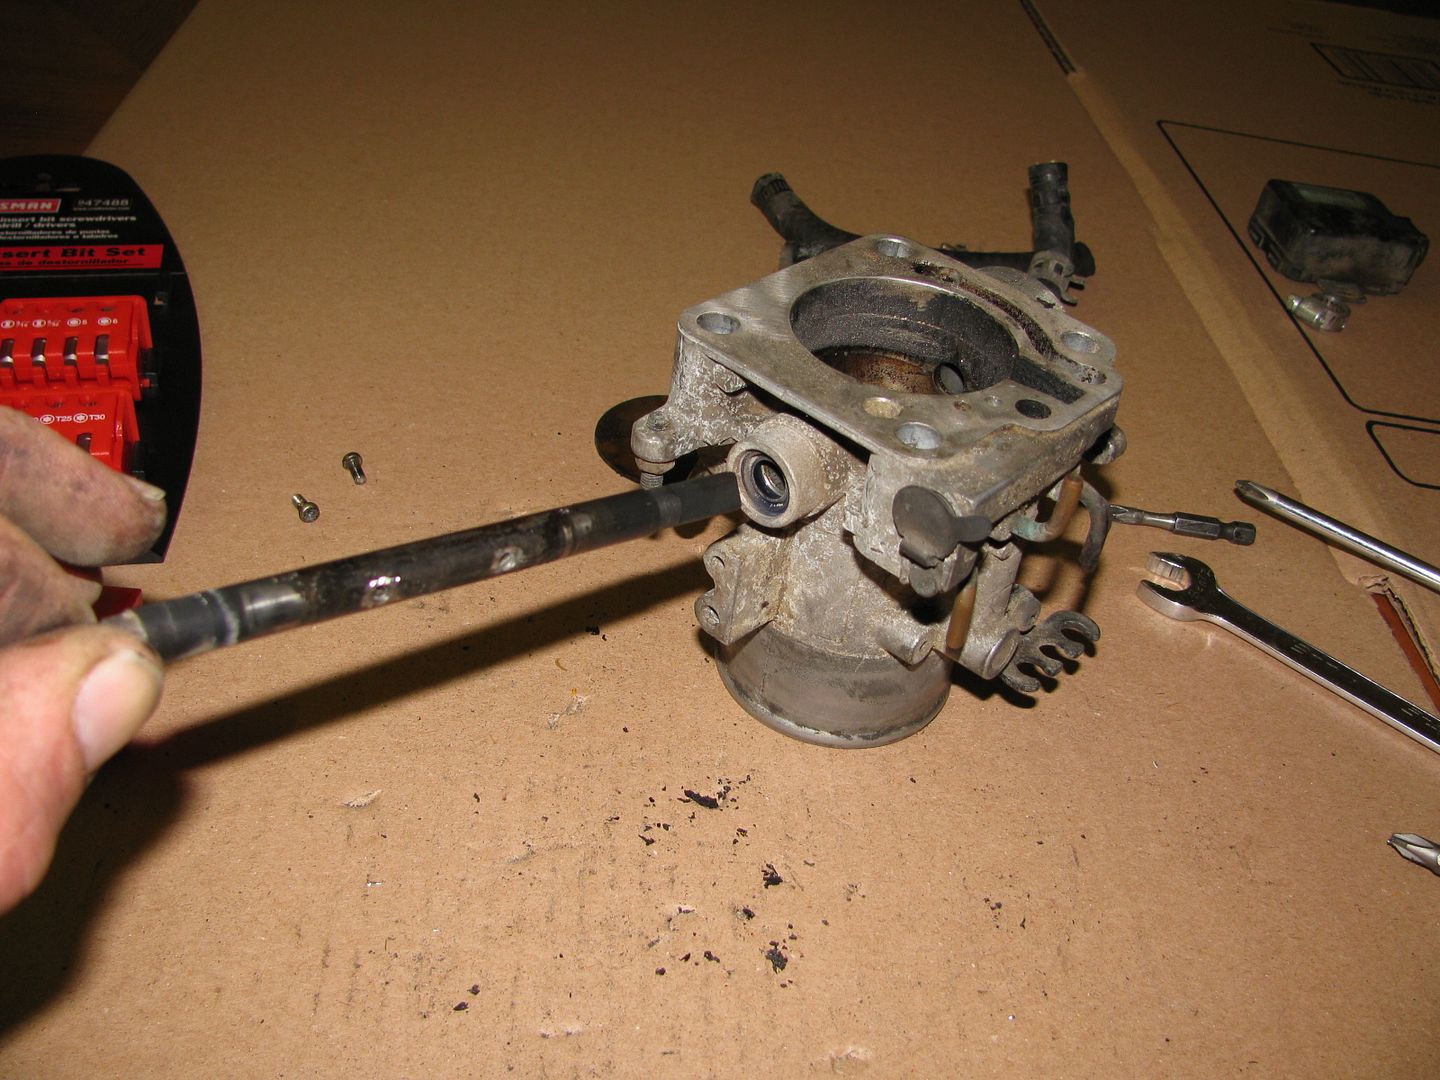
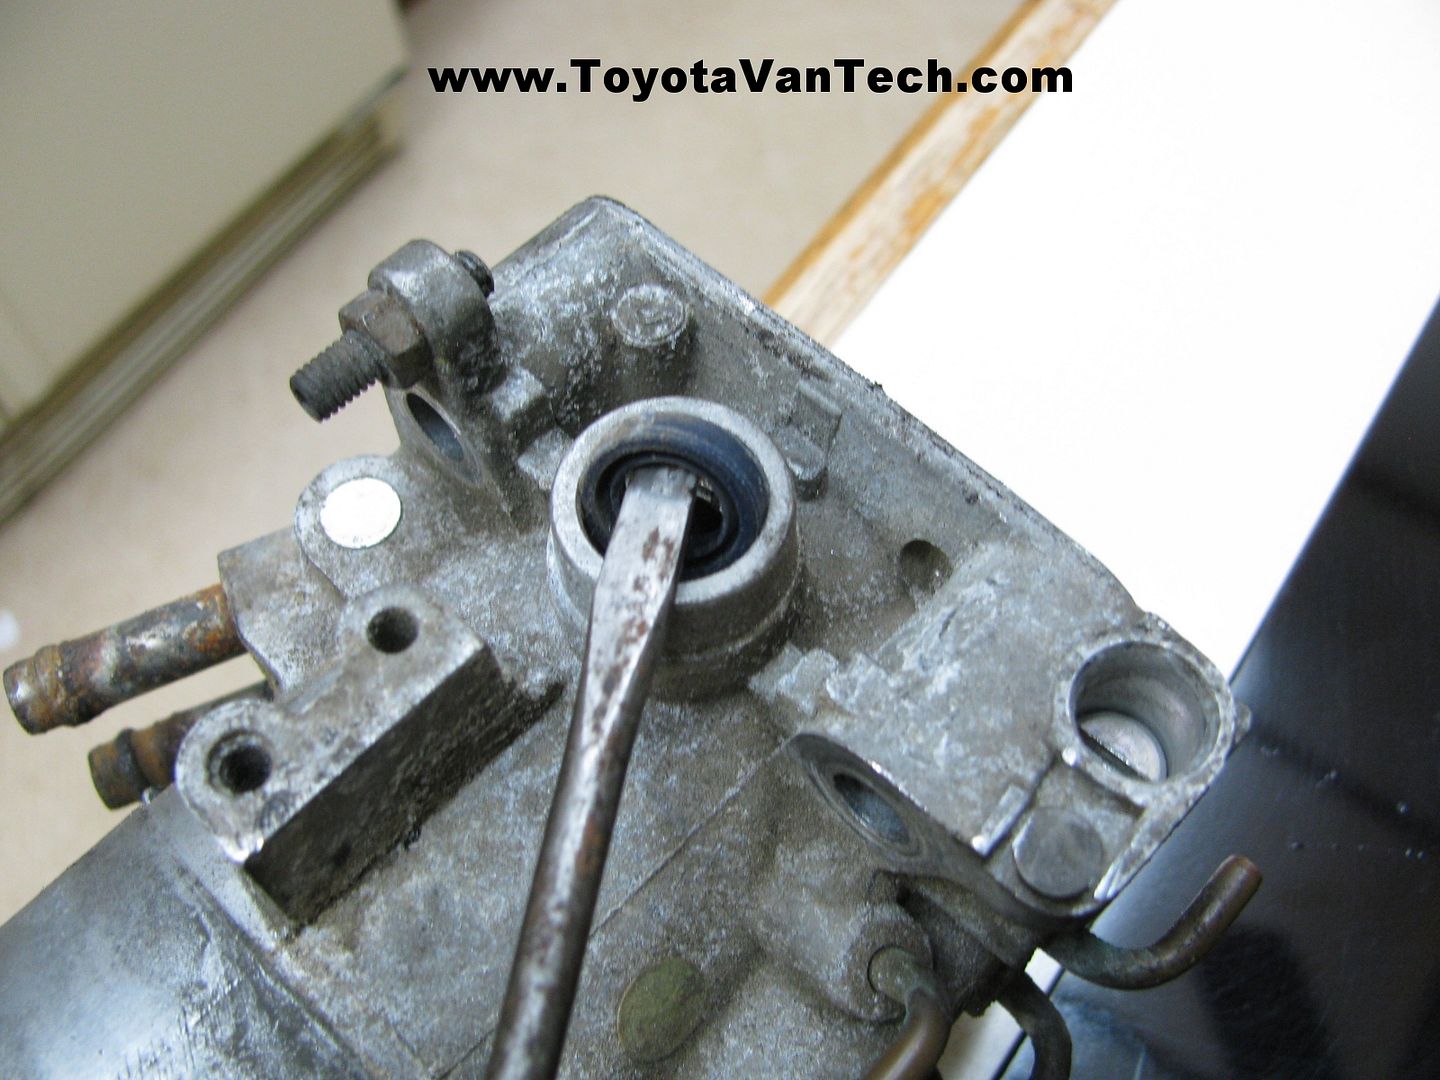
    Take a slot tip screwdriver and gently pry out the throttle shaft seals.


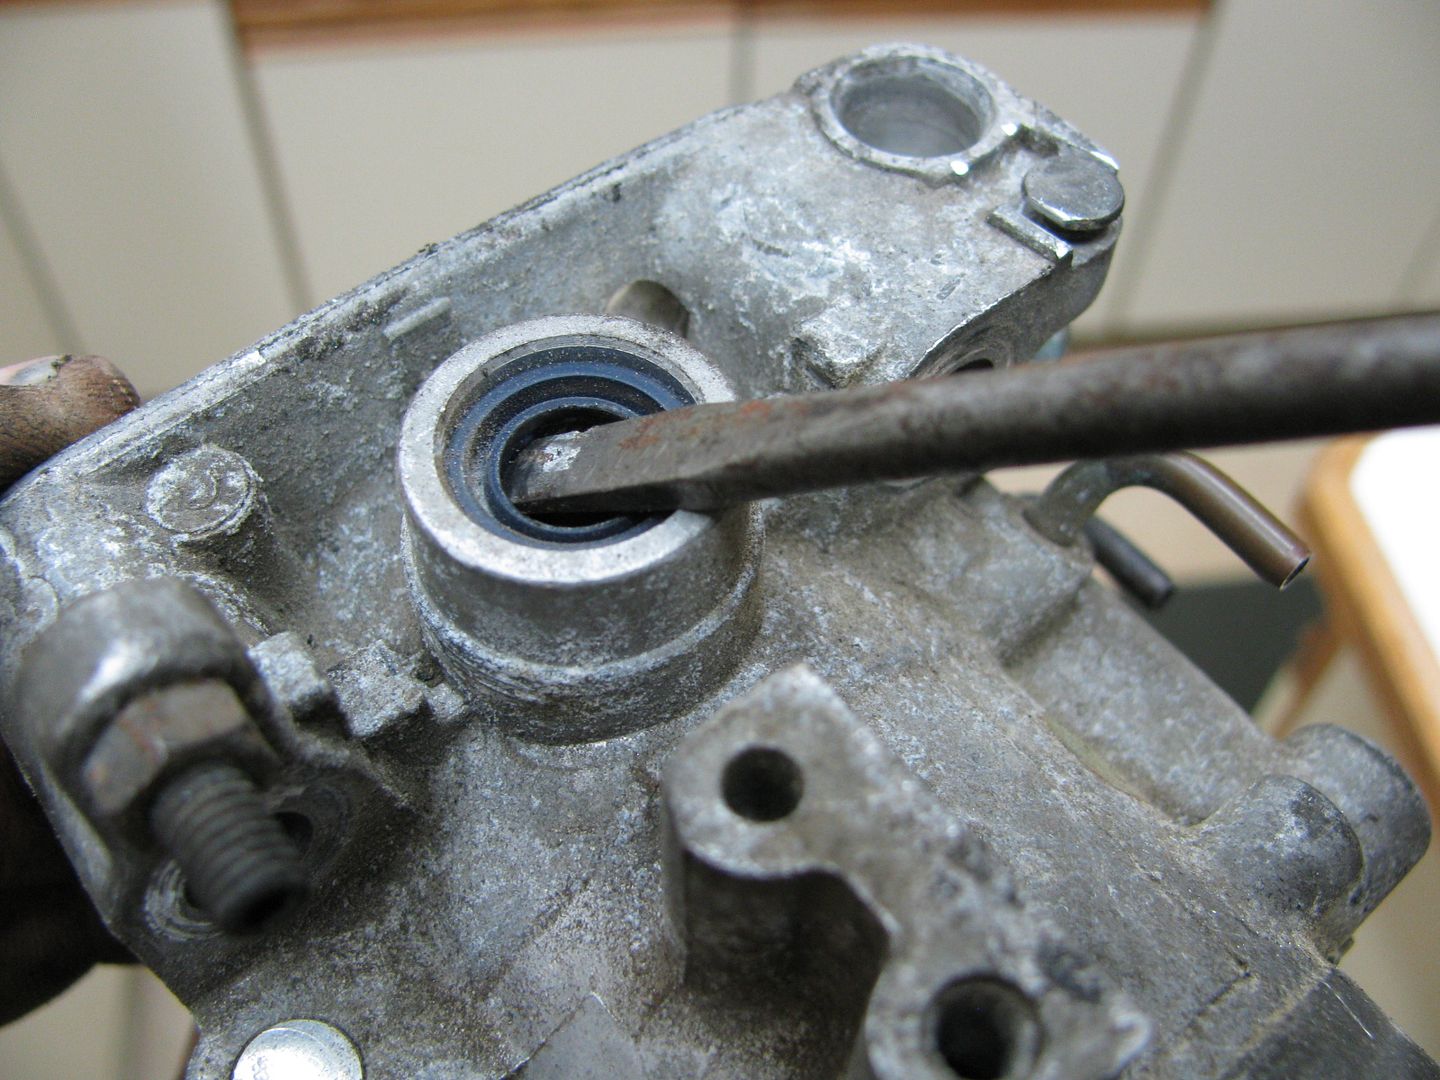
    These typically pop right out.


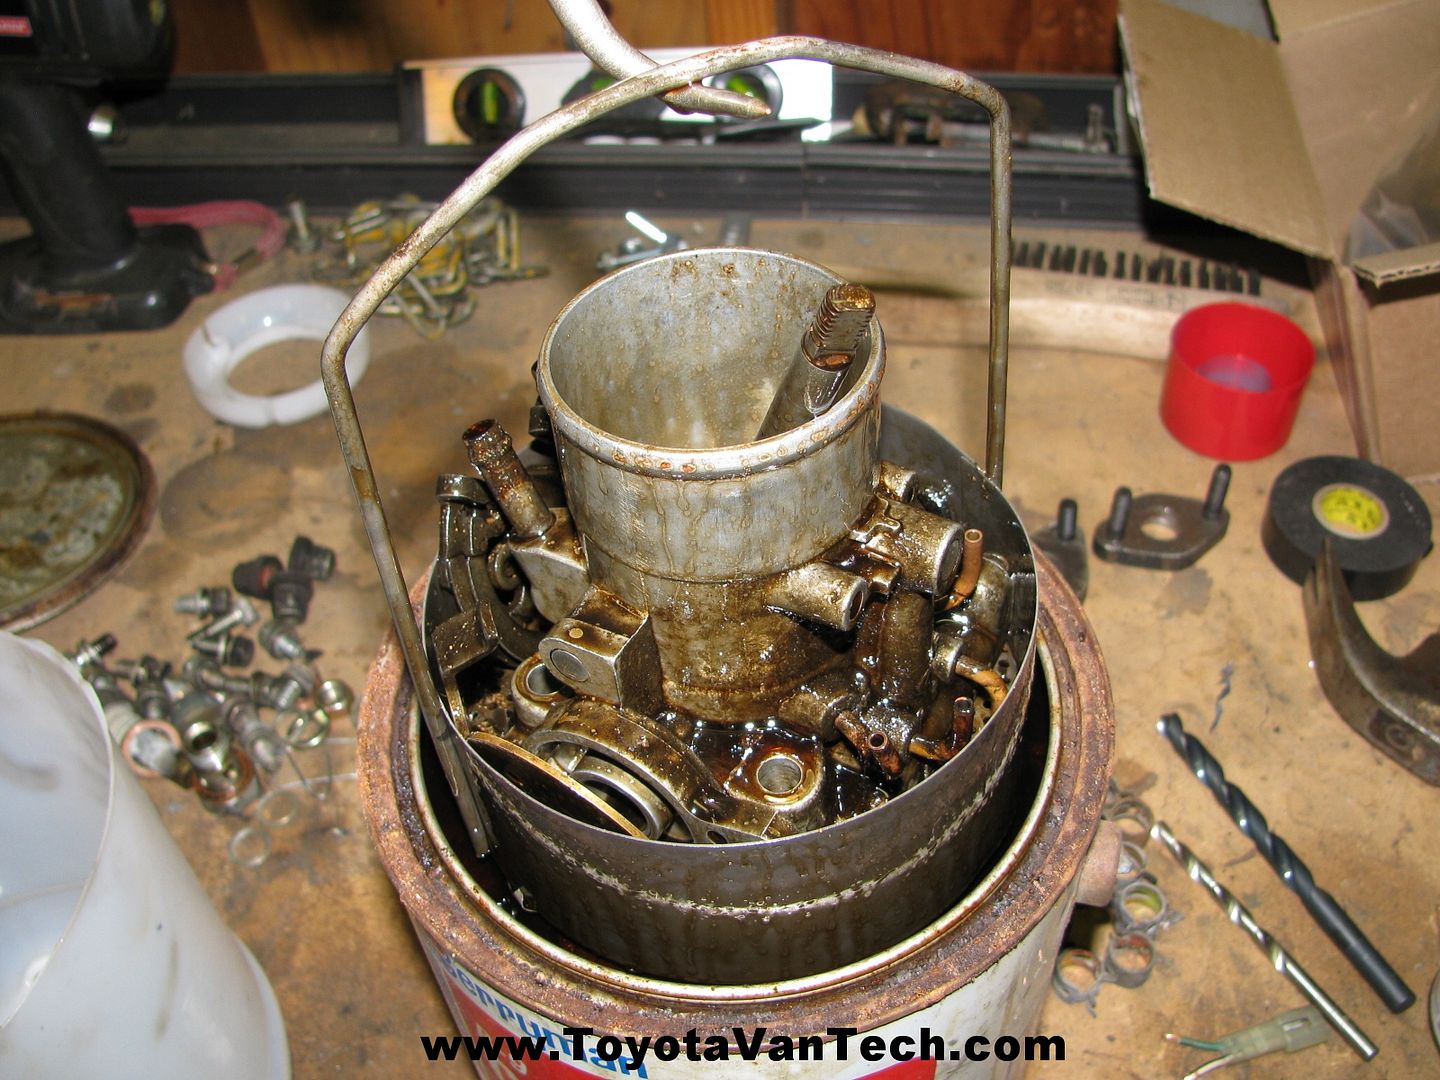
    When it comes to your idle adjust screw, get a slot tip screwdriver and while counting revolutions, turn it clock-wise until it bottoms out. Record the number of turns for future reference and then remove it. Sometimes the rubber o-ring will make it difficult to remove. If you have one, an expanding tip slot tip screw driver works well for extracting the idle screw. If you don't have that then it can be "blown out" by using compressed air through the exit port. If you use the compressed air method cup your hand under the screw so you don't lose it. Once removed, carefully remove the rubber o-ring from the idle screw and save for later. The other parts on the throttle body are pretty self explanatory. If you don't already have some, go to your local parts store and get yourself a gallon of Chem-Dip. Remember this stuff is nasty so read the directions and avoid skin contact. Load all the metal parts into the basket (included inside the gallon container) and lower into the can. Put the cover back on the can and forget about it for a couple of days. Hint: Chem-Dip will eat almost anything, but it will work better if you remove excess dirt before dipping. Also, I recommend scraping/cleaning all old gasket material prior to soaking. Soaking won't always remove gasket material so it's better to get it off before hand. Another thing to consider is how long you may want to keep/use your Chem-dip. The more junk it eats-up the less effective it becomes. The can I'm using now is one I've had for over 10 years. It's getting weak, but it still does the job.


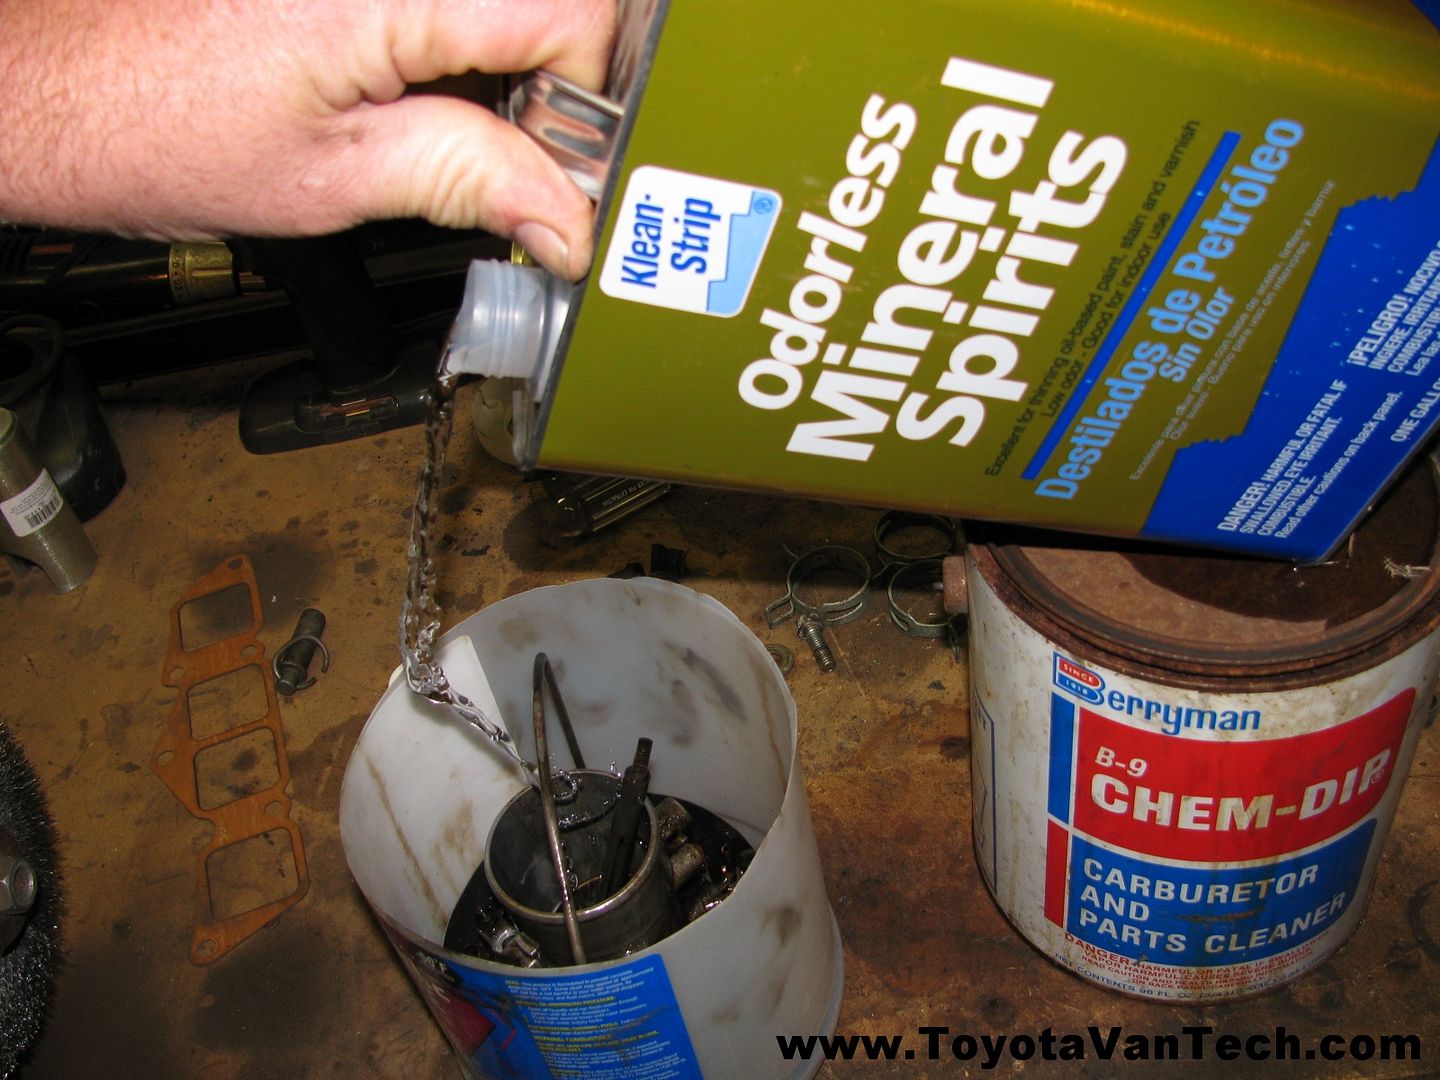
    Okay, so a couple days have passed, now it's time to get back to it. Use a pair of pliers or a wire hanger to hook the basket and pull out of the Chem-Dip. Have another container of an appropriate size ready to set the basket in. I use Mineral spirits to dilute and remove the residual Chem dip. After the parts are covered with mineral spirits I agitate the basket to rinse. Now parts can be removed one at a time and a parts cleaning brush is used, then compressed air to blow dry.......Be sure to use eye protection!


    Could these be the same parts I had before? Okay, the TPS is new, but everything else is original!


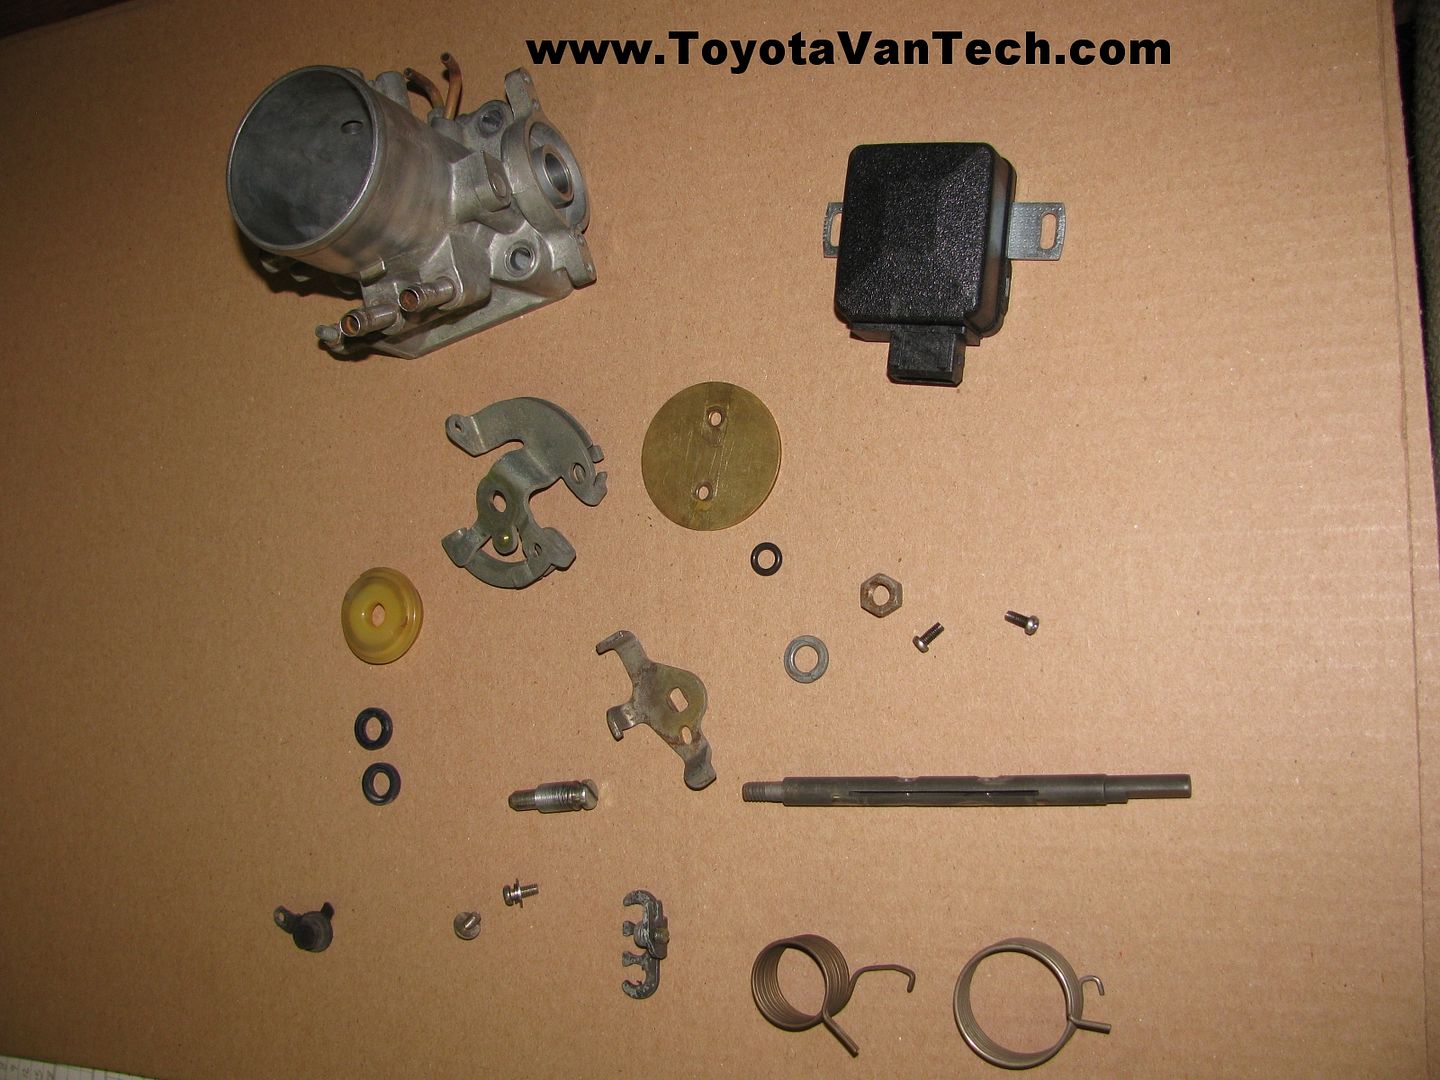
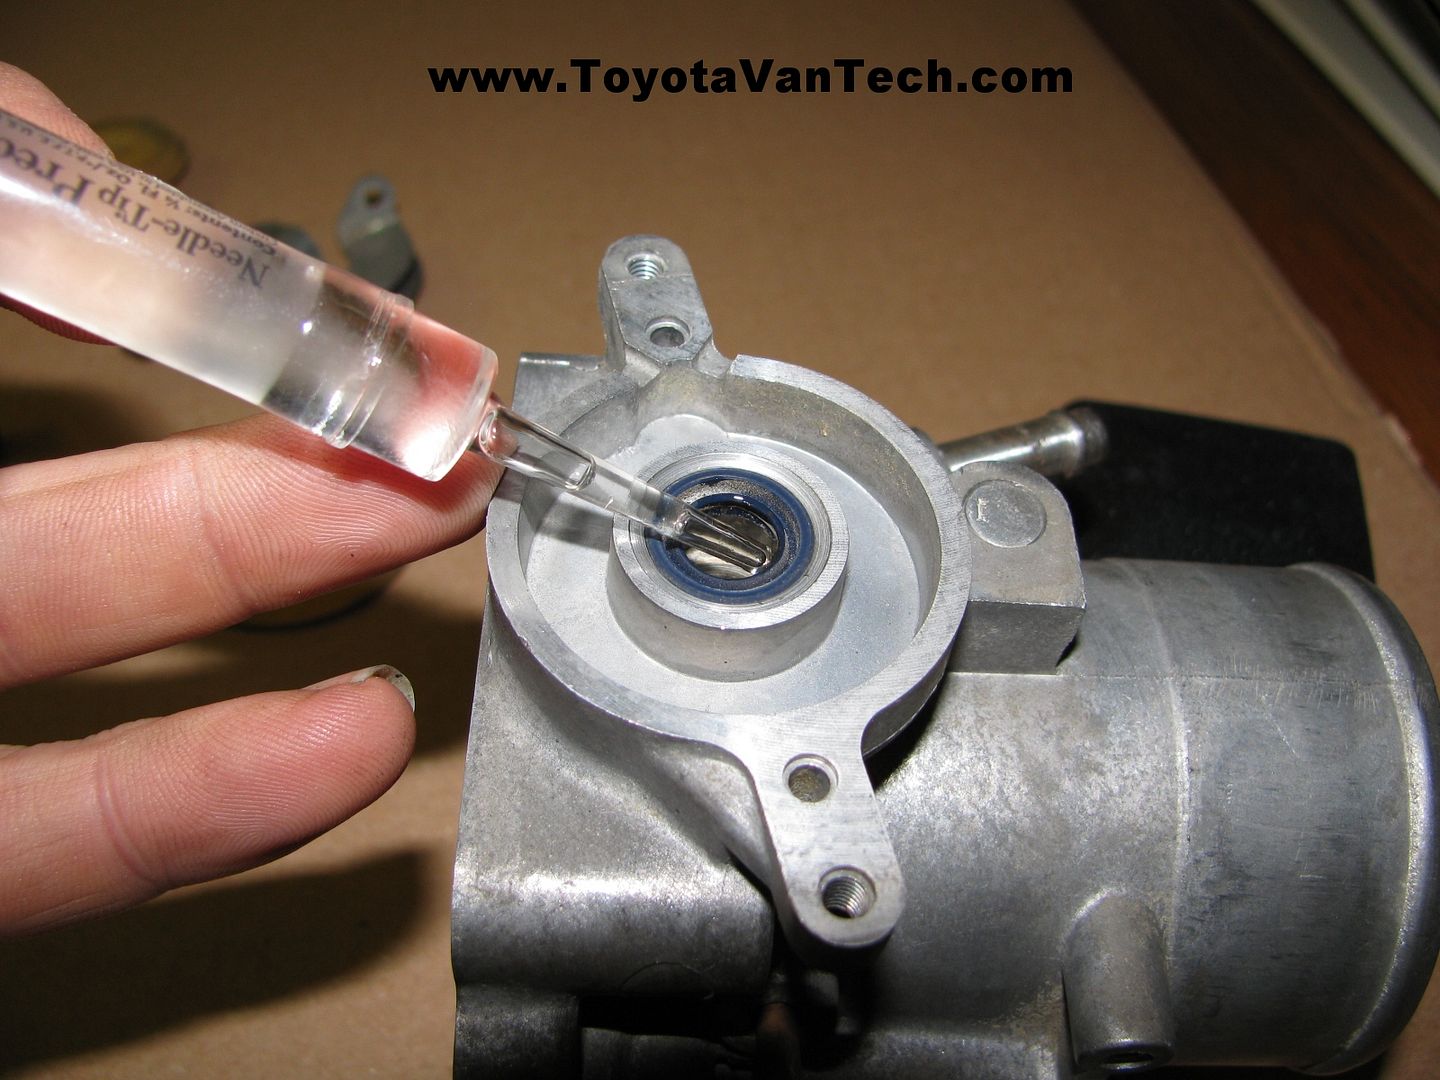
    The old shaft seals will usually push right in with just thumb pressure. I'm using a synthetic lubricant with PTFE to lubricate the throttle shaft seals & bores.


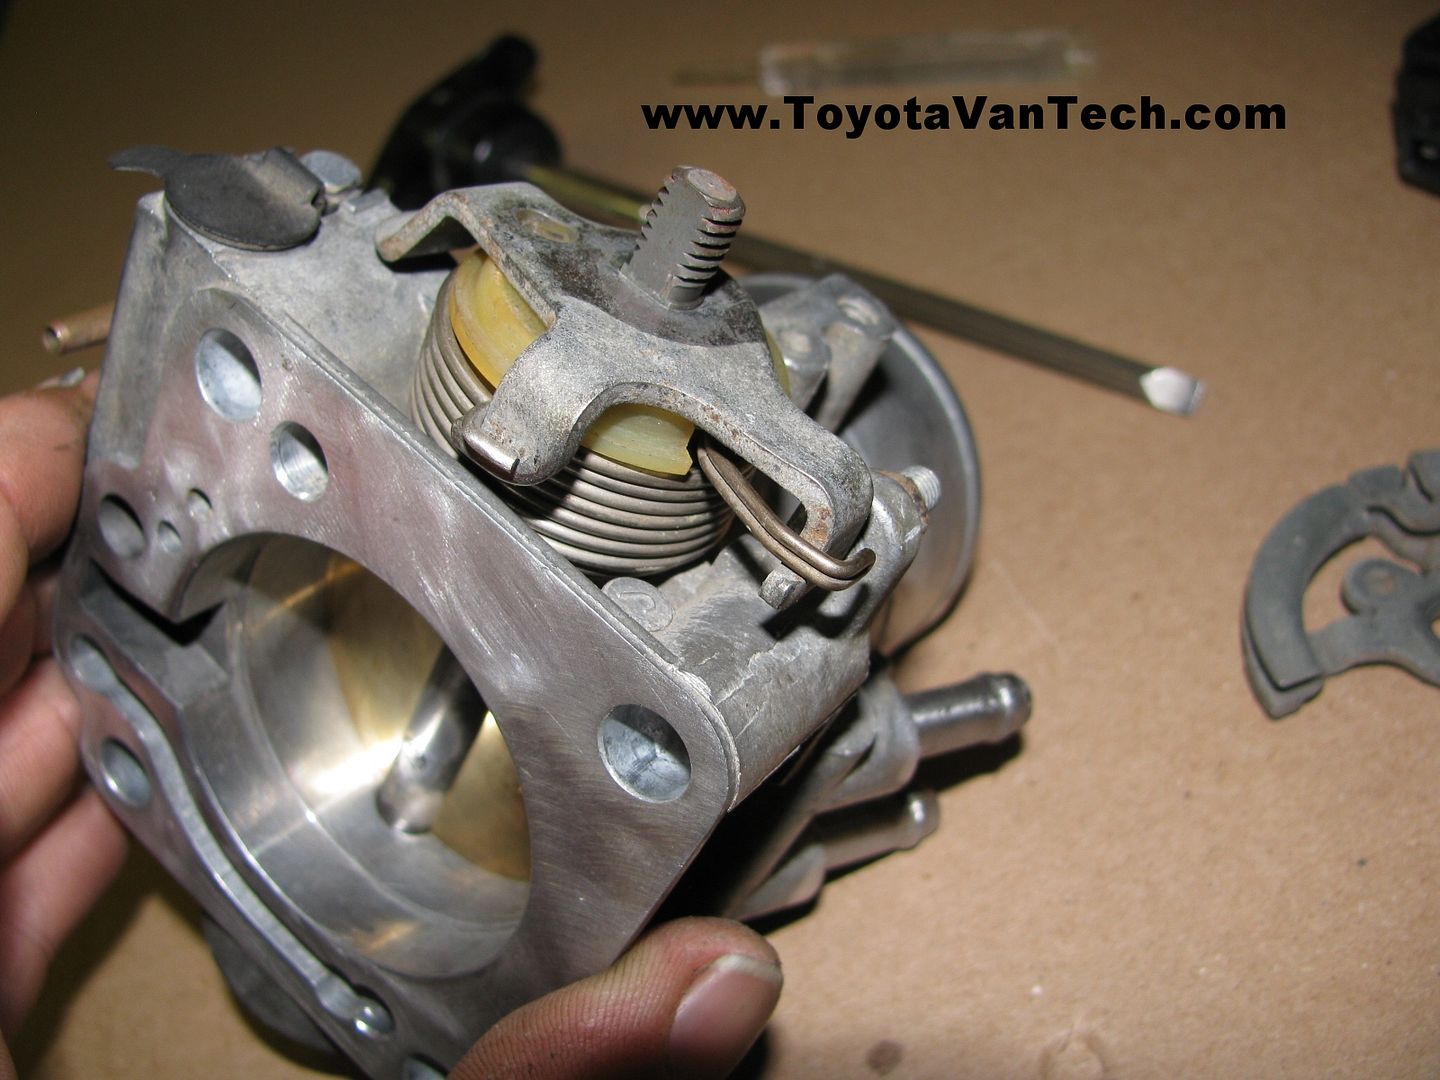
    After installing the throttle shaft & aligning the butterfly, I clean the burrs off the shaft screws threads & apply some semi-permanent Lock-Tite.


    Screws are installed but left loose. Before final tightening allow butterfly to self center by closing throttle all the way & then tapping on it & the shaft. The periphery of the butterfly is precision machined at an angle to match the inside of the throttle body, so Make sure it's oriented correctly! Without the throttle stop assembled, while closed it should make an air-tight seal. Hold it up to the light to verify it's centered & intimate with the throttle body bore. Once you're satisfied tighten the screws.


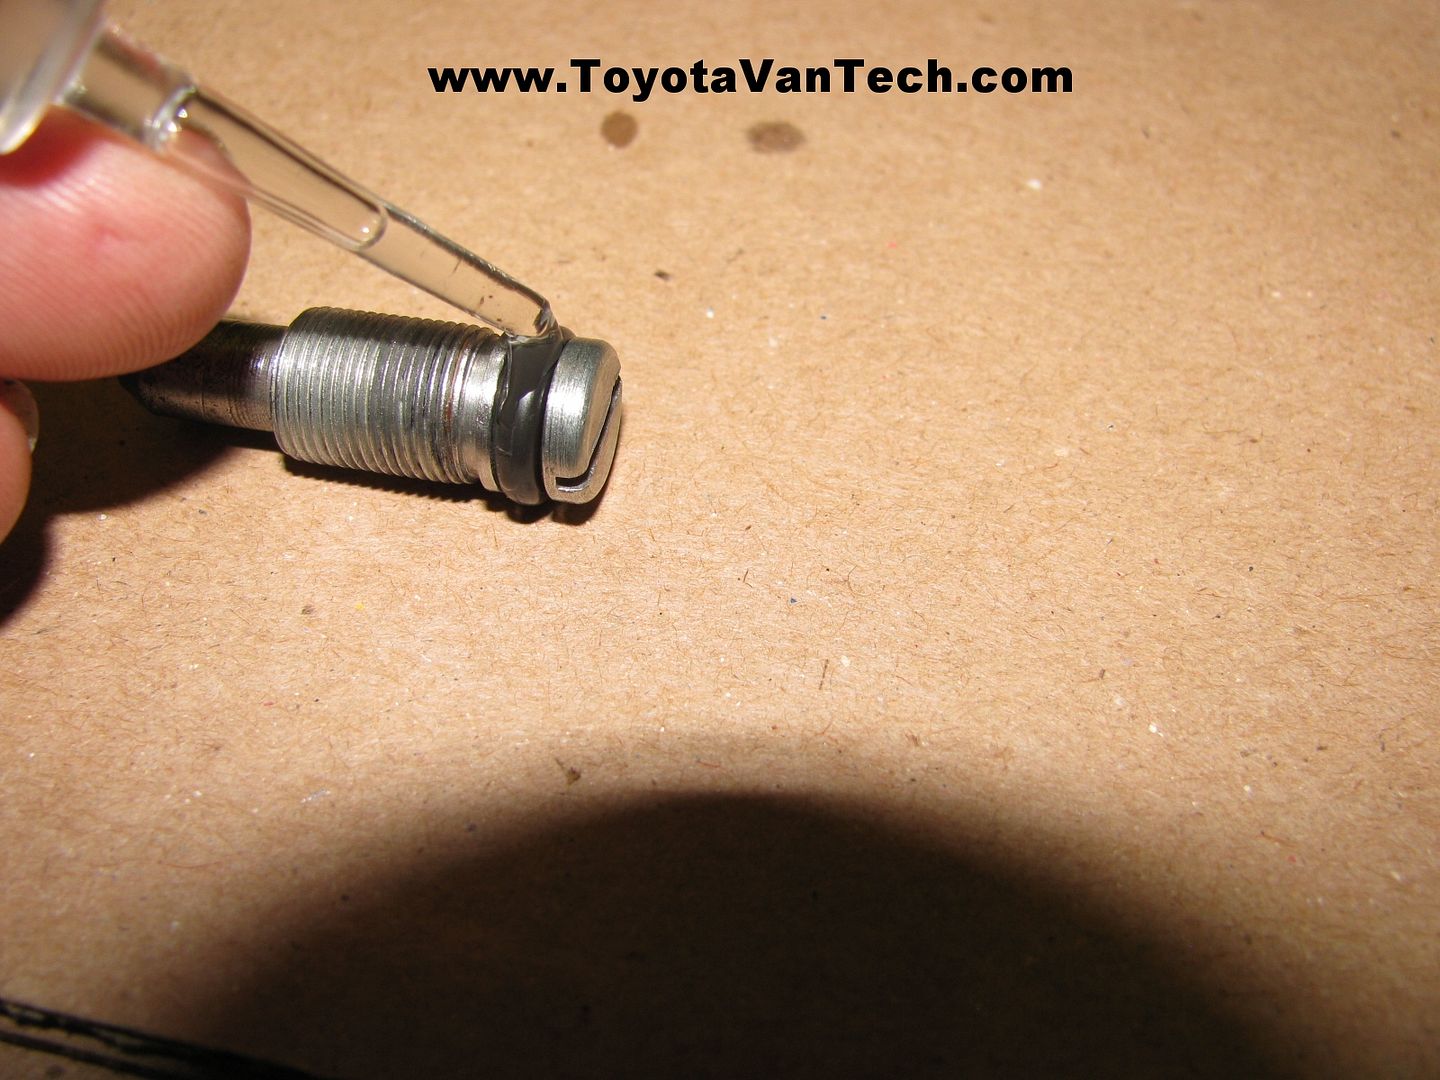
    O-ring is installed on idle screw and lube applied.


    Idle screw is installed & bottomed out. Next we back it out the number of turns previously recorded.


    Throttle shaft built up with return spring, cable guide & associated parts. Nut is installed and tightened.


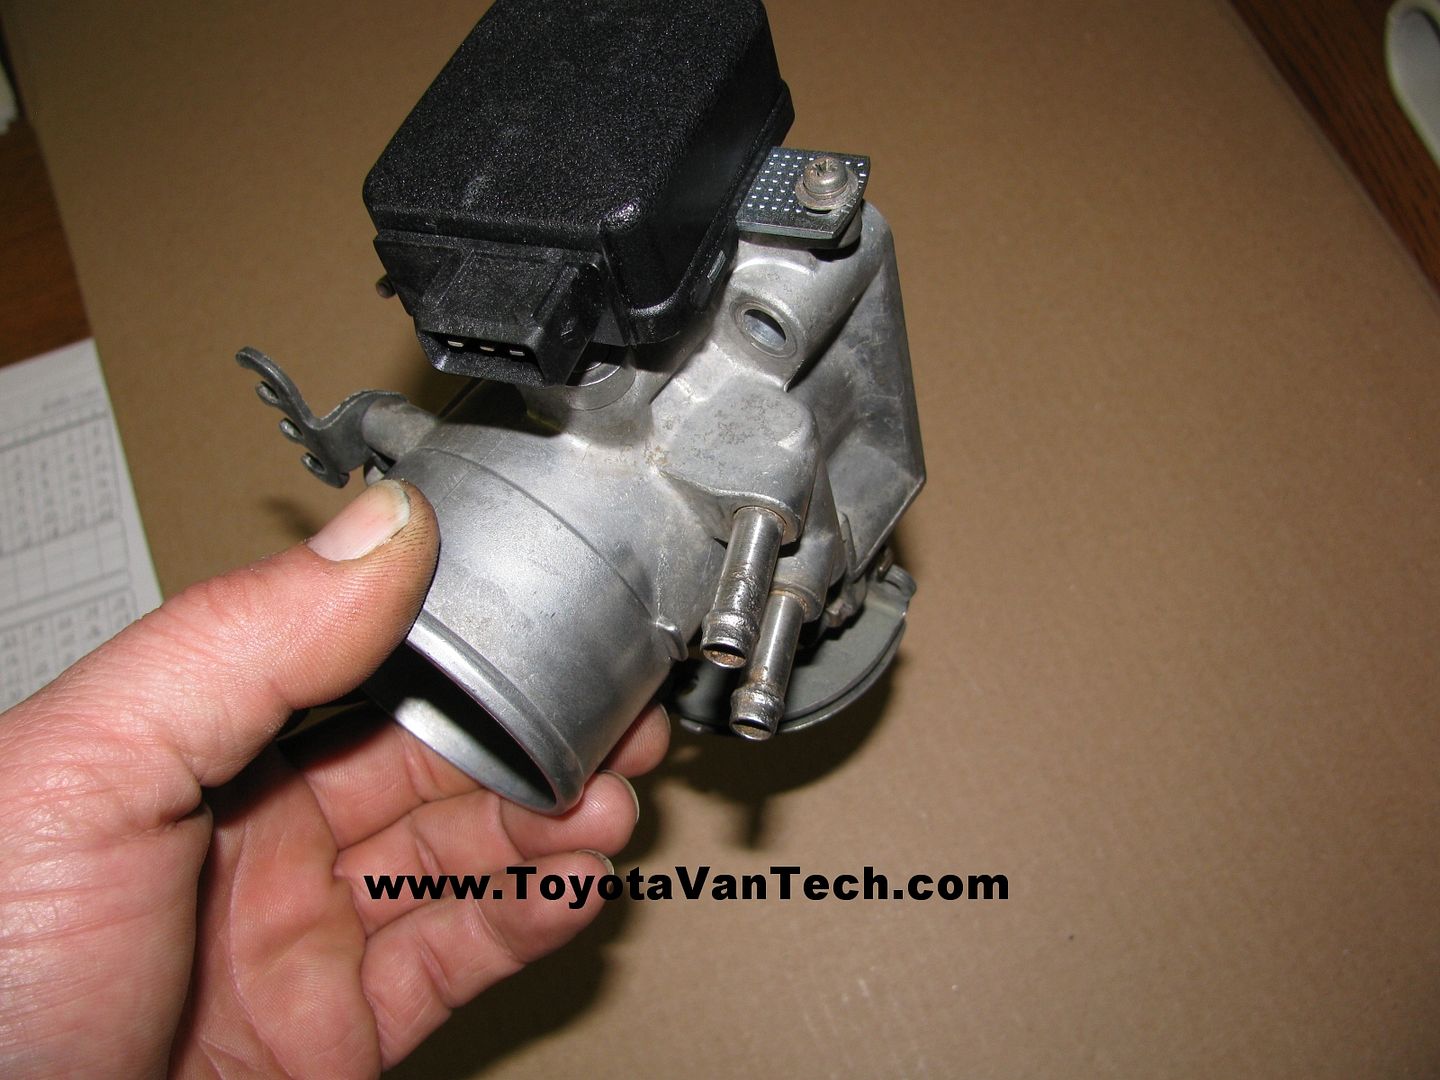
    New throttle position sensor is installed & other misc pieces of throttle body are put back like before.


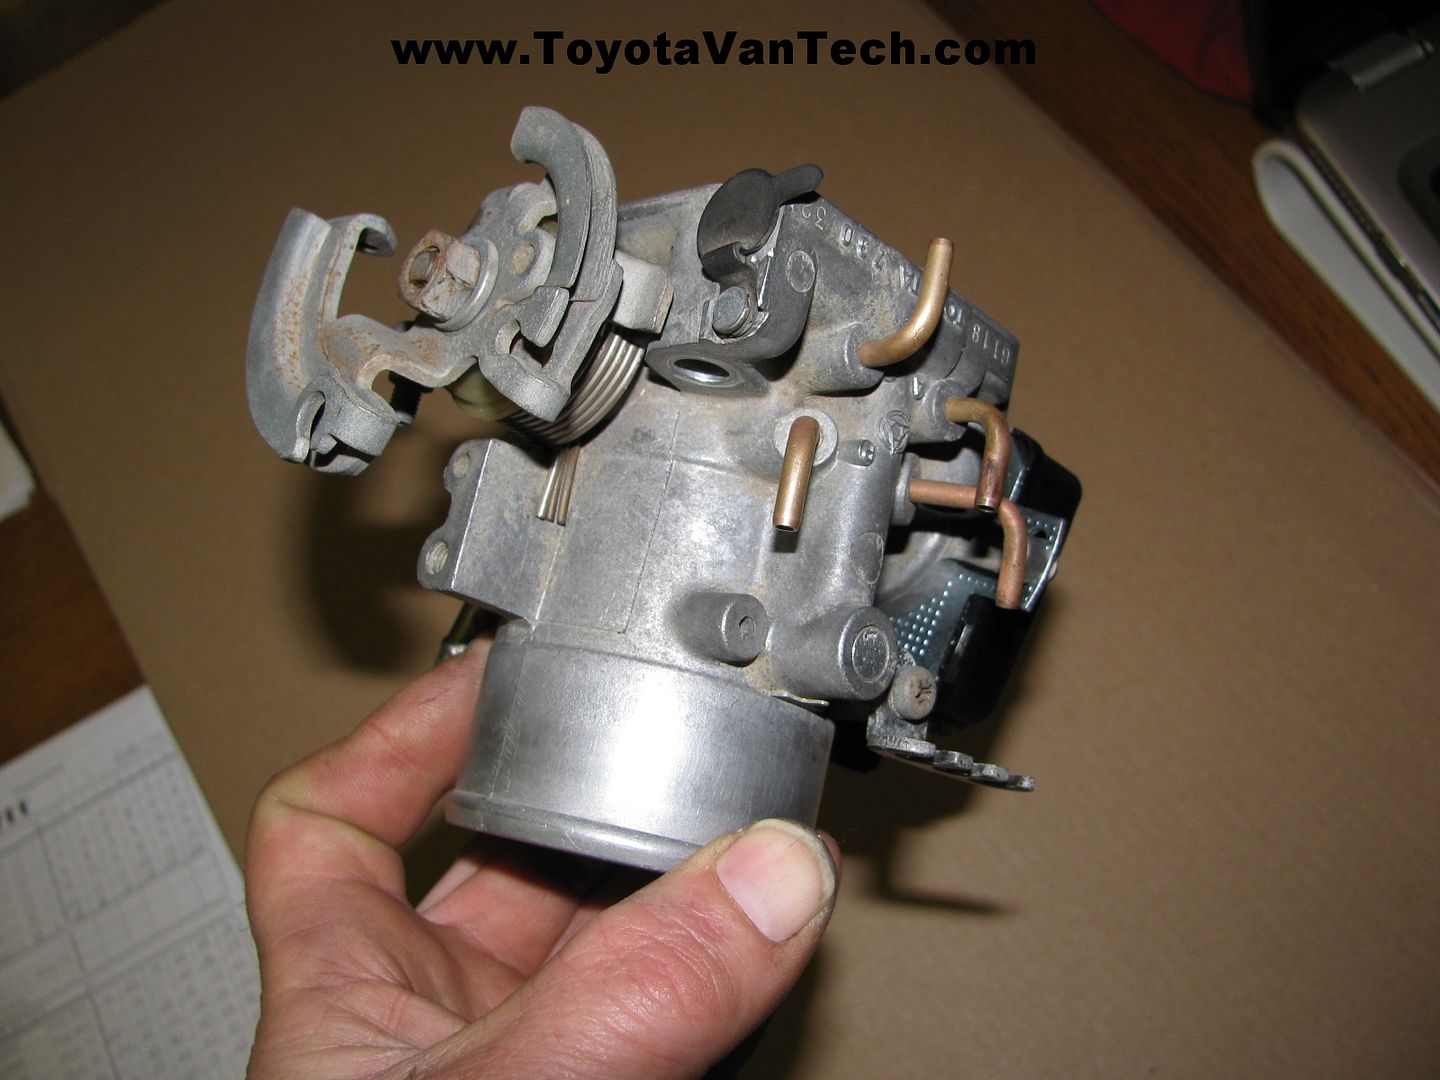
    And here's the end result .


    Now that the throttle body is reassembled the only thing left to do is adjust the TPS & install it on your van. Here is a video on how to do this (click on the image below to view video).


    Before you install check the condition of the throttle body coolant hoses. If soft or deteriorated now is a good time to replace. I suppose a bulk 5/16" or 8mm hose could be used here, but the bends are rather tight and you may end up with a crimped hose. Last time I needed these they were still available through Toyota. They are part #16267-73010 & 16264-73021. You'll also want a new throttle body gasket & that one is Toyota part ##22271-73011 & sells for ~$5. Tim
    This article was originally published in forum thread: The Throttle Body Thread started by timsrv View original post
    Comments 150 Comments
    1. gushaman's Avatar
      gushaman -
      i have an 87 4wd five speed and it has a dashpot on the throttle body. what exactly does this do?
    1. timsrv's Avatar
      timsrv -
      It's an emission device. It's job is to delay return to idle while you are decelerating. For some reason that reduces emissions. Occasionally you will find one that sticks and/or will not allow the throttle to return to idle at all (this is usually what happens when they fail). These are NLA from Toyota & haven't been available for some time. If you find a bad one just take it off and throw it away (bad ones do more harm than good). I like keeping things original so whenever I find 5 speed vans in the salvage yard (which is hardly ever) I always take the dash pots and save them.

      For those of you who don't know what the dash pot is, here's a picture of one from a previous throttle body I cleaned. It's the black component in the top right of the picture below:

    1. skibum's Avatar
      skibum -
      I will be remembering this thread . I saw that my carb on the '88 that I got was pretty dirty, when I had the head off. I just sprayed the crap out of it with carb cleaner and brushed and scraped it as best I could (assembled). The finished product in your case is really looking good. I almost hope I have trouble now, so I can take it back off and do it right
    1. timsrv's Avatar
      timsrv -
      For anybody planning to do this, I thought I'd mention it's a very good idea to have a M3.5X0.6 tap & same size die available before hand. As stated earlier this is an uncommon thread size & I wouldn't expect to find these in a regular tap & die set. After you get the screws out of the shaft use the tap to clean-up the shaft threads & the die to clean-up the screw threads. In my experience the tap & die are much easier to find than new screws. Here's a couple links to them on eBay:

      http://www.ebay.com/itm/3-5mm-x-6-Me...item19ca996ff3

      http://www.ebay.com/itm/Hanson-Whitn...oAAOSwZd1VcmBc

      In case those links go bad, here they are again on Amazon:

      http://www.amazon.com/3-5mm-Metric-T...M3.5+x+0.6+tap

      http://www.amazon.com/New-3-5mm-Metr...M3.5+x+0.6+die
    1. Reducto's Avatar
      Reducto -
      Nice article! Couple of question:
      Did you replace the shaft seals or were they in good enough shape to reuse?
      Are all of the throttle bodies interchangeable? Like, could I grab one off an '85 automatic, rebuild it, and put it on my '89 5-speed? I only seem to find early vans in the junkyards.
    1. timsrv's Avatar
      timsrv -
      I've probably done a dozen of these so far and have never found bad seals. Before I did the 1st one I searched for seals but other than the TPS Toyota doesn't break the throttle body down or list individual parts. If I recall correctly you can get aftermarket heavy duty seals for some of the other Toyota throttle bodies (for guys running turbos & superchargers). I suspect they would be the same diameters but don't know that for sure. Since these seals are fairly well sheltered & because they are easy to remove/reinstall I have always just re-used. Perhaps I've been lucky but these don't seem to get much wear & tear.

      All vans 84-89 use the same throttle body. The only variable is manual transmission vans have a dash pot & the autos do not. The casting of the body is the same on all so you could always take the dash pot off one & add it to another. I did a cross reference with the EPC and according to that this particular throttle body was only used on the vans. I suspect there may be some other throttle bodies that may interchange, but not sure what the differences would be.

      If you were looking to adapt a throttle body from another application, the vehicles listed below would likely show the most promise (these use the same TPS as the van). Tim

    1. gushaman's Avatar
      gushaman -
      i have a few questions, too.
      If the idle air screw has been monkeyed with, is there a specific number of turns that it should be? on a particular lpg regulator on a forklift it is 4.5 turns from bottom, but that is just a starting point,it is usually adjusted about a half turn either way, if the other components in the system are in correct specs.

      also the throttle stop screw was loose so where should it be???

      I am trying to adjust the TPS on an extra throttle body, so I can just swap them out (CEL is showing the tps code) but my meter doesnt do sound. what range setting should I use? with out the leads attached, it shows 000, then if i touch them together it blinks a bunch of numbers, and then shows 001??? i am lost
    1. timsrv's Avatar
      timsrv -
      The factory setting for the idle adjustment screw is approx 1 3/4 turns CCW after being bottomed out. The idle stop screw is set to hold the tang of the cable guide approx .095 away from touching the aluminum tab the stop screw is threaded into. Regardless of what meter you use & it's accuracy, when set to ohms it will at least tell you the difference of continuity vs no continuity. Continuity is what it reads when the probes are touched together, no continuity is what it reads when the probes not touching. Regardless of what yours says when probes are touching, that's what you should see when you find that "magic spot". Keep in mind you're seeking out the illusive spot where it transistions from continuity to no continuity, so your meter could fall on either side of the transistional spot. Even if it's a tad off, you'll still be "in the zone". If your meter is not quality enough to tell the difference between continuity/no continuity, then perhaps it's time to find another meter. Tim
    1. gushaman's Avatar
      gushaman -
      lol yes, tim, it is time for a nicer meter, i have a nice older craftsman, but the fuse that does resistance is out, and i cant find a suitable replacement fuse. i think maybe the old tps i have is bad, but cant confirm it. i found a sweet spot using the 2000 ohms setting, but when i re tested it it failed.

      thank you for the response, where did you find that info, by the way? is it in the manual?
    1. timsrv's Avatar
      timsrv -
      I've gone through a few throttle bodies and was able to remember the idle set screw setting. For the throttle stop setting I grabbed an extra throttle body I have laying around with the anti-tamper paint still on the idle stop screw & I measured it . Then just for kicks I bottomed out the idle screw & verified 1 3/4 turns .

      As for older TPS units, unless you know how many miles it has (and it's under 100k) I wouldn't trust it. Over time the contacts inside become "iffy". If it still completes the circuit(s) it will likely connect at different spots each time you cycle the throttle. If you're trying to save money, you might try aftermarket. The last 5 or 6 of them I've installed were Beck Arnley #158-0503 & they seem to be quality units. So far none have given any issues. I usually stock up on them when RockAuto has a sale (around $20 each). Their normal price is around $35 each. Tim
    1. gushaman's Avatar
      gushaman -
      calibrated new TPS this evening, removed old throttle body, and found that it has been disconnected for years. the contacts in the plug were green with corrosion. supposedly this engine was swapped in from a 4wd 5speed, but there is no dashpot.......I imagine he just didnt know it was unplugged. Now I have a clean throttle body, with a new sensor. van starts and runs better than ever, just need to replace coolant temp sensor, and reset my timing and i think it will be great. Thanks Tim!
    1. timsrv's Avatar
      timsrv -
      Quote Originally Posted by gushaman View Post
      calibrated new TPS this evening, removed old throttle body, and found that it has been disconnected for years. the contacts in the plug were green with corrosion. supposedly this engine was swapped in from a 4wd 5speed, but there is no dashpot.......I imagine he just didnt know it was unplugged. Now I have a clean throttle body, with a new sensor. van starts and runs better than ever, just need to replace coolant temp sensor, and reset my timing and i think it will be great. Thanks Tim!
      Awesome! . That's certainly not the 1st time I've seen a TPS disconnected. I did this job once & then went check my timing & could get no advance when I pulled the "check engine connector" jumper. I also noticed it was blinking a TPS code. I was like "damn, I got a bad TPS".........that's when I noticed the TPS connector dangling there . I felt stupid but at least it was an easy fix. All issues were quickly resolved when I plugged that connector back in . Tim
    1. mahleek87's Avatar
      mahleek87 -
      Quote Originally Posted by timsrv View Post
      Awesome! . That's certainly not the 1st time I've seen a TPS disconnected. I did this job once & then went check my timing & could get no advance when I pulled the "check engine connector" jumper. I also noticed it was blinking a TPS code. I was like "damn, I got a bad TPS".........that's when I noticed the TPS connector dangling there . I felt stupid but at least it was an easy fix. All issues were quickly resolved when I plugged that connector back in . Tim


      Just noticed my TPS was also disconnected this morning. Im gonna try to connect it back later today and see if I can zip tie it to the TPS to prevent it from being disconnected again.

      Question... If the TPS is bad, will the check engine light come on? Or could a bad tps never signal the check engine light to come on? I think I have put more then 150K on my van since I replaced this 5-7 years ago.
    1. timsrv's Avatar
      timsrv -
      A bad or disconnected TPS will trigger a code inside the ECU but may not necessarily make your "check engine light" illuminate. To read codes you'll need to jump the CEL connector & count the blinks. Since it's been disconnected you will likely have a TPS code, so you'll need to clear that and drive for a while to see if it comes back. If it doesn't, then you're golden. Tim

      PS: These connectors are pretty solid as far as accidentally falling off. If yours is doing this it's either damaged or missing the little locking spring clip.
    1. timsrv's Avatar
      timsrv -
      I just did another one of these and this time destroyed both screws. I was able to drill & remove without damaging the threads on the shaft. Then I got lucky enough to find some replacement screws on eBay. I estimate the originals to be 10mm in length, so these will likely be a tad long (12mm). Still, this diameter & thread size is rare, so I feel lucky to have found these (can always be shortened if necessary). Here's a link: http://cgi.ebay.com/ws/eBayISAPI.dll...E:L:OC:US:3160. Since I had to buy 100 of them, I'll probably never need them all. If anybody else runs into this issue and needs some screws, PM me your address and I'll mail you a couple. Tim
    1. JFratzke's Avatar
      JFratzke -
      Tim what are you using for TPS replacement these days? I searched pretty hard on toyotapartszone for one the other night and couldn't find it.
    1. timsrv's Avatar
      timsrv -
      We have discussed this a few times here, and again just a few days ago. This is a good thread for this discussion though (better than the other places it's been posted). Here's a few quotes from the last time it was discussed. Tim

      Quote Originally Posted by timsrv View Post
      Clear codes, drive it some more & recheck codes. If #51 comes back you most likely have a bad TPS. These are a common failed part on the van. If it's got more than 150k miles on it or if you don't know how old it is, then I'd just replace. Testing these per the manual is a somewhat involved process. I'm not saying he didn't do it right, but it's hard to imagine your average mechanic going to this much effort (it would be hard to do with the throttle body installed). Even if he did do everything right, when these get old they become intermittent. Bottom line? For a $35 part it's not worth messing with. I replace these like some people replace spark plugs. If I'm doing a tune-up and I see code 51, I won't even mess around with trying to clean or whatever. Just replace it and be done with it . Tim

      PS: If it's newer and you know it's got less than 100k miles on it, then perhaps it's worth a little more consideration. But for me, my time is more valuable than messing with a questionable TPS. Tim
      Quote Originally Posted by kestrel View Post
      thanks, tim. i'm going to do it. i see that the part on 1sttoyotaparts.com is almost $70 and on rockauto.com is $32 (beck/arnley). that's a big difference. is it worth spending the extra bux for the toyota part?

      Quote Originally Posted by timsrv View Post
      I used to think so, but a while back www.rockauto.com had one of their "closeout" sales and I picked-up "the last 6" of the Beck Arnley #1580503 units for $18 each. Of course they weren't the last 6 (but were certainly the last 6 I've seen at that price). I took the cover off the 1st one and inspected before installation (thought it looked good). These Beck Arnley units are made in Italy (not sure if that matters) & appear to be of high quality. That was about 4 years ago and I've since used them all (and then some) on different vans I've worked on. I just ordered another one last week (sucked having to pay ~$35 for it), but it's a lot better than $70 something from Toyota. Unless these aftermarket ones start dropping dead, I'm not buying any more from Toyota. Tim


      BTW, the last one of these I got was off of Amazon http://www.amazon.com/gp/product/B00...?ie=UTF8&psc=1. It's listed for a few cents more, but if you have Prime shipping is free and it will show up in just a couple days (so it's a better deal overall). If you click on the link, ignore the picture in the Amazon listing (it's wrong). The part you get will be the correct one. Tim
    1. Reducto's Avatar
      Reducto -
      Quote Originally Posted by timsrv View Post
      Then I got lucky enough to find some replacement screws on eBay.
      For future reference, Mcmaster Carr has these screws with a variety of head types. I'm always amazed by how much weird stuff they have and how fast they're able to ship. I think you need to set up a business account with them, but last time I did that I just used the name and address I worked at and used my own credit card with no issues.
    1. timsrv's Avatar
      timsrv -
      I always forget about these guys. I used to purchase a lot of stuff through them when I was a tool maker. It's amazing how much stuff they have. Thanks for pointing that out. Tim
    1. ninz30's Avatar
      ninz30 -
      i will be doing this soon! Awesome write up