-
How to replace your ball joints in about 2 hours (2wd)
Have you ever got an estimate from a shop to replace ball joints? If so, then you know this isn't a cheap job. What they don't want you to know is with a small investment in parts and a couple hrs labor, they can make over $500 profit. I changed the ball joints on my 89 2wd cargo van today, and I'm going to show you how it's done. I timed the job from start to finish and took some step by step pics. As many of you know I'm a strong advocate for Genuine Toyota parts, but there are also several parts I don't think make enough difference to justify the additional expense. IMO ball joints are one of the latter. For the record, Toyota part numbers for these are 43350-29076 (uppers) with an MSRP of $38.86 each (84-89 van 2wd) & 43330-29545 (lowers) with an MSRP of $58.20 each. (that's $194.12 for 2 uppers and 2 lowers  ). For this job I went to RockAuto.com and purchased the Bech-Arnley replacements for a fraction of the price. The part numbers are #1014056 (uppers) at $12.01 each, & #1014023 (lowers) at $21.79 each. There was also $9.05 in shipping bringing the total to $76.65 for everything
  . RockAuto.com is quick and shipping typically only takes 2 or 3 days
  . Okay, before getting started I wanted to point out I did not follow the manual, so you may find some discrepancies (if you reference that). My goal was to do the job as quick and easy as possible, so I took some short cuts. For this write-up, I skipped the part of jacking up and removing the tires. I figured if you can't do that, then you shouldn't be attempting this job either
  .
.
Removing the shock absorbers is step #1, but since that's pretty self explanatory I'll start here:
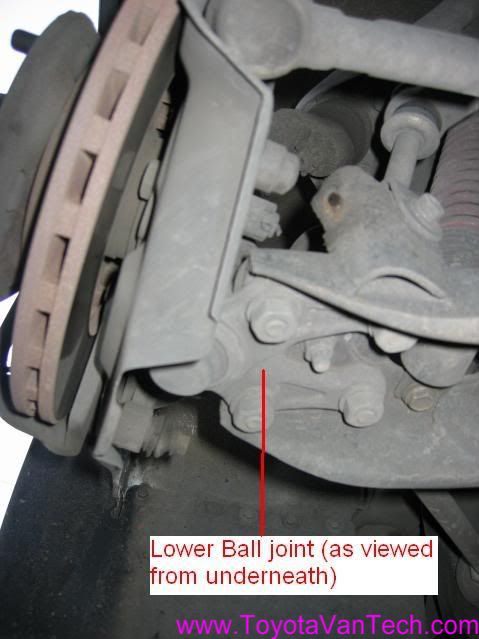
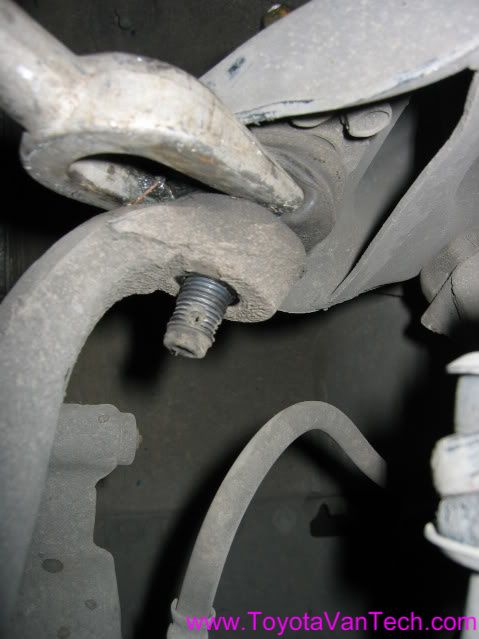
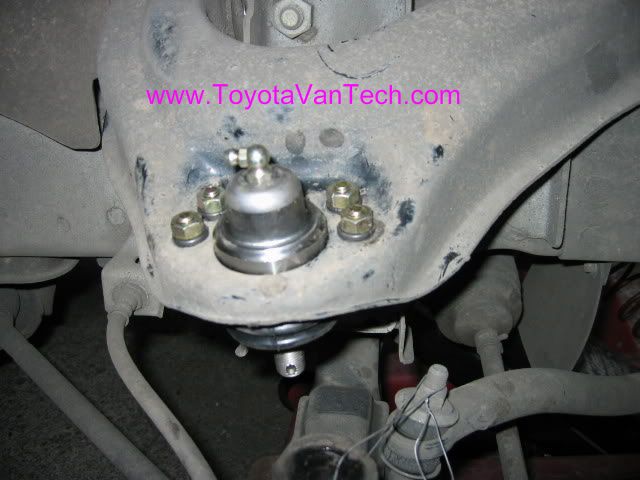
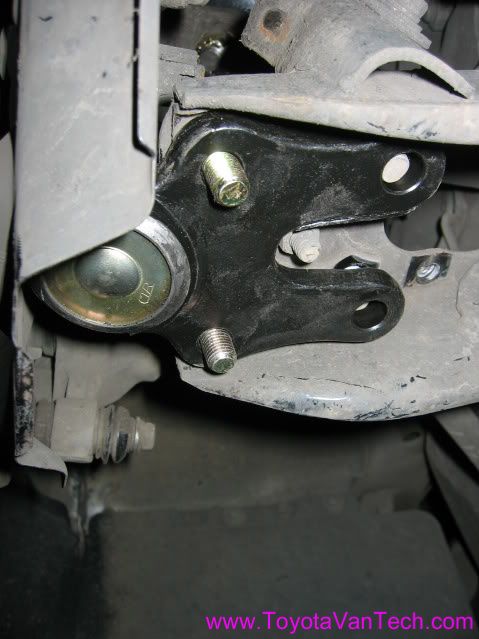
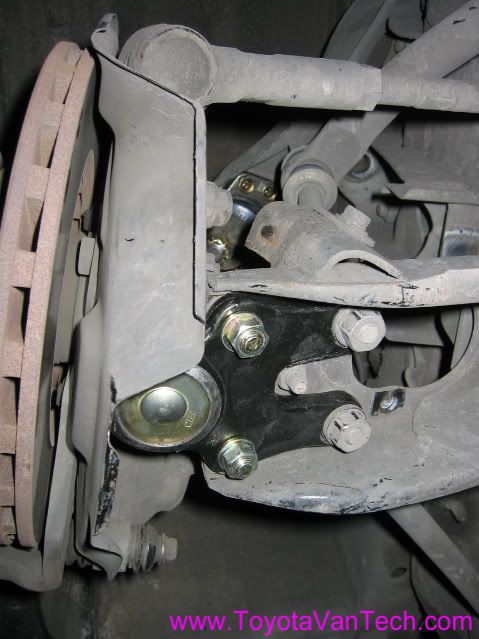
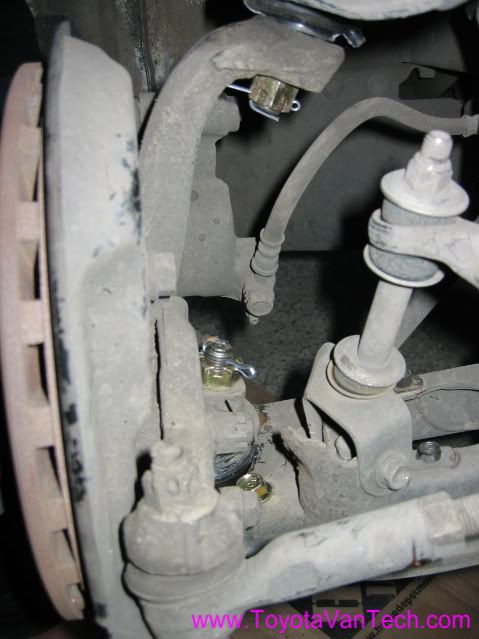
After shock has been removed, take out the 4 nuts holding the lower ball joint on & tap the bolts up and out of the way.
Next take out the cotter pins and remove the castellated nuts from both upper and lower joints.
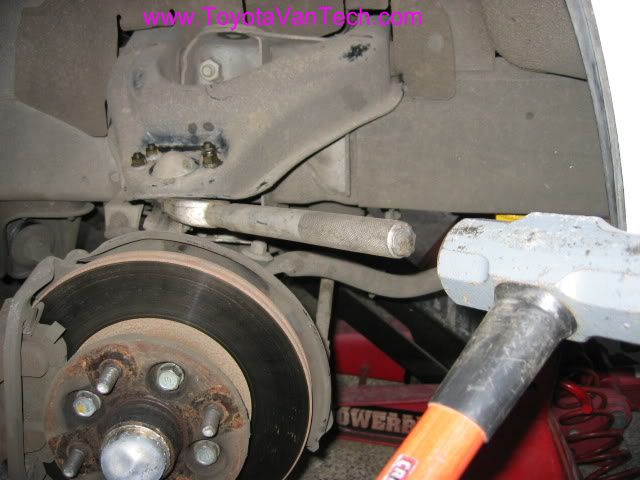
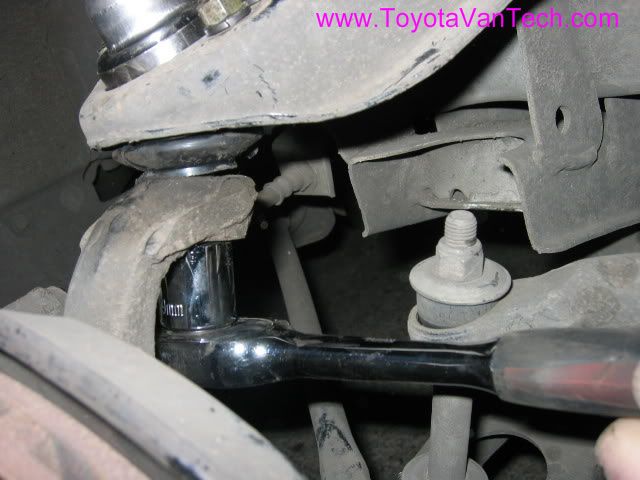
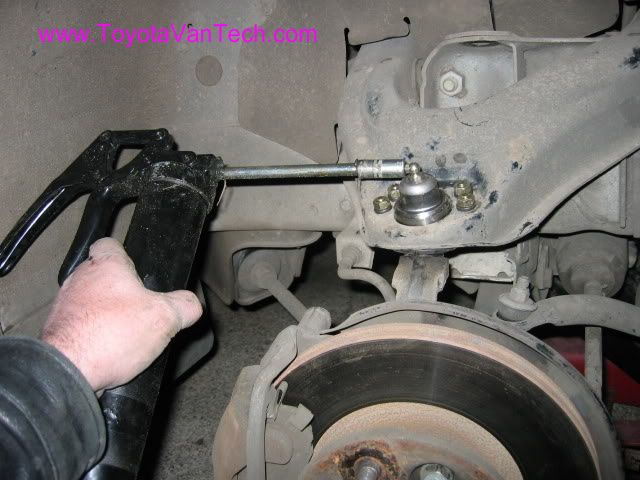
You'll need a pickle fork and a BFH (big hammer) for this next part. If you don't have a pickle fork, you should be able to find at most auto parts stores or you could probably rent one. Anyhow, position the pickle fork as shown and start giving it some big whacks. Just be ready to catch it when it comes loose because you don't want your rubber brake line to be damaged by the sudden stress caused by a falling spindle assy. I recommend having a few blocks of wood laying around and some wire for tying it up for support while you work on the next step.
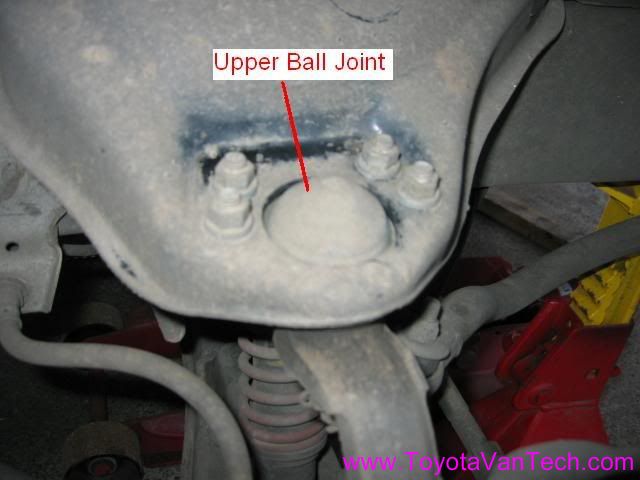
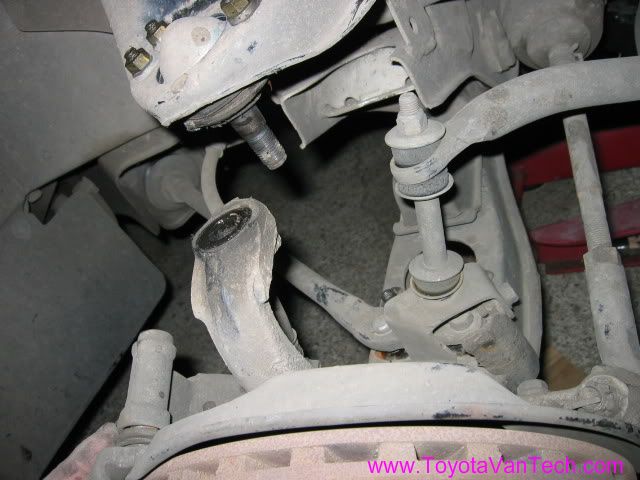
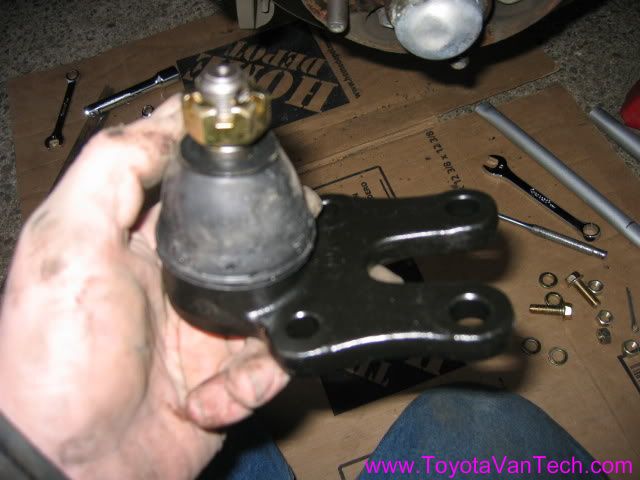
Now that the steering knuckle is removed from the upper joint and the spindle assy is supported, you can remove the four bolts and remove the upper ball joint.
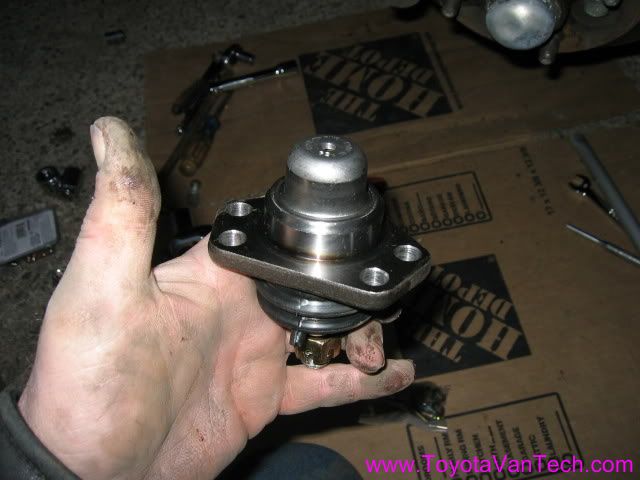
Install the new upper ball joint.
Okay, the way I do this, there's too much stuff in the way to use the pickle fork on the lower joint. When I did the job one side was stuck and needed some help, but the other side was loose and came right out. If you have a stuck lower joint, it's a bit of a problem because with the spindle assy hanging there, there's nothing solid to support it while beating with a hammer. What I did is stacked some 4x4 wood chuncks under the rotor, then used a long drift punch to go through the upper steering knuckle hole and onto the shaft of the lower joint. I applied a little heat to the area around the shaft with my torch (not nearly enough to make it glow), then one good whack and it was off (sorry, no pictures of that part).
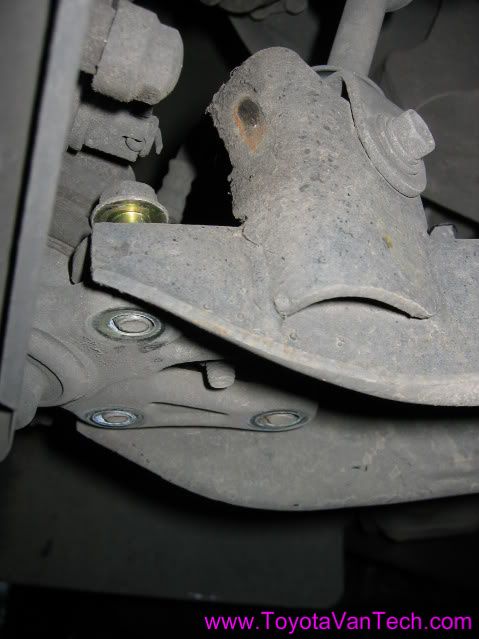
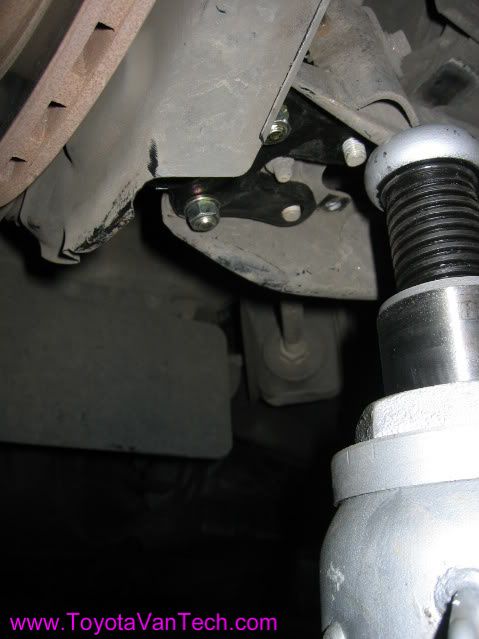
Okay, here's the next step. Install the shaft of the new lower joint into the spindle assy and snug up the nut until the joint shaft seats on the tapered bore.
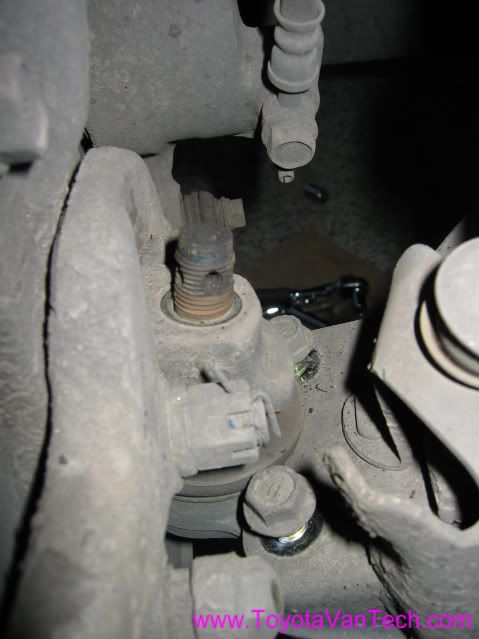
Position the shaft of the upper joint so the angle lines up with the angle of the bore in the knuckle. Lift the spindle assy up and insert the upper joint shaft into the bore. Have the nut ready and start it on the threads to support the spindle assy.
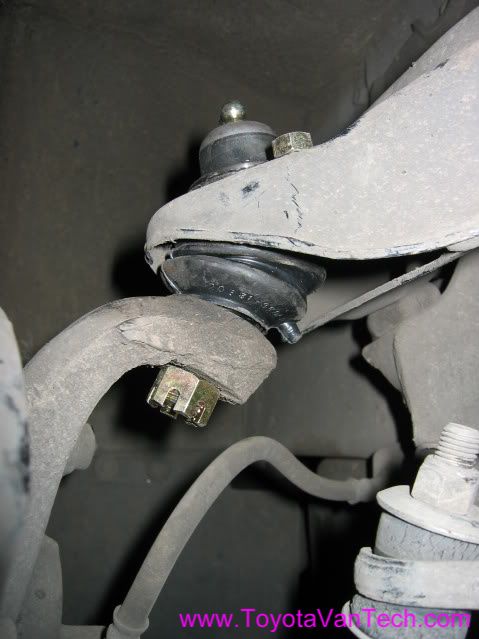
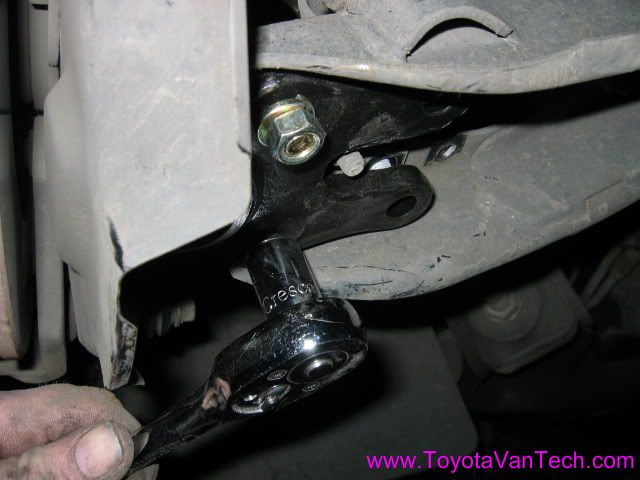
Now grab your ratchet and snug the nut until the shaft is seated against the tapered bore.
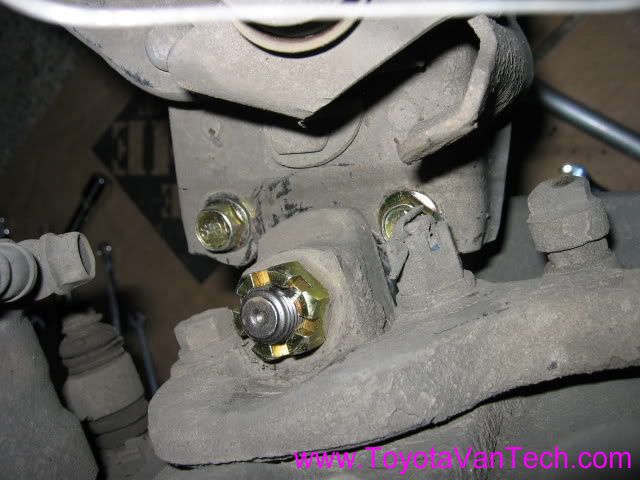
Okay, this next part can be a little fun. You'll need a large slot tip screwdriver to pry against the side of the joint in an attempt to align the bolt holes with the bolts. With a little bit of prying and pushing you'll get it close enough to push the outboard bolts through the holes.
Now put the washers and nuts on them and snug them up (not too tight, you may still need to adjust).
Now that the outboard nuts are on, use a jack under the lower control arm to lift until another bolt drops through. You should only need to move the lower arm about 1/2". If the bolt doesn't drop by then, stop and tap it from the top until it drops through the hole. When enough threads are there, start the nut / washer and tighten until the other side is close enough to put do the same. Tighten the nuts a little at a time switching from side to side to keep the pressure even.
There it is, almost done!
Put the final torque on all the nuts & install the cotter keys.
Grease the zerks (only needs about 5 or 6 pumps each) Note: lower joints have no zerks
Now the only thing left is to reinstall your shocks, put the tires back on, and take it off the jack stands. Don't forget to torque lugs to 100 ft lbs and set your tire pressure according to tire manufacturer's recommendations. Remember anytime this type of front suspension work is done it's strongly recommended to have an alignment done ASAP. So be sure to set up a front end alignment and you shouldn't drive your van unless you're driving it straight to the alignment place. Tim
-
Forum Newbie

- Rep Power
- 0
Re: How to replace your ball joints in about 2 hours (2wd)
Hi Tim,
Thanks so much for taking the time to post this! It's a big help. I'm getting ready to do a bunch of procedures (upper and lower ball joints, inner and outer tie rods, shocks, and all control arm bushings), none of which I've done before. Is there anything else you'd add to the list while I have the front end ripped apart?
Also, slightly off topic, what do you think about these control arm bushings?
http://www.partsgeek.com/catalog/198...m_bushing.html
They're significantly cheaper than the OEM bushings from 1sttoyotaparts.com. However, they only list one upper bushing, and I know there are two uppers on each side. 1sttoyota lists these as different part numbers; could I just buy two of this one part for each upper control arm, or would that not work?
Thanks and I'm happy to see this new site!
Josh
-
Re: How to replace your ball joints in about 2 hours (2wd)
Hi Josh and welcome to the site! It sounds like you are taking on quite a bit all at once. There are other moving parts in the front suspension that you don't mention, but you're addressing the ones that most often need attention. The bushings you choose will affect performance, but probably not real noticeable unless you switch to a hard material like polyurethane. If you choose a harder material (like urethane), the typical result is better handling but less insulation between you and the road. There is a strong argument for this on sports cars and racing vehicles, but not so much on passenger vans. Unless you plan on using the van for competition or plan on driving it in a harsh manner, IMO hard bushings would be a waste of money and may even make the van less comfortable for you and your passengers. An exception for this argument would be the sway bar bushings. If available for a reasonable price, you may consider an upgrade to polyurethane here. Hard bushings in this area won't transmit much (if any) noise or vibrations, but will improve the "dive" you get during hard cornering.
When it comes to ride comfort, shock absorbers are also very important on the van (arguably one of the most important of all front suspension components). This is due to the "forward control" design of the van. On most passenger vehicles the passengers sit further away from the wheels. With the van, the driver and front passenger sit right on top of them..........and this means front suspension problems are much more noticeable in a van.
As for your question regarding the aftermarket parts, I have no experience with that brand, so I can't speak for them. As a general rule, if the price is good, I'll usually take a chance with these type parts, and so far I've been pretty lucky.
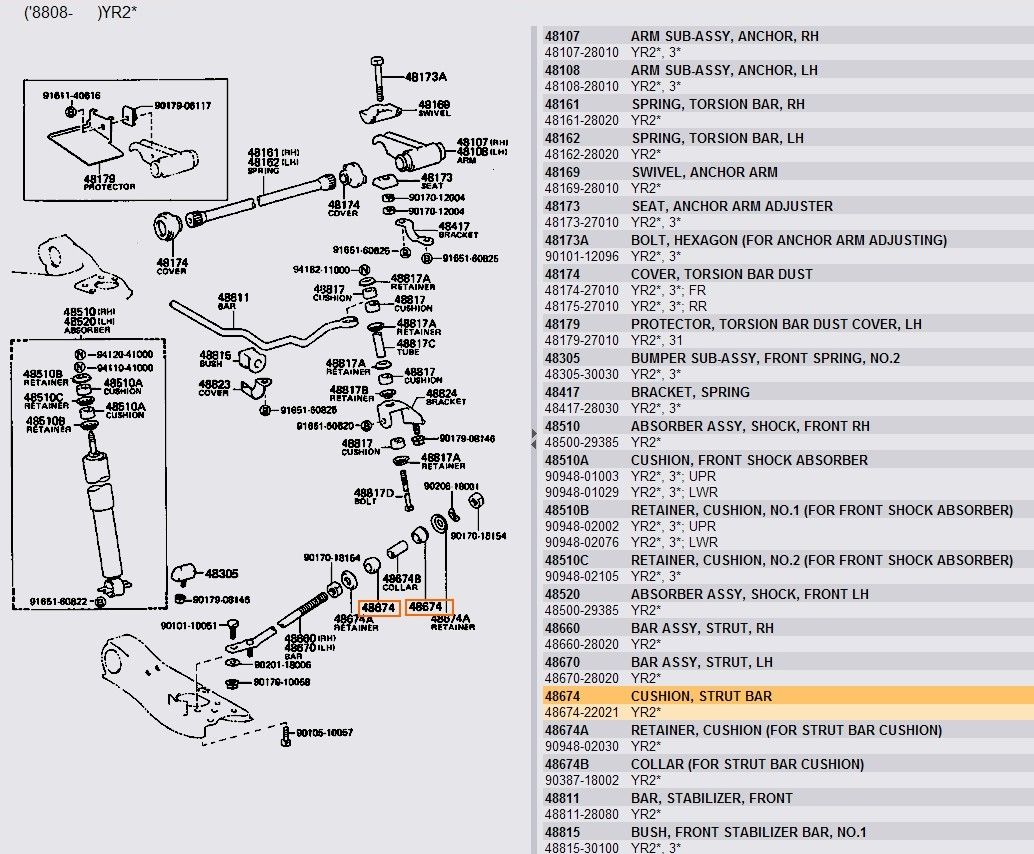
Here is a parts break-down with part numbers for the front suspension parts. As you mentioned in your post, there are different part numbers for the front and rear upper control arm bushings (please note the orange highlighted areas):
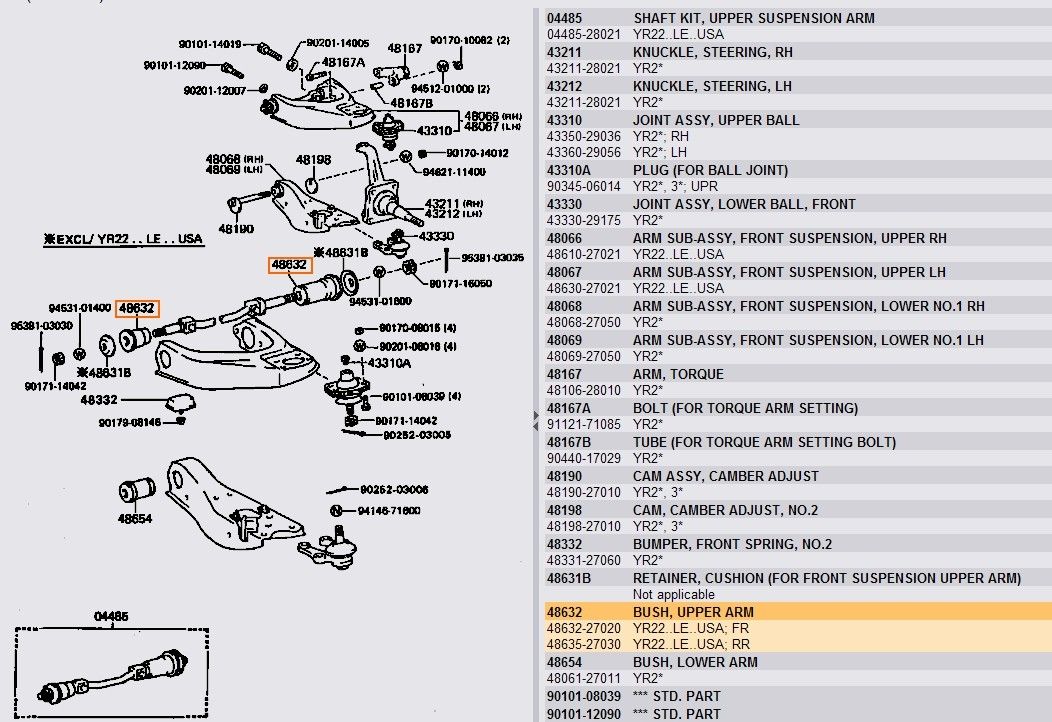
According to the descriptions in the link you provided, it looks like they have the lower control arm bushing and the upper front. The fact that they list the lower one as "front lower" doesn't instill a lot of confidence as there is only one lower control arm bushing (no front & back). Too bad they don't have "vehicle specific" images. For that price, I guess it's worth a shot. If they end up sending you the wrong one I guess it's no great loss. I checked www.rockauto.com for you and see they have a lower one (the only van control arm bushing they sell). It's RAYBESTOS Part #5651344 and it sells for $24.79. As for the upper rear control arm bushings, you may need to call around to see what's available. I checked with www.1stToyotaParts.com and see that bushing (Toyota Part #48635-27030) has been changed to part #48635-28040 and sells for $47.98 (assuming it's still available). Good luck with your search & please report back with the ones you purchased, where you got them, and your impression on quality.
One word of caution: before you remove your control arms be sure to back-off the torsion bars all the way. There can be a lot of energy in a "loaded" torsion bar, so be careful & make sure all torsion bar tension is completely removed before disassembly. As for other parts to replace / repair while in this area, I would recommend repacking your wheel bearings and checking your brakes. These front calipers have a tendency to get sticky slide pins. When that happens your brakes get squishy and the pads wear unevenly (heavy wear on the inside edge of the pads, but not so much on the outside). If there's any doubt about your calipers or pads, just replace them and be done with it. Take a good look at your rubber brake lines too and replace if they are cracking or if you see any bulges. I prefer genuine Toyota when it comes to pads, but I wouldn't hesitate to purchase the cheapest calipers I could find. Good luck and have fun with your suspension. Tim
PS: Make sure your strut bar bushings are tight and don't forget to take the van in for a front end alignment immediately after you do the work.
-
Forum Newbie
- Rep Power
- 0
Re: How to replace your ball joints in about 2 hours (2wd)
Thanks so much for the thorough response, Tim! That's a lot of good information to consider. I'm wondering about the shocks I was going to get; maybe I should upgrade. I'm on a very tight budget (hence why I'm attempting all this myself instead of paying the mechanic $1500). I'm ordering most parts through RockAuto. I was going to get the cheapest front shocks they have, the Monro-Matic Plus for $16 each. Being that my budget is so tight, how strongly would you recommend the KYB Gas-A-Just at $40 each? That's about a $50 difference for the pair.
Also, regarding the link to the PartsGeek bushings -- two of the bushings on that page are listed as 4wd, two as 2wd. So for my 2wd, they only have two options - one front upper and one front lower. It seems like the two front upper bushings are different sizes, which makes me think I can't just order two of their front upper bushings (part W0133-1753595) for each upper control arm. Do you concur?
I emailed the PartsGeek customer service also, so we'll see if they get back to me with some useful info.
-
Re: How to replace your ball joints in about 2 hours (2wd)
The front and rear upper control arm bushings are definitely different and would not interchange. The rear bushing is the big one that takes most of the force. This is due to the torsion bar's attach point and it needs extra surface area to handle the load.
It's certainly possible that they have mislabeled these bushings and you will end up with both uppers???.....then again probably not. It's a total gamble in my opinion. Good luck with talking to them. Even if they respond it's not likely they'll be of any help.
I have not tried Monroe Matics for this application so I can't comment on performance. I suspect there are other members here that have, so hopefully they will chime in. I have run KYB's and Gabriels on the front of the van. I liked the KYB's, but not too impressed with the Gabriels. Tim
-
Forum Newbie
- Rep Power
- 0
Re: How to replace your ball joints in about 2 hours (2wd)
Thanks again, Tim. No word yet from the PartsGeek people; I'll keep you posted.
If you have the time, there were a couple questions that came up in researching these parts. The OEM control arm bushing numbers I came up with prior to your post were:
Front bushing (upper control arm): 48632-27010
Rear bushing (upper control arm): 48635-28010
Lower control arm bushing: 48061-27011 (replaces 27010)
1stToyotaParts has these, as well as the part numbers listed on your exploded illustration. Could they be for different years? My van is an 89 LE.
Also, I hope it's not too much to ask, but do you have an exploded illustration/part numbers for the sway bar bushing and the strut arm cushion/bushing?
Thanks so much -- if you have any questions regarding something I know a good deal about, like homebrewing beer for instance, I'd be happy to return the favor!
Josh
-
-
Forum Newbie
- Rep Power
- 0
Re: How to replace your ball joints in about 2 hours (2wd)
PM sent with the VIN, Tim.
Thanks so much!
-
Re: How to replace your ball joints in about 2 hours (2wd)
Okay, here's the other break down you requested:
This one was brought up using your VIN number. I also brought up the other break-down (the one I previously posted) using your VIN and it was the same (same part numbers & everything). Keep in mind the EPC I'm using is a bit out of date and things change. Toyota will sometimes change part numbers for organization reasons, or sometimes even make improvements on replacement parts. If these changes are significant enough, they will often supersede old part numbers with new, yet the parts will all be interchangeable. I don't know if that's what's going on here, but it's a possibility. FWIW, I have often ordered parts using the most recent numbers, only to end up with a NOS original part in a package with old original numbers.
If you have any doubts, call 1stToyotaParts.com or whoever you purchase from and ask them to verify using your VIN before ordering. Tim
-
Re: How to replace your ball joints in about 2 hours (2wd)
Hey, check these out:
http://cgi.ebay.com/ebaymotors/86-89...mZ280506605546
http://cgi.ebay.com/ebaymotors/ws/eB...=STRK:MEWNX:IT
In the pictures they both appear to be right side uppers, but they are genuine Toyota. What a deal! I went ahead and purchased one of each for spares. Part numbers are slightly different than what the EPC calls for, but I bet they'll interchange. Even if they don't, at the very least I should be able to harvest the bushings and ball joints out of them. These will come in handy when I do my control arm bushings. Looks like he has 2 of the $23 ones and 5 of the $15 ones left. Tim
-
Forum Newbie
- Rep Power
- 0
Re: How to replace your ball joints in about 2 hours (2wd)
Hi again,
Well, all the parts arrived and I finally got started on replacing the inner and outer tie rods, upper and lower ball joints, shocks, upper and lower control arm bushings, rubber sway bar bushings, etc.
Things are going ok so far -- I started with the passenger side, and have removed the tie rods, upper and lower ball joints, and lower control arm -- it's going slowly but surely, which feels good because I've never done any of this before. However, I'm having a hell of a time figuring out how to get the upper control arm off! The torsion bar is cranked way down (loose), but the arm doesn't move much. I was able to remove the two nuts that connect the arm to the torsion bar, as well as to loosen the castellated nut on the front end. However, there is the rod that the control arm uses as a pivot, which has two bolts going through it and mounting the arm to the frame -- and those are the problem. I can barely get a wrench back in to grab those bolts, and on the outer side, the nuts are welded to the frame. I can the a closed end wrench on the bolt heads, but have very little room for leverage. Is there a trick here or should I just continue to soak everything with PB Blaster and hope things loosen up enough that I can move the bolts?
(Also, I did remove the rubber dust flap so that everything is exposed -- there's just so little room to get at these nuts!!)
If this is straying too far off topic, feel free to move this to a new thread.
Also, if anyone has any advice about replacing the control arm bushings, bring it on! I have a feeling these are going to be a pain to pop out and push the new ones back in.
Thanks!
-
Re: How to replace your ball joints in about 2 hours (2wd)
You might get lucky and find another way around it, but I'm pretty sure you will need to remove the entire control arm & shaft assemblies............and that requires removing those shaft bolts that go into the frame. It might not be necessary, but for easy access, I would take off the passenger seat, the engine access panel under it, AND removed the radiator. Once this stuff is out of the way you will have awesome access to the mount bolts. When you get the arm assemblies out on the bench you might be able to rig something up, but I'd probably just take the arm assemblies down to a shop that has a press (and pay them to press out the old bushings and the new ones in). They probably wouldn't charge much for that, but if you're on a tight budget you might want to call and ask how much $$$ 1st. I'm guessing around $75 to do both sides (and I'd consider it money well spent...........considering the hassles of trying to do yourself without the proper equipment). Good luck. Tim
-
Forum Newbie
- Rep Power
- 0
Re: How to replace your ball joints in about 2 hours (2wd)
Well, I'm still working on this project with the van... it's taking a while, doing all this between other obligations. Luckily I've been able to borrow a car when I need it, or take the subway.
I started working on the control arm bushings, after finally getting the upper one removed. I was able to get all of the bushings out of the passenger side control arms, with the aid of a screwdriver, big hammer, and vice. It went pretty well, but I did crush a retainer on on of the bushings (thin metal piece which inserts into the center of the bushing and holds the washers in place). I know someone on another forum had posted these part numbers, but that forum seems to be out of service at the moment. Tim, or someone else with access to a part numbers catalog -- is there any way I might be able to trouble you for the part numbers for these retainers for each of the upper control arm bushings? Sorry to be a pain!
Thanks!
-
Re: How to replace your ball joints in about 2 hours (2wd)
I'd be happy to do this but I'm not exactly sure what parts you're talking about. Is there any way you could post a picture of the damaged items? Tim
-
Forum Newbie
- Rep Power
- 0
Re: How to replace your ball joints in about 2 hours (2wd)
Thanks Tim!
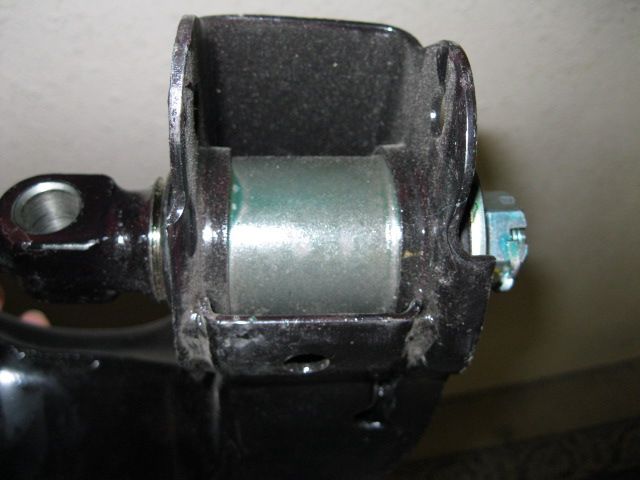
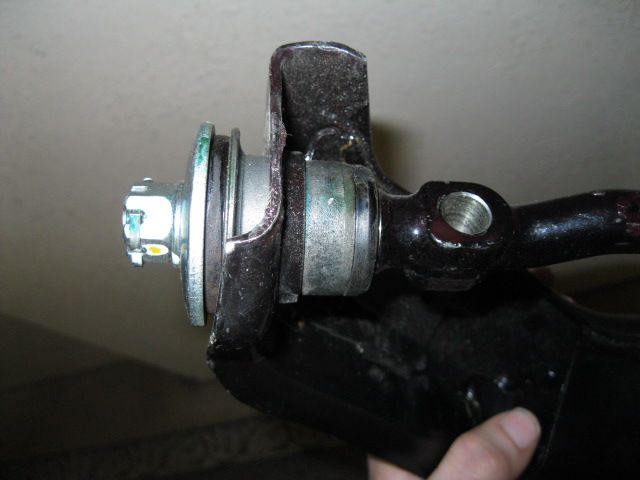
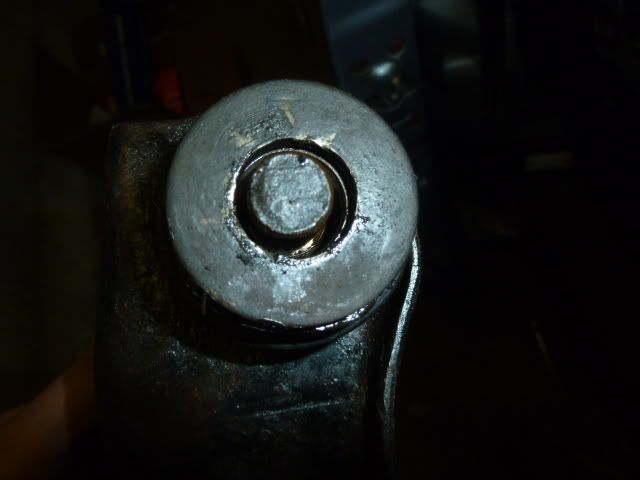
These first two photos show the front upper bushing (the smaller one on the upper arm) that I removed from the van (looks healthy, eh?). The part I'm asking about is the crumpled piece of metal.
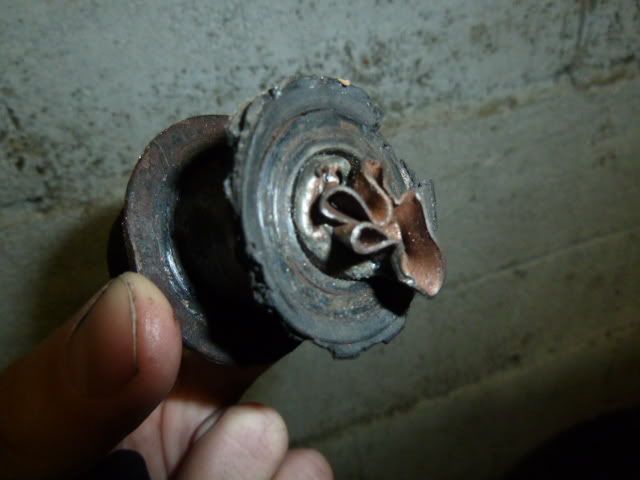
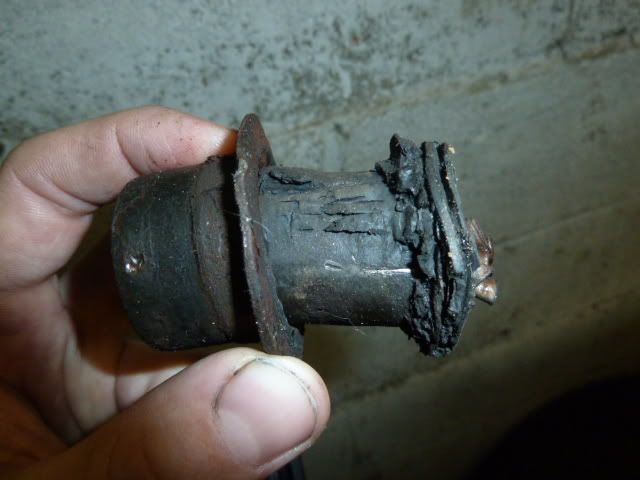
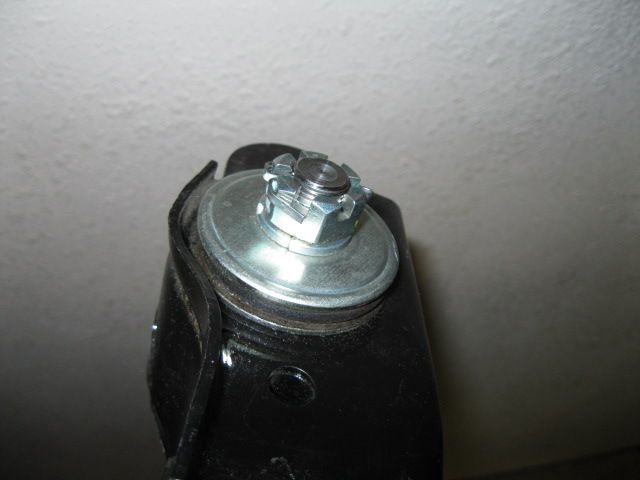
These pics show the new front upper bushing installed on the upper control arm. However, the part I'm asking about is missing (since I crushed it). It would insert through the washer hole and into the end of the bushing to hold the washer in place.
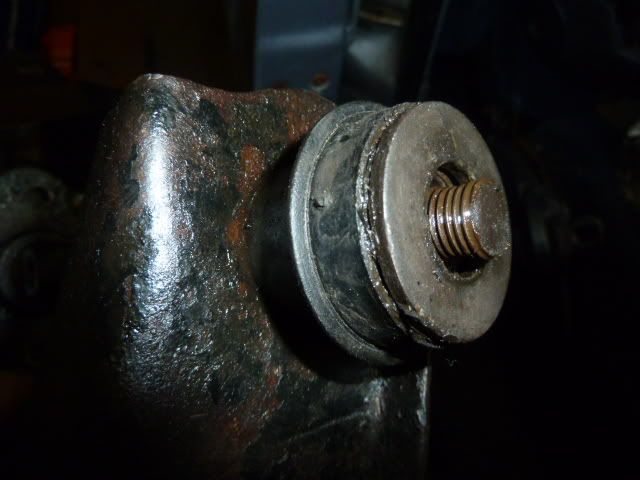
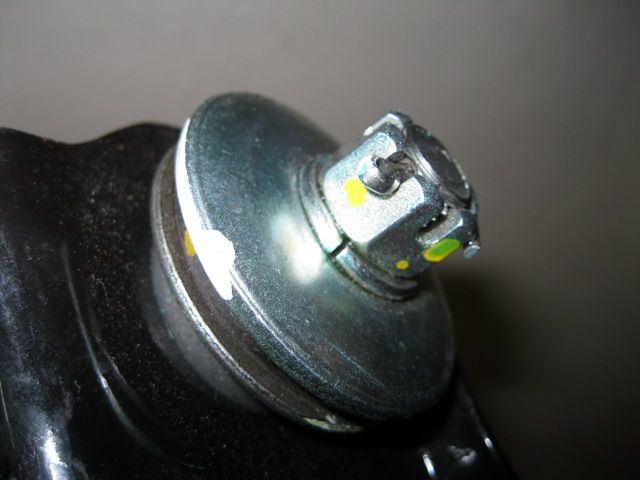
Since the crumpled piece of metal is pretty hard to read, I'm also posting pics of the new rear upper bushing, installed on the upper control arm. You can see that the part I'm asking about is installed here, between the heavy washer and the nut. The shape of the part is kind of like a tee-nut -- it goes through the washer hole and into the end of the bushing, to lock the washer in place.
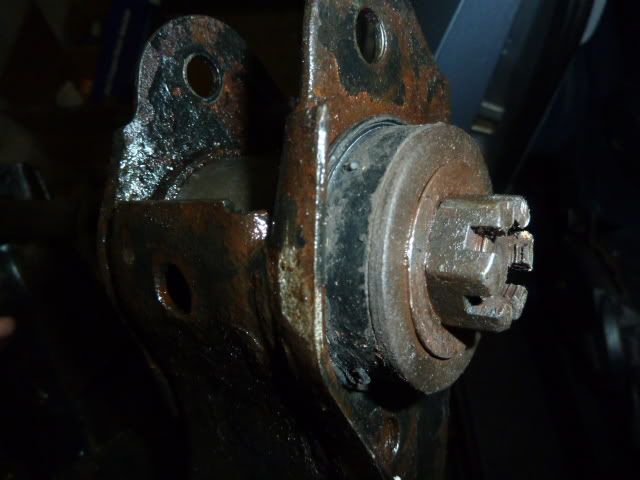
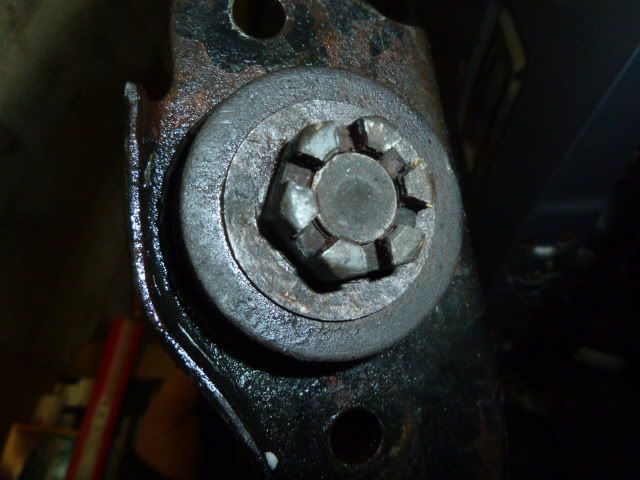
If it's not too much trouble, I would love to have the part numbers for each of these retainers -- the two for the front upper bushing, and the two for the rear upper bushing. The lower arm bushing didn't have these parts.
Because the metal on these is so thin and susceptible to damage, this seems like a part that anyone changing their bushings should purchase (obviously, they don't come with the new bushings).
-
-
Forum Newbie
- Rep Power
- 0
Re: How to replace your ball joints in about 2 hours (2wd)
Hmm... that is strange. The bushings on your new arm look like they are more the style of the lower arm bushings that I have, with no retainers necessary. The parts I'm describing definitely pop out of the old bushings, and fit into the center holes of the new bushings. If these parts are really not available, I may be able to get by if I buy a new outer washer with a hole exactly the size of the threaded 'rod'.
I'm pretty sure someone in a control arm bushing replacement thread on the old forum listed these part numbers, but that site seems to still be down.
-
Forum Newbie
- Rep Power
- 0
Re: How to replace your ball joints in about 2 hours (2wd)
Well, I was able to find the info I was looking for, as the other forum I mentioned is back up and running:
I purchased the retainers (for the uppers) just in case the old ones were deformed:
Front retainer: 90948-02049
Rear retainer: 90948-02048
1stoyotaparts.com lists these as:
RETAINER, CUSHION [Part# 9094802049] $3.30
RETAINER, CUSHION [Part# 9094802048] $4.43
Tim, do you have any input on this? Do these numbers allow you to pull up an image of the parts?
-
Re: How to replace your ball joints in about 2 hours (2wd)
Sorry for the late reply. I've been out of state for Christmas and just returned.
That's great you were able to find this info over at TVP. They are a great resource and I'm happy they're still with us. Unfortunately I get no returns when I enter those part numbers. It's possible they did something different for a while, but eventually did away with this to standardize their inventory. Even though I couldn't find doesn't mean they don't exist. I'd try a Toyota dealer and see what they can come up with. Please let us know what you find out. I know it sucks for you, but it could save the next guy some headaches. Tim
-
Forum Newbie
- Rep Power
- 1
Re: How to replace your ball joints in about 2 hours (2wd)
Tim, I have a question. After installing the new ball joints, was it harder to turn the steering wheel? Because when I finished installing everything I try turning the steering wheel, with the front end up the air and with the engine off, I found it very hard to turn the wheel. Is this normal because I need to brake in the new ball joints? Thanks.
Kenny.
Tags for this Thread
 Posting Permissions
- You may not post new threads
- You may not post replies
- You may not post attachments
- You may not edit your posts
-
Forum Rules


 Reply With Quote
 . I'll PM you if I ever need to know that sort of thing.