
This is a simple switch so positive and negtive are irrelevant. You can crimp an insulated female spade to each wire on the van and plug one into each terminal of the float connector.


This is a simple switch so positive and negtive are irrelevant. You can crimp an insulated female spade to each wire on the van and plug one into each terminal of the float connector.

It's just a switch. 2 wires coming from van harness hook to the 2 wires coming from switch. No particular order necessary. Rather than hack your $100 switch, I'd probably put some female spade connectors on the van harness (where those butt connectors are) and plug those into the new float switch harness. Tim
One simple thing would be to put female spade connectors on the ends of the wires on the harness, and plug them on to the male spades in the connector shell. You might want to tape around the outside of the metal part so there's no chance the connectors will touch.
This is what should be on the harness, which can be bought here: http://www.clipsandfasteners.com/Met.../w38c005-5.htm
Update... I missed the two response before mine (they snuck on to the next page, that's my story and I'm sticking to it). Sorry for the redundancy.
Last edited by Jbbishop2; 05-12-2016 at 06:53 AM.
Oops, that link is for the female shell, but the one on the harness is the male side:
http://www.clipsandfasteners.com/Met.../w38c004-5.htm

Thanks for all the info and tips, guys.
I was thinking about getting one of those heat-shrink tube kits to keep it all
clean looking. I'll let you know how it turns out.
Also plan on doing the clumping cat litter cleaning trick. (no cat emoji available)
"You came in that thing?... You're braver than I thought!" - Princess Leia
How does the tank come out? I have searched the manual and this site with no luck.
My float sensor is no longer floating!
Take the lid off and stick your left thumb inside the tank (you'll need it there to get a good grip). Take your right hand and reach under the right side of the tank. You'll need to manhandle the tank with extreme side to side rocking force while lifting straight up at the same time. Tank should pop-off the bracket. If it doesn't you're not being aggressive enough. It's all about knowing you can do it. It's all about knowing how much pressure to put and where. It will come off. Tim

Wow, perfect timing for this thread to resurface. I've been trying to track down a random wet spot under my van for a bit and the coolant reservoir is the culprit. I like the expandable freeze plug solution.... just peeking into the reservoir every time you check the oil isn't hard at all.
But, I may have lucked out for a bit since my parts van has a reservoir that isn't leaking at all, but I'm sure it's just a matter of time before it starts.
Thanks to everyone for sharing their solutions.
Cheap fix , a boat plug fits perfect in the hole , turn the plug until it expands and you will not have anymore leaks . Checking your coolant level in the resevoir is not hard at all !!!!
I wrote:Anyone have any suggestions for a heat gun? There are a gazillion to choose from. I might go for this one:I was thinking about getting one of those heat-shrink tube kits to keep it all
clean looking.
http://www.usplastic.com/catalog/item.aspx?itemid=24073
"You came in that thing?... You're braver than I thought!" - Princess Leia

Hey all --I managed to fix this as well using information from this thread, and I thought I'd share!
I ended up starting with the black RTV as a bandaid, and it did last for a good 6-10 months, but I noticed when replacing my radiator that it had developed some weeps (probably from re-disturbing it removing it from the van).
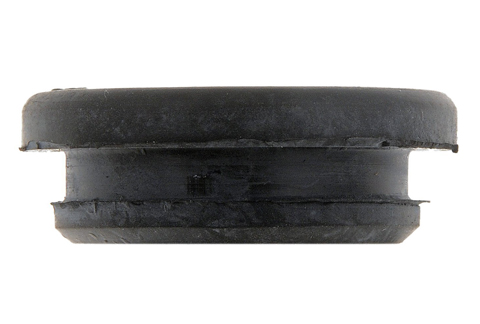
I wanted a more permanent solution, but I'm also a poor so I started hunting for a rubber seal that would do the trick.Using the rough measurements from this thread, I started looking for a 3/4" ID and roughly 1" OD at the groove to seal it up. Google indicated that a PCV seal from a 70's Monte Carlo (sweeeet) would work, and that my big box parts place had it in stock. The sizing was right but the bore went through at an angle. I assumed this wouldn't work as it would interfere with the proper function of the float. I did some eyeballing on the other available units and found that DORMAN 42049, for a Ford Taurus (less sweet) was almost identical, with the added benefit of being a little beefier at the bottom.
I "SlugLoafed" the tank, ripped apart my nasty RTV repair, cleaned all the goop up on the outside and went to work.
I figured out there's a reason that Toyota sells this as a combined unit - getting that rubber grommet over the larger float is not easy at all. I ended up flipping it inside out as the previous post suggested, putting the grommet in boiling water and then really forcing it on with the round edge of a tiny open-end wrench.
It sat nicely in the bottom of the bottle but felt way too loose to hold liquid, UNTIL I crammed the bottom of the sensor into it.
The original locking ring has nowhere to go, as I didn't create a new groove for it on the grommet, but it sealed up very snugly and it doesn't leak a bit.
It's been back in service for about a week and it's dry as a bone. The sensor works properly, though I suppose it won't turn on until it's a little lower than factory given that the sensor sits on the outside of the rubber. (I assume you're all monitoring your cooling systems with more care than waiting for an idiot light, though.) I'll update if it fails for some reason, but for three bucks it seemed worth the attempt!
Nice! is there a replacement part number for that unit? mine doesn't leak but the seal is older and the wiring is busted, so my rad light is always on.
^ replacement part from page 1 of this thread: Toyota 85335-73010
btw: i found another grommet that works well with NO modification. fits the sensor and the reservoir tank nice and tight:
Dorman 42055 PCV Valve Grommet
been in there 3 months no leaks or problems.
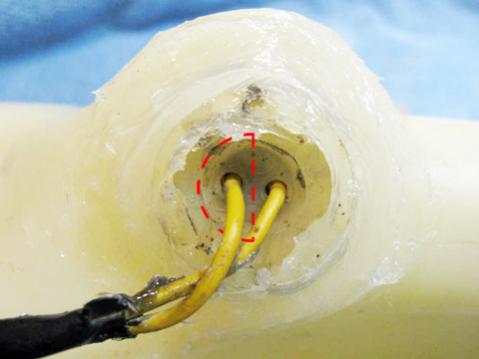
be xtra careful inserting sensor into the grommet and then into the reservoir tank (maybe use a little grease or silicone spray) those yellow wires can snap off very easy (ask me how i know) and you'll need to re-solder back together.
yeah i was referring to the whole assembly - i see the part numbers now. thanks!
i snapped my yellow wires too
rather than buy a soldering iron and fiddle with it i'd rather replace the whole plug/float unit including the harness...kinda pricey though. might just fix it myself.
I'm not sure if there's a reason you're putting the grommet on the sensor 1st, but typically the grommet would be inserted into the bottle 1st, then the sensor should slide right in (no need for boiling water and other such headaches). Tim
PS: Great information regarding the Dorman and other such parts! This is the type of information that will help save others lots of $$$. Thank you!
The reason I did it the above way was because the OD of the sliding bit is larger enough than the sensor body to make it pretty difficult to put on. In hindsight however, having the grommet steadied on the bottle might have made it easier. If I ever have to do it again, I'll try it that way first! (I really hope I don't have to do it for a long time, though)
Here's one more photo of the grommet installed so you all can get a sense of where it sits when installed.

Originally Posted by PNW vanwagon

PNW, one of my yellow wires broke off at the base of the tank when i lifted it out of the way to replace my alternator. is it pretty easy to solder? i have a cheap-o soldering iron that I'm very inexperienced with (only used it once or twice) so I'm planning on giving it a go but thought id check with you for any tips to get it done proper.
Nice work finding the Dorman grommet! When my RTV repair finally lets go I'll fix it with that.
So far, so good, though, the RTV has held without losing a drop for nearly three years.
yep this was my first time soldering as well and i bought the cheapest smallest soldering iron from harbor freight. my situation was additionally challenging as the wire broke off inside the plastic bottom of the sensor. i had to carefully cut a half moon section out of the plastic with an x-acto knife to expose the wire inside. and very carefully get a hot blob of solder on the yellow wire and get it stuck onto the exposed wire inside. it worked! i've checked it a couple times when the engine's hot and cold. i figured what do i have to lose to attempt a repair and if it fails later down the road i'll buy a new part.
just go slow. and don't worry: worst case scenario you have to buy a new sensor.
this isn't my photo of my sensor but here's about how much plastic i cut out to get to the wire:
awesome, great advice. mine broke off exactly the same way as you described. ill give it a try! would be nice to save the $100 it costs for a new one!
 Posting Permissions

 Reply With Quote
