Page 1 of 2 12 LastLast
Results 1 to 20 of 30

Thread: 1st post & already need help!!

  1. #1
    Forum Newbie
    My Van(s):
    1991 Previa LE AllTrac
    Join Date
    Feb 2011
    Location
    SW PA
    Posts
    11
    Rep Power
    1

    1st post & already need help!!

    Hi All,

    Brand new to the forum, & asking for help already.

    Going a little nuts here. Hope you can/will help.

    All that the Toyota parts people around here can say is "the book says..."

    anyway,

    Going to change out the front springs on my 91 all-trac. I'm seeing 3 different p/n for them, each side. The weird thing is the left side p/n for the early 91s supersedes to the late right side p/n. Does this make any sense to you? I have a Feb of 91 date code.VIN: JT3AC22S4M0011566
    Could the later p/n units be more heavy duty?

    (from Toyota PartsZone East)
    48131 SPRING, FRONT COIL, RH **131-28090 1 1990.01-1990.03 TCR20.. 07S $135.98 $101.29
    48131 SPRING, FRONT COIL, RH **131-28090 1 1990.03-1991.08 TCR20 $135.98 $101.29 *
    48131 SPRING, FRONT COIL, RH **131-28510 1 1991.08-1995.08 TCR20.. 07S.. EFI $156.61 $116.65 *
    48132 SPRING, FRONT COIL, LH
    Replaced by: **131-28510 **131-28100 1 1990.01-1990.03 TCR20.. 07S $156.61 $116.65 *
    48132 SPRING, FRONT COIL, LH
    Replaced by: **131-28510 **131-28100 1 1990.03-1991.08 TCR20 $156.61 $116.65 *
    48132 SPRING, FRONT COIL, LH **131-28520 1 1991.08-1995.08 TCR20.. 07S.. EFI

    I see my "correct" p/n is 131-28090 & 131-28100 (replaced by 28510) if I could get some info on the later units being HD I would prefer that route.


    Also, what is your opinion on KYB struts vs the OEM?


    Thanks in advance,
    -Jay

  2. #2
    Administrator timsrv's Avatar
    My Van(s):
    Lots of them
    Join Date
    Jun 2010
    Location
    SW WA ST
    Posts
    6,202
    Rep Power
    10

    Re: 1st post & already need help!!

    As you may have suspected, when I look up these parts I get original Toyota part number 48131-28090 for the right. This is still a good part number and Toyota is not recommending any substitutes. The left comes up as part number 48131-28100 (original part number) but that one is NLA (No Longer Available). Toyota is recommending part number 48131-28510 as a substitute, but that part is listed as a front right spring for the later model Previas. Normally I'd trust the substitutes that Toyota recommends, but this isn't even for the same side? Also there's the concern that spring rates may not be the same for both sides. For these reasons I would disregard Toyota's advice on substitutes. I do happen to know that All Previa struts are interchangeable from 91-97, so that would mean the springs are too. I don't know what differences there are from 91-92 springs, but personally I feel having a matched set should over-ride all else. Therefor I'm going to recommend you go with both springs from a 92 All-Trac Previa. These part numbers are: 48131-28510 R/H front coil spring and 48131-28520 L/H front coil spring. In addition to the springs I would also order new insulators and bumpers: 48157-28010 (qty:2) upper insulator, 48158-28010 (qty:2) lower insulator, 48304-28010 (qty:2) bumper.

    These additional parts are not necessary, but they are fairly inexpensive and are nice to have (who wants to put the old grimy rubber parts on brand new struts and springs?). As for struts, so far I've used Monroe, Gabriel, and KYB on my Previas. Out of the bunch I liked the KYBs the best. I haven't purchased any for a few years, but for a while they were practically giving these things away on eBay. I think the last set I got there I paid $100 for the pair. Other than the ones that came used with my Previas, I've never tried Toyota struts (who can afford them? : )

  3. #3
    Forum Newbie
    My Van(s):
    1991 Previa LE AllTrac
    Join Date
    Feb 2011
    Location
    SW PA
    Posts
    11
    Rep Power
    1

    Re: 1st post & already need help!!

    Tim,

    U are indeed THE MAN !

    Thanks for the good info.

    I'm planning to have the struts built up as units before even lifting Blue. (Yea, she has a name. Only vehicle I ever had with one & I've had a bunch.) That way I can replace it all at once, limiting down time, and I can't imagine parts with 246000 + miles aren't as tired as I am.

    Is there an easy way to access the top plates ? I saw your excellent post (w/pictures!) on dash removal, is that the way to go? I have a book around here somewhere, but I can't put my hands on right now.

    I will photo the project as it proceeds, & will be glad to share if desired. I can also give a materials list w/costs.

    This is a great site, and will be an awesome resource to keep these wonderfully wacky vans alive.

    Many thanks, again,

    -Jay

  4. #4
    Administrator timsrv's Avatar
    My Van(s):
    Lots of them
    Join Date
    Jun 2010
    Location
    SW WA ST
    Posts
    6,202
    Rep Power
    10

    Re: 1st post & already need help!!

    No need to remove the dash. Getting access to these nuts is actually pretty easy and it only requires minimal disassembly. I snapped some pics of the job last time I did this (about 3 years ago) but never got around to posting. I guess now's as good a time as any 
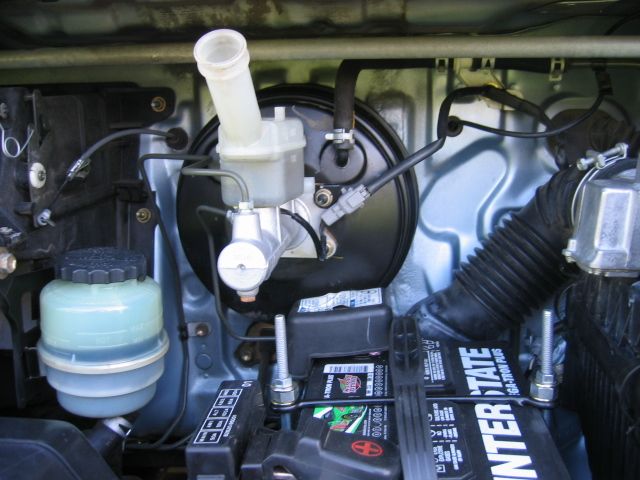
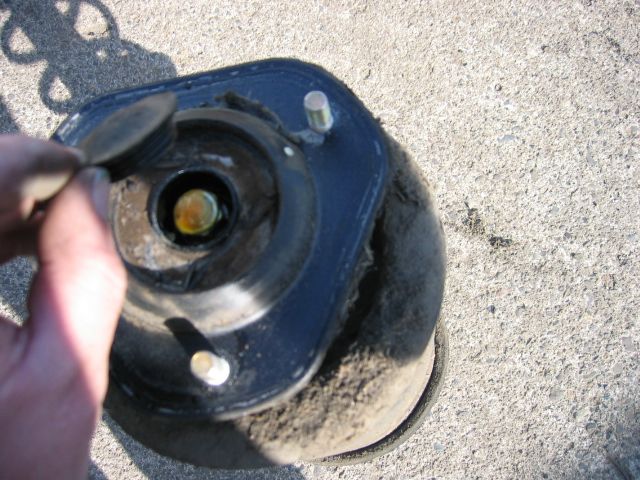
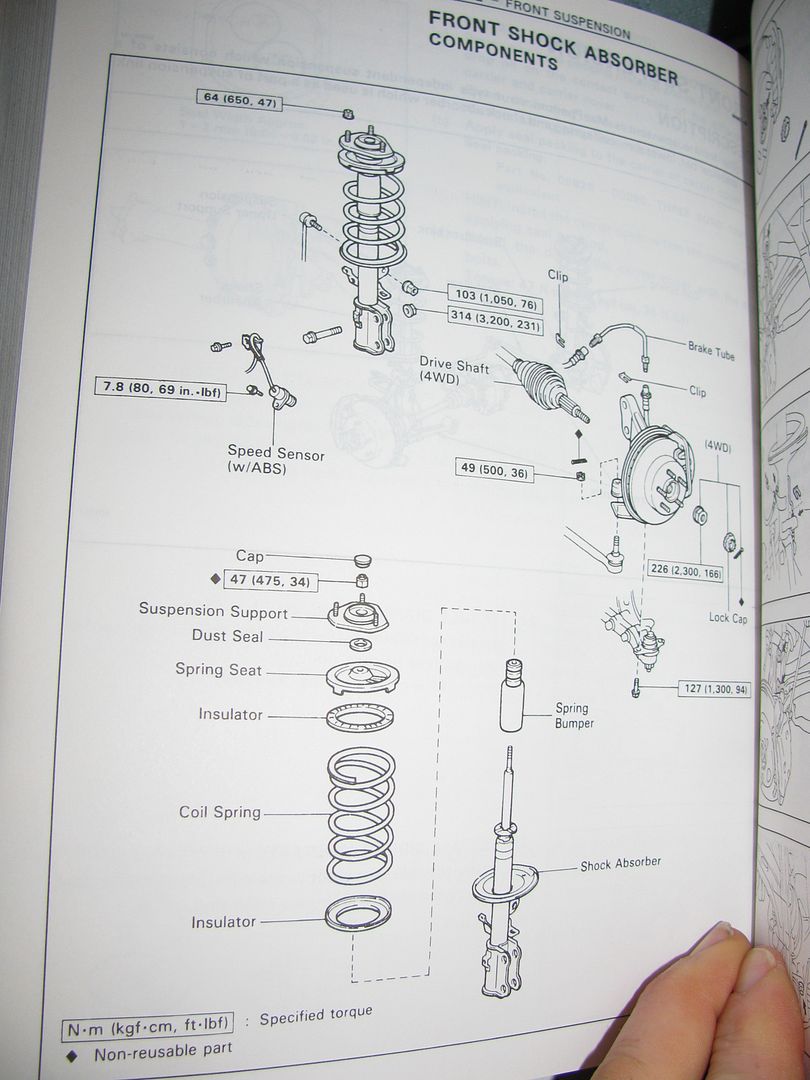
. These upper mount nuts should be removed last (after all the exterior stuff is removed), but I like to get the interior access opened up 1st while my hands are still clean.

    Passenger side is easy. Open the glove box and remove the duct piece. It's sort of a PITA to remove, but if you pry it and tweak it just right it will pop out.


    Yeah!


    There's a few more steps for the driver's side, but it's still not too bad. Start by popping off this snap-on plastic plate and remove the screw under it.


    Same thing here.


    Now pop-out the cluster dimmer and pull the harness.


    Now remove the bottom screws of this panel (one on right not shown) and remove the hood release lever assy (not shown). Dash panel can now be unsnapped and removed. Next remove the brace cap and lower brace screw (bottom arrow).


    Remove other 2 brace bolts (only one shown).


    Remove brace.


    Yeah! 
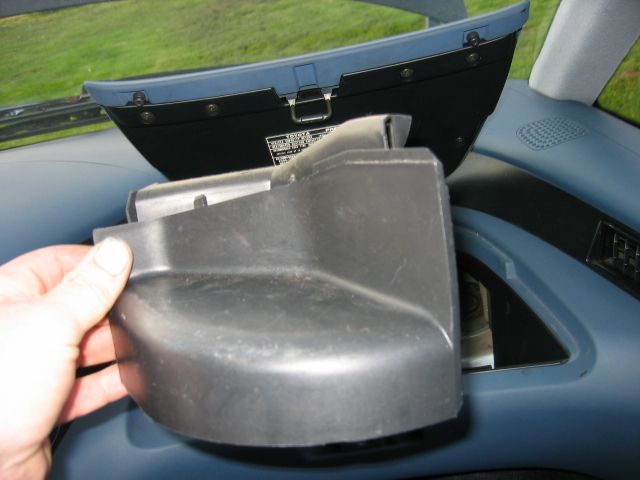
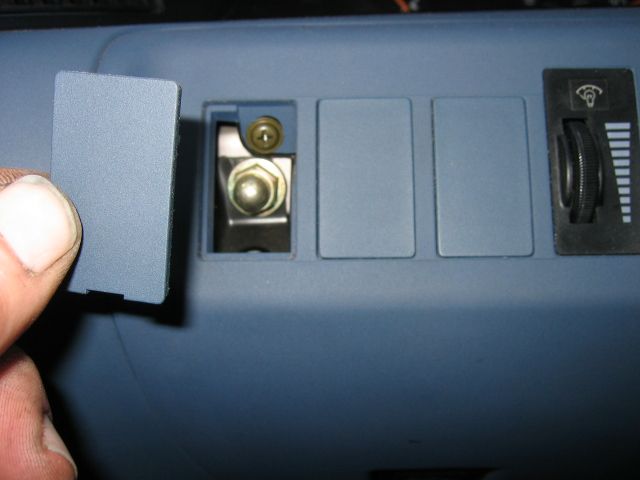
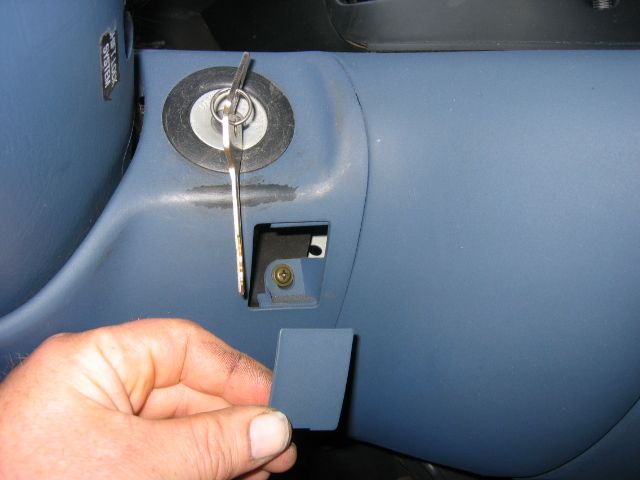
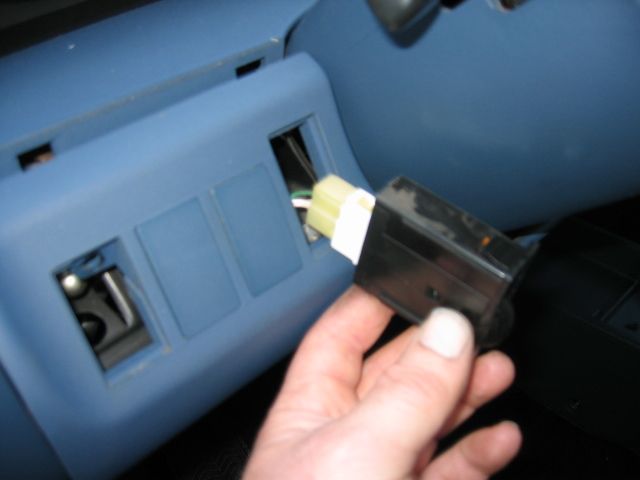
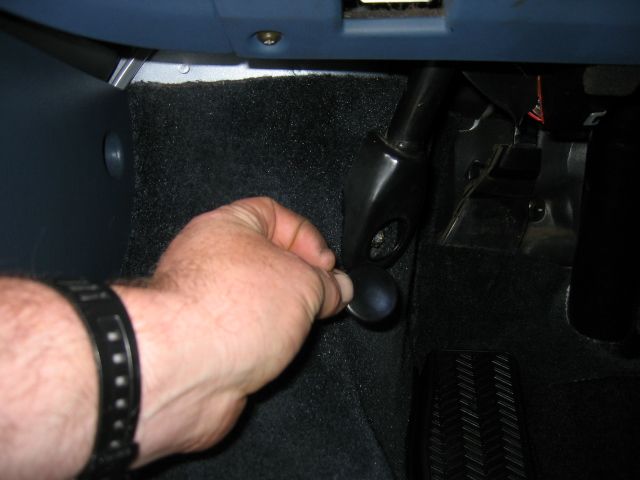
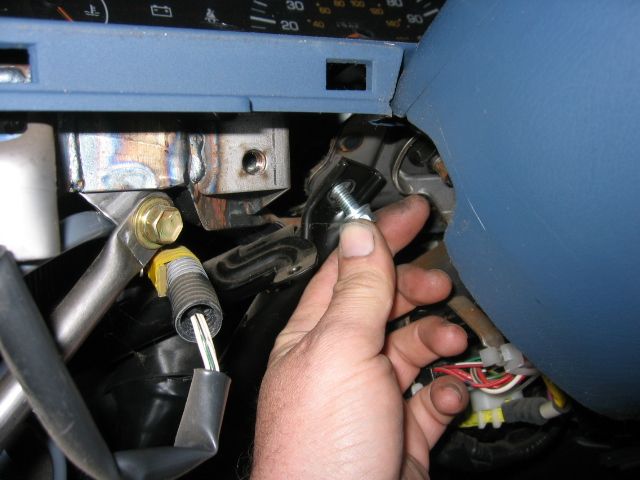
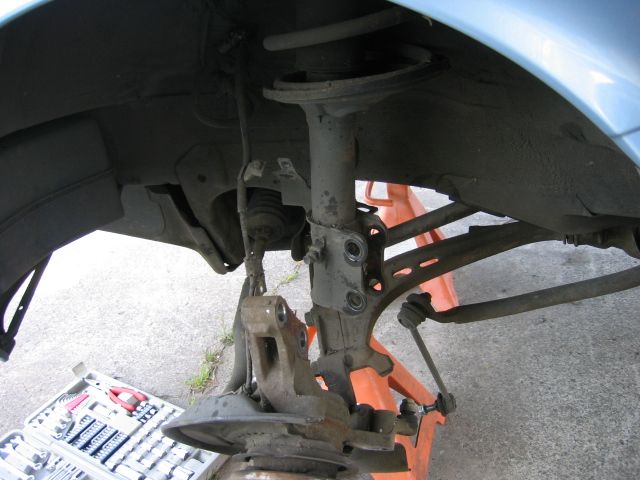
Yes it's a bit tight, but there's enough room to get these now.


    You will need to remove brake lines so now is a good time to empty the master cylinder. The filter will pull right out from the filler neck and then you can suck the fluid out. A mighty vac pump works good for this.


    Next remove the brake lines from the strut. If your van is equipped with ABS remove the ABS harness screw from the strut. Now Remove the 2 big lower strut mount bolts.


    Now the only thing holding your struts in are the 3 upper mount nuts (per side) inside the van. I found it best to leave the easiest one tight and remove the harder ones 1st. This way you can spin the harder ones off with your fingers without too much trouble. It's a big help to have an assistant for the last one. Have him/her grab hold of the strut assy from the outside, push it up and wiggle it a little while you remove the final nut. If you don't have a helper use a jack or wedge a piece of wood under the strut to keep it pressed up against the upper mount while you work.

    Once off you can remove the soft rubber cap on top of the upper mount. Find the right size socket for the nut inside and get your tools ready. A pneumatic impact wrench is highly desired for the next step. WARNING: DO NOT REMOVE THIS NUT YET OR SERIOUS INJURY COULD RESULT!


    Lay strut assy on it's side.


    WARNING: There can be an enormous amount of energy in compressed springs. You don't want to pinch a finger or lose an eye due to flying projectiles! If you do not feel comfortable doing this STOP! It's better to be safe than sorry. You have the option to take the strut assy into a shop and pay them to remove spring and swap parts over. This part of the job isn't labor intensive so won't cost you much.

    If however you feel confident and have the correct tools, you may proceed at your own risk. Attach spring compressor tools to spring and compress spring until it's loose inside strut assembly. For this next step it's important the strut assy be laying down. Never remove the upper mount nut with strut assembly standing up. If compressor tool were to slip it's much better to have parts flying sideways at ground level than to have them flying up and possibly into your face or through a window.

    When you are ready to remove the nut go ahead and do so. A pneumatic impact is great for this because it will remove the nut quickly and easily. It's also safer because you can work while standing and avoid getting up-close and personal with a loaded spring. If you're going to re-use your old springs, leave the compressor tools on and set it in a safe place until you're ready to re-install it. If you're replacing springs then carefully remove your compressor tools for safety. Don't compress your new spring until you're ready to install.


    Once you have your new strut assy built up torque the nut to specifications. For re-assembly have a friend hold it in place while you install the 3 upper mount nuts.


    Re-assemble van in reverse order and torque bolts/nuts to specifications.


    Refill the master cylinder and bleed the brakes.

  5. #5
    Forum Newbie
    My Van(s):
    1991 Previa LE AllTrac
    Join Date
    Feb 2011
    Location
    SW PA
    Posts
    11
    Rep Power
    1

    Re: 1st post & already need help!!

    Tim,

    You are unbelievable! Really. Thanks much. I'll keep you posted on my progress.

    Thanks again,

    -J

  6. #6
    Forum Newbie
    My Van(s):
    1991 Previa LE AllTrac
    Join Date
    Feb 2011
    Location
    SW PA
    Posts
    11
    Rep Power
    1

    Thumbs up Re: 1st post & already need help!!

    Well, OK boys & girls.

    Please note when this thread started. I ordered the parts directly after Tim answered.
    Got the struts from Amizon (KYB) & all else from Toyotapartseast.com Not advertising for them, but price was good, service better. They were out of the springs, emailed me same day & asked what I wanted to do. Since I was not rushed, I told them to get them in & ship complete.
    Two days later, another email told me pkg shipped & included tracking #. Not bad communication in my experience with internet ordering. YMMV.

    Anyway, the project is finished. Only problem I had was getting one of the sway bar links disconnected. Had to drill it out. Aah, the joys of living in the salt belt.

    Tim, thanks for all the help, would not want to have tried this without you.

    -J

  7. #7
    Administrator timsrv's Avatar
    My Van(s):
    Lots of them
    Join Date
    Jun 2010
    Location
    SW WA ST
    Posts
    6,202
    Rep Power
    10

    Re: 1st post & already need help!!

    Awesome! Glad you got it done. Salt sucks. I never understood about salt problems until I got an east coast vehicle. I couldn't get rid of it fast enough........never again. I can't see how you guys can put up with that stuff. So, does it drive like a new van now???

  8. #8
    Forum Newbie
    My Van(s):
    1991 Previa LE AllTrac
    Join Date
    Feb 2011
    Location
    SW PA
    Posts
    11
    Rep Power
    1

    Re: 1st post & already need help!!

    It's amazing, actually. She seems to glide over the road now. Not getting her new, I didn't know how she was supposed to ride, but the difference is incredible.
    She is well worn, not abused, but not maintained as she should have been. Every time I do something on her, the difference is astounding. These vans must have been the best of the best new.

    And yes, I'm thinking of replacing my other car with another Previa.

    Have a new issue, but will start a new thread for it.

    Thanks again!!!

    -J

  9. #9
    Forum Newbie Mr. Previa's Avatar
    My Van(s):
    1992 Previa AllTrac Automatic
    Join Date
    Nov 2011
    Location
    United States
    Posts
    15
    Rep Power
    1

    Re: 1st post & already need help!!

    Does anyone have the torque specs for this process? Especially the nut holding the spring on.

  10. #10
    Administrator timsrv's Avatar
    My Van(s):
    Lots of them
    Join Date
    Jun 2010
    Location
    SW WA ST
    Posts
    6,202
    Rep Power
    10

    Re: 1st post & already need help!!

    I verified this info to be the same in the FSM (Factory Service Manuals) from 91-93 (I only have FSMs in that range). I suspect however this information stays the same for all US Previas 91-97. The locking nut that attaches the strut to the top mount s/b torqued to 34 ft lbs. The 2 big bolts that attach the lower strut to the steering knuckle s/b torqued to 231 ft lbs. The 3 nuts that attach the upper mount to the body s/b torqued to 47 ft lbs.

    The picture below is out of my 93 FSM.

  11. #11
    Forum Newbie Mr. Previa's Avatar
    My Van(s):
    1992 Previa AllTrac Automatic
    Join Date
    Nov 2011
    Location
    United States
    Posts
    15
    Rep Power
    1

    Re: 1st post & already need help!!

    Thank you!

  12. #12
    Forum Newbie
    My Van(s):
    92 Toyota Previa
    Join Date
    Feb 2013
    Location
    Northern CA
    Posts
    14
    Rep Power
    1

    Re: 1st post & already need help!!

    Hi Tim, I am preparing to do this job on a 92 Previa RWD very soon. As per your recs, I plan to order new bumpers and upper/lower spring insulators from Toyota.

    In your picture, it appears that there is a hard/black plastic dust cap (to protect the rod) and a yellow bump stop. Are both of these included in the 48304-28010 bumper package?

    Also, the generic KYB SB101 kit for these cars is a bit cheaper and may provide a bit more protection for the rod since the generic boot appears to be longer. Any thoughts on this?

    Thanks in advance.

  13. #13
    Administrator timsrv's Avatar
    My Van(s):
    Lots of them
    Join Date
    Jun 2010
    Location
    SW WA ST
    Posts
    6,202
    Rep Power
    10

    Re: 1st post & already need help!!

    Both the yellow and the black come together as one part. I'm not familiar with the KYB bumpers/boots, but I'm sure they're fine too. Tim

  14. #14
    Forum Newbie
    My Van(s):
    92 Toyota Previa
    Join Date
    Feb 2013
    Location
    Northern CA
    Posts
    14
    Rep Power
    1

    Re: 1st post & already need help!!

    Quote Originally Posted by timsrv View Post
    Both the yellow and the black come together as one part. I'm not familiar with the KYB bumpers/boots, but I'm sure they're fine too. Tim
    Thanks!

  15. #15
    Forum Newbie
    My Van(s):
    92 Toyota Previa
    Join Date
    Feb 2013
    Location
    Northern CA
    Posts
    14
    Rep Power
    1

    Re: 1st post & already need help!!

    Tim, what is the best tool that one can use to access the strut mount nuts, especially on the driver's side? Judging from the pictures, a socket + ratchet may be too high for that space? It almost looks like a job for a flex-head ratcheting wrench!

    What size are those nuts?

    Also, what size flare wrench will I need to loosen the brake line on the strut?

    Thanks.

  16. #16
    Administrator timsrv's Avatar
    My Van(s):
    Lots of them
    Join Date
    Jun 2010
    Location
    SW WA ST
    Posts
    6,202
    Rep Power
    10

    Re: 1st post & already need help!!

    I'm going from memory here, and it's been a long time since I did this job. I think the strut mount nuts are 14mm. I used a box end wrench to break these loose, then spun off with my fingers, but use whatever get's the job done. The brake line nut is a 10mm (I think). Tim

  17. #17
    Forum Newbie
    My Van(s):
    92 Toyota Previa
    Join Date
    Feb 2013
    Location
    Northern CA
    Posts
    14
    Rep Power
    1

    Re: 1st post & already need help!!

    Quote Originally Posted by timsrv View Post
    I'm going from memory here, and it's been a long time since I did this job. I think the strut mount nuts are 14mm. I used a box end wrench to break these loose, then spun off with my fingers, but use whatever get's the job done. The brake line nut is a 10mm (I think). Tim
    Thanks!

  18. #18
    Forum Newbie
    My Van(s):
    92 Toyota Previa
    Join Date
    Feb 2013
    Location
    Northern CA
    Posts
    14
    Rep Power
    1

    Re: 1st post & already need help!!

    I finally did the job yesterday. timsrv, you were a great help and were spot-on with your instructions, thanks again.

    I found that the best tool for the upper strut mount nuts is a serp belt tool. My gearwrench serpentine belt tool came with a ratchet with a "pass-thru" type socket which is of a low-enough profile to reach all of the upper strut mount nuts.

    Brake line plugs would be helpful too, since you may spend a long time fussing with the rental "suicide sticks" spring compressor from autozone. After a lot of trouble, I was able to do the driver's side, but gave up on the passenger side. Pep Boys will swap the spring for you for $20/unit - and it is worth every penny. I highly advise taking the assemblies out and paying Pep Boys the $20 per assembly to do the swap for you.

    Also, a good flare wrench is a must. The brake lines on mine were pretty crusty. The Snap-On wrench that I has very thick jaws and allowed me to safely break the line loose; a cheaper flare wrench may have been a disaster.

    Lastly, the 231 ft-lbs for the strut bolts is pretty tight. My cordless impact removed and installed them with ease, but I can see many DIY-ers (with hand tools only) having some trouble here.

    Overall, the van rides and steers very nice. The KYB Excel-G struts are actually quite soft (must've been redesigned since the GR-2) and when paired with the firmer Gas-a-just shocks in the rear, make for a pretty good combination.

  19. #19
    Van Fan PrivatePrevia's Avatar
    My Van(s):
    1995 Previa LE SC
    Join Date
    Apr 2012
    Location
    Marietta Georgia
    Posts
    24
    Rep Power
    1

    Re: 1st post & already need help!!

    I found the thread 
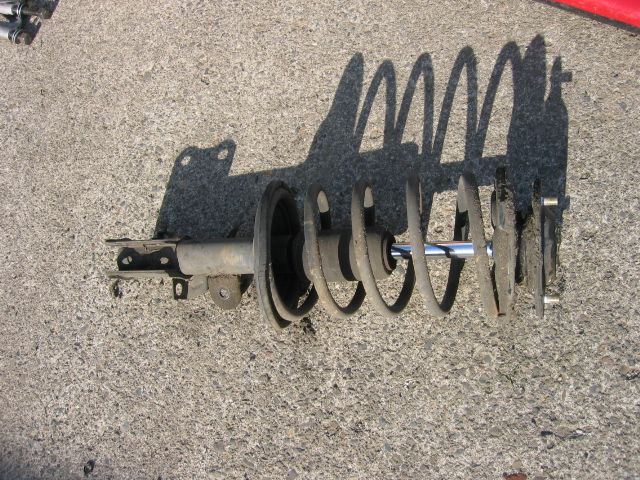
. Hoping to do this job over the weekend . I sent Tim a pm about it but if anyone else knows a good place to order the front springs please let me know. I decided if I am going to do this much work I am not going to use the old springs. Rock auto and a couple other places only seem to have the rear springs.

  20. #20
    Administrator timsrv's Avatar
    My Van(s):
    Lots of them
    Join Date
    Jun 2010
    Location
    SW WA ST
    Posts
    6,202
    Rep Power
    10

    Re: 1st post & already need help!!

    For a 95 LE S/C 2wd Previa the left front spring is Toyota Part #48131-28550 & lists for $185.14. Right front spring is #48131-28540 & lists for $178.04. Some of the on-line Toyota parts places (like www.1stToyotaParts.com) will sell them for around $130 each + shipping. Not sure who (if anybody) makes/sells aftermarket springs (I've only purchased from Toyota). Tim

Tags for this Thread

Posting Permissions

  • You may not post new threads
  • You may not post replies
  • You may not post attachments
  • You may not edit your posts
  •