Page 1 of 2 12 LastLast
Results 1 to 20 of 133

Thread: Alternator woes

Hybrid View

Previous Post Previous Post   Next Post Next Post
  1. #1
    Van Fan
    My Van(s):
    1987 4wd 5sp
    Join Date
    Mar 2011
    Location
    Oregon
    Posts
    30
    Rep Power
    1

    Alternator woes

    Hello all. Excited to make my first post on this site!

    I do believe my Alternator is done or at least really dirty and not working. I have studied up on this issue (on another site) and believe my van passes the smell test:

    power steering pump leaking
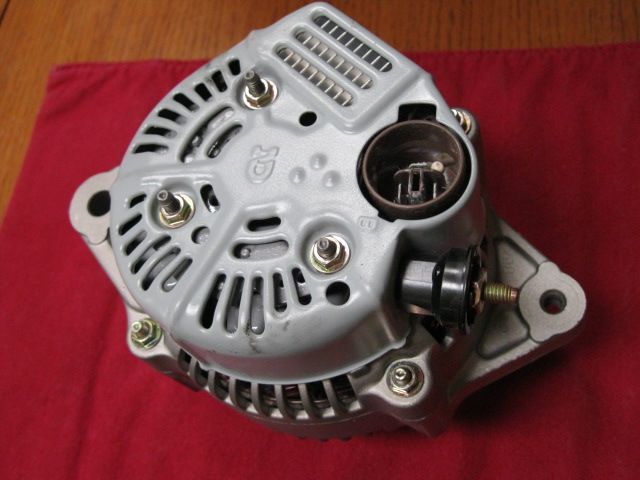
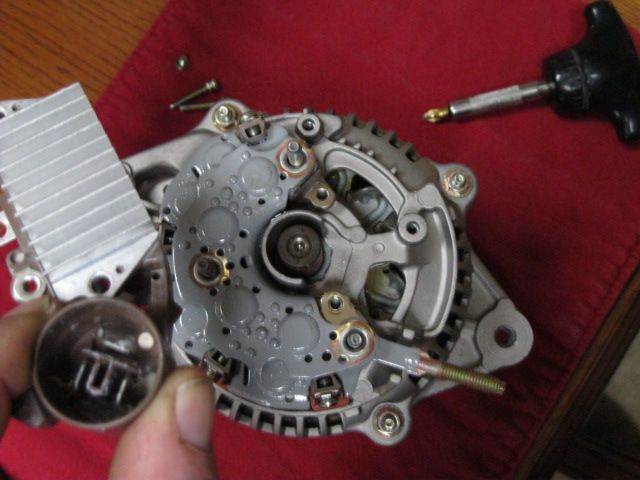
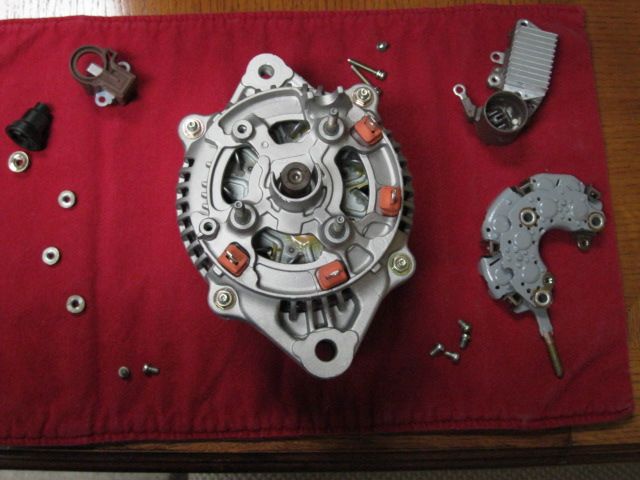
    Very dirty alternator (sand, dirt,mud)
    Believe ALT is OEM and never replaced
    Battery has charge, but cannot start engine without a jump start

    What to do now: Do I remove alternator and clean it, then test?
    Buy new or refurbished Alt (denso)? Grab one at salvage yard?
    Is it best to replace power steering pump as well, if leaking?

    I am willing to pay to get a good one. Any info will help.

  2. #2
    Administrator timsrv's Avatar
    My Van(s):
    Lots of them
    Join Date
    Jun 2010
    Location
    SW WA ST
    Posts
    6,202
    Rep Power
    10

    Re: Alternator woes

    Hello and welcome to the site! FWIW, it's okay to mention www.toyotavanpeople.com here. I assure you the censorship between them and us is a one way street. I guess what works best for you will depend on your mechanical ability, your willingness to get your hands dirty, and your resources.

    In my opinion a damaged but original alternator is better than a working rebuilt one (the exception being an alternator rebuilt by Denso). The original alternators can usually be repaired for a fraction of the cost and will typically last longer than the "lifetime" rebuilds you find at the auto parts houses. If however you need something fast and don't have the ability to repair then a rebuilt one might work better for you. If you go the rebuilt/remanufactured route, I would just pay the core charge and save your original (perhaps you could fix it later and keep it as a spare).

    I understand the challenge of repair without the correct equipment. Unless you have a bench tester all you can do is disassemble, clean, perform a visual inspection, repair/replace as required (any obvious defects), and re-assemble. Once you think you got it fixed you can take it to an auto electric business for testing on a machine. Most auto parts houses also have the bench testing machines, but finding a sales guy competent enough to run it might be a problem. Some of your more reputable places like Napa have better trained counter guys and you'd have a better chance there.

    Before I got my bench tester that's how I did it. It's hardly worth making an investment like that for a single alternator repair, so taking it in for testing is probably the way to go. I got my tester because over a 10 year period I had collected 8 failed alternators . After repairing them I sold them for $40 each, so that helped pay for the machine (it's really more of a toy for me).

    Based on what you said I'm guessing it's just your brushes that have failed and the rest of the alternator could be fine. Brushes that fail due to power steering leaks are usually pretty obvious so I'd at least take the tin cover off the case and check those before going and replacing the entire thing. Whatever you decide, by all means repair the power steering leaks before putting an alternator back in there. For information on the common power steering pump leaks CLICK HERE.

    As for alternator removal here are a couple of good threads where this is discussed:

    https://www.toyotavantech.com/forum/...or-ILLUSTRATED!

    https://www.toyotavantech.com/forum/...atively-easily....

    Once your alternator is removed inspect the harness and replace if questionable. The round harness that plugs into the back of the alternator (with 3 small wires going to it) tends to get broken wires in it. Often times the wires will look good on the outside but the conductors inside can be compromised. CLICK HERE for more information on the alternator harness.

    Once out it's fairly easy to disassemble the alternator. Here are some pictures of what you can expect to find:

    These are your alternator brushes


    These are your brushes on ATF (power steering fluid)


    Alternator brushes are Toyota Part #27370-35060 and sell for about $15 - $30 (depending on the dealer). Another thing to check (2nd most common failure) is the diode assembly. Here is a messed up one off of a remanufactured alternator:


    If you look closely you can see several of the diode stems have desoldered themselves from the assembly. This is partly due to a low temp solder the rebuilder improperly used and partly due to the alternator being overworked (owner tried to use it to recharge a dead battery). I don't have a factory Denso diode assembly handy for pictures, but those are identifiable by a gray plastic coating Denso uses to protect from moisture. Even if your diode assembly looks good it doesn't mean it is. There are several diodes here but it only takes one to fail and you're dead in the water. Sometimes diodes short. A shorted diode will allow electricity to travel both ways. An alternator with a shorted diode will often still charge okay but will also discharge when not in use. The easiest way to test for this is before you remove the alternator. Go to the little plastic "+" box (under & slightly forward of your air intake tube) & open it up.


    Being careful not to touch your tools on any other metal surfaces remove the 10mm nut from the stud. Now remove the eye terminals from the post & touch them together. If they spark or arc, then you have a shorted diode and the diode assembly will need to be replaced. Protect these wires from touching any metal surfaces & before going any further disconnect the battery! Removing the alternator with the battery still connected can be very exciting .

    Even if the diode assembly passes the above test and it looks good, it could still have an "open" diode. An open diode is one that will not conduct electricity in either direction. Testing for an open diode is easy IF at least one side of the diode is disconnected. Unfortunately since these are soldered with a high temp solder disconnecting them for testing is not an option. The only way I know how to test for this is to put the diode assembly into an otherwise good alternator and run a bench test on it. If the output voltage is low or not even there then the diode assembly is bad and should be replaced. I haven't priced diode assemblies, but frankly I wouldn't want a remanufactured one and I probably couldn't afford a new Denso one. For this reason I shop for them at the pick & pull salvage yards. It's actually pretty easy and inexpensive to find good Denso diode assemblies at the yard. Keep in mind that Denso made variations of this same alternator for many vehicles. There are many vehicles from this era that use internally identical alternators. The cases and mount configurations are often different but the internals are the same. This is good news because it gives you several vehicles to choose from. I've found several Toyotas and several Hondas (among others) to be 100% compatible (other than the cases). Just look at the connection locations on the back side and make sure the round regulator plug is a match.

    Another big advantage to this is these alternators are usually in good shape. Even if they have a bunch of miles on them they have most likely had a relatively easy life (cool environment and no ATF leaking onto them). I've pulled several apart with over 200k miles on them and found them to be original equipment and only in need of brushes. Another awesome thing is ease of removal. I always look for the transverse mounted engines that have the alternators mounted on the front side of the engine. These can be removed in just a few minutes. Most pick & pulls around here will charge $19.95 for the complete alternator, but I've found they will usually sell me the diode assembly for about $5. They will often just give them to me for free if I'm making a bigger purchase .

    Voltage regulators are the 3rd most failed component on these alternators. Here is a picture of one (left side of picture sitting on box):


    Like the diode assemblies, the only way I know to test these is by putting into an otherwise good alternator and running it on the bench tester. I've purchased these new from www.rockauto.com for around $20 on their close-out sales (Standard part#VR-405), but I actually feel a bit more comfortable with the used Denso ones from the pick & pulls. Again, they will usually charge me anywhere from $0 - $5 each.

    There are other parts inside the alternator that can fail, but these are the 3 big ones. It's been my experience that bearings, windings, etc will often go beyond 300k miles so why compromise reliability by replacing with a remanufactured unit? Here's a little video I made while playing with my alternator tester. Enjoy Tim


  3. #3
    Van Fan
    My Van(s):
    1987 4wd 5sp
    Join Date
    Mar 2011
    Location
    Oregon
    Posts
    30
    Rep Power
    1

    Re: Alternator woes

    Tim you are awesome, thank you sir!

    My alternator is out. It was my first attempt and only took about 40 minutes, some cursing and a deep breath. I followed llamavan's instructions found here: https://www.toyotavantech.com/forum/showthread.php?90-Change-your-alternator-ILLUSTRATED!&p=360#post360

    My next step is to examine brushes for potential damage. How do I pry the case open? It is really dirty, no wonder it stopped working properly!

    If I need to buy a new/refurbished one what is the model I am looking for?
    There are three sets of numbers on the alternator, two sets that include a hyphen (xx-xx) but some of the numbers on the sticker have been ripped off. The third set reads U145288.

    I will try posting pictures later.
    Last edited by momentum; 03-04-2011 at 05:36 PM.

  4. #4
    Administrator timsrv's Avatar
    My Van(s):
    Lots of them
    Join Date
    Jun 2010
    Location
    SW WA ST
    Posts
    6,202
    Rep Power
    10

    Re: Alternator woes

    No need for prying and technically speaking you won't even need to open the case. Everything you need to access is right there under the tin cover on the back side.

    Take off these 4 nuts and pull the black plastic stand-off from the stud.


    Remove the tin cover.


    Remove these two screws.


    Remove brush assembly and then remove these 3 screws.


    Remove regulator assembly.


    Remove these 4 screws.


    Remove diode assembly.


    Here is a factory Denso diode assembly. Note the gray coating as mentioned in my previous post (as far as I know, Denso is the only one that does this).


    Here is the alternator with all 3 of the common failed parts removed. It takes less than 5 minutes to remove all 3 of these components.


    As for part numbers there are so many remanufacturers of alternators out there I would guess there's dozens of part numbers for these. If you go reman just have them look it up by application. An OEM Denso rebuild is Denso part #210-0272 or #210-0115. Toyota's part number for a Denso rebuild is 27060-72171-84. In my experience the Denso rebuilds are very reliable units (as compared to other rebuilds I have used). Tim

  5. #5
    Van Fan
    My Van(s):
    1987 4wd 5sp
    Join Date
    Mar 2011
    Location
    Oregon
    Posts
    30
    Rep Power
    1

    Re: Alternator woes

    Name:  TV.dirty.ALT.jpg
Views: 5698
Size:  75.3 KB

    Perhaps this picture is an insult to TV lovers or maybe a testimonial to how resilient these machines are. Nonetheless, this is a picture of my alternator before I cleaned it. Yes, I drive in snow sand and mud. Yes, I have a power steering leak. NO, As far as I know it does not work. I will get it bench tested soon. I am trying to get this all sorted out and back on the road ASAP. Just wanted to share this picture with you.


    I have inspected the three most likely problem areas addressed above. The brushes are intact and look fine. The Diode assembly appears to have intact solder and very similar to the picture presented here. I am unsure about the Voltage Regulator, I suppose a bench test will answer this part. I will keep you updated, with the hope that this info can help expedite future people's problems and questions.
    Last edited by momentum; 03-08-2011 at 04:24 PM.

  6. #6
    Van Fan
    My Van(s):
    1987 4wd 5sp
    Join Date
    Mar 2011
    Location
    Oregon
    Posts
    30
    Rep Power
    1

    Re: Alternator woes

    UPDATE:

    After cleaning my alternator, I took it to be bench tested. Good news is it tested fine (14.7?). I also tested the battery, which is also fine. So I tried to jump the van and drive it to get a diagnostic done...

    The van will start with a jump start, but if the jumper cables are disconnected, the van immediately dies. Dash light that remain on 1) Charge Engine 2) radiator

    Now what? Am I missing something. Any help would be great...

  7. #7
    Van Enthusiast
    My Van(s):
    IG:@dialupthevan 89 - 2WD - 201k 87 - 4WD - 188K
    Join Date
    Feb 2016
    Location
    Los Angeles, California
    Posts
    136
    Rep Power
    1

    Re: Alternator woes

    Quote Originally Posted by timsrv View Post
    As for part numbers there are so many remanufacturers of alternators out there I would guess there's dozens of part numbers for these. If you go reman just have them look it up by application. An OEM Denso rebuild is Denso part #210-0272 or #210-0115. Toyota's part number for a Denso rebuild is 27060-72171-84. In my experience the Denso rebuilds are very reliable units (as compared to other rebuilds I have used). Tim
    I haven稚 been able to source a #210-0272 but I found a #210-0115, after reading that post I知 under the impression their identical units? And would this fit an 89? thanks again!
    That smells like regular! She needs premium DUDE! PREMIUM!

  8. #8
    Administrator timsrv's Avatar
    My Van(s):
    Lots of them
    Join Date
    Jun 2010
    Location
    SW WA ST
    Posts
    6,202
    Rep Power
    10

    Re: Alternator woes

    Yes, these are interchangeable. Unfortunately Denso has discontinued both, so snatch up what you can before available inventory disappears.

  9. #9
    Forum Newbie
    My Van(s):
    '87 4WD Cargo Van
    Join Date
    Jul 2015
    Location
    Louisville, Colo.
    Posts
    1
    Rep Power
    0

    Re: Alternator woes

    Quote Originally Posted by timsrv View Post
    Being careful not to touch your tools on any other metal surfaces remove the 10mm nut from the stud. Now remove the eye terminals from the post & touch them together. If they spark or arc, then you have a shorted diode and the diode assembly will need to be replaced. Protect these wires from touching any metal surfaces & before going any further disconnect the battery! Removing the alternator with the battery still connected can be very exciting .
    Does the van have to be running when you open the + box and touch the two eye terminals together or not?

  10. #10
    Administrator timsrv's Avatar
    My Van(s):
    Lots of them
    Join Date
    Jun 2010
    Location
    SW WA ST
    Posts
    6,202
    Rep Power
    10

    Re: Alternator woes

    Quote Originally Posted by Harv's Go Go Van View Post
    Does the van have to be running when you open the + box and touch the two eye terminals together or not?
    No, the van should be off. If the diodes in the alternator are good, they will not allow current to pass, so no spark. If you have a shorted diode, the alternator will draw power (about 5 amps or so) this load will cause a spark or an arc when you make/break the connection.

  11. #11
    Van Fan Danny's Avatar
    My Van(s):
    1987 Toyota 4WD Automatic Vanwagon - "The Pale Blue Dot" 1990 JDM Toyota HiAce 4wd Automatic Diesel w/ a DIY camper conversion
    Join Date
    Jan 2015
    Location
    Portland, OR
    Posts
    42
    Rep Power
    1

    Re: Alternator woes

    Thanks for all the helpful info Tim. I was able to remove the alternator and replace the brushes in less than an hour thanks to this thread.

  12. #12
    Administrator timsrv's Avatar
    My Van(s):
    Lots of them
    Join Date
    Jun 2010
    Location
    SW WA ST
    Posts
    6,202
    Rep Power
    10

    Re: Alternator woes


  13. 08-29-2016, 04:16 PM


  14. #14
    Van Fan
    My Van(s):
    1988 4WD LE
    Join Date
    May 2014
    Location
    California
    Posts
    74
    Rep Power
    1

    Couple of alternator questions

    Hi, all,

    The current alternator in my '88 4WD Van is an AC Delco, installed in 2015 when my original Denso unit finally quit (after replacing seals in the PS pump so it didn't drip any more, and cleaning the alternator and replacing the brushes). It has started to whistle lately, and while it's still putting out 14.3V+ I don't know how much longer it will last, and I'd like to rebuild my Denso to replace it. The brushes in the Denso are still fine, but I think the diode may be bad and I'd like to buy a new Denso diode block to put in it. I've read many of the alternator threads that mention the diodes but other than the recommendation to pick them up at the pick-and-pull I haven't found a part number or source for a new Denso diode block.

    Is it possible to buy a new Denso diode block?

    I'd be interested in any insights as to the cause of the whistle. I've read in other places that it can indicate the alternator is working too hard. The battery is fairly new (within the last two years) and the whistle is there even when the battery has been fully charged with an AC charger. It goes up in pitch as the RPM goes up, not in a narrow range of RPM like a resonant vibration frequency.

    One thing that started about the same time as the whistle was that the charge light came on. It now only comes on when the van is idling just after a start from cold, and it goes off once the engine is revved above about 1000 rpm the first time. Looking at battery voltage at the same time, when the charge light is on right after the cold start the voltage at the battery terminals is 12.0-12.3 or so, when revved the voltage goes up, eventually reaching 14.3V+, and dropping back into the 13s when allowed to go back to idle.

    Thanks,
    John

  15. #15
    Van Enthusiast bushcat's Avatar
    My Van(s):
    '85 Toyota 2WD Cargo Van 5 Speed ------------------ '89 Toyota 4WD LE Auto 覧覧覧覧
    Join Date
    Dec 2017
    Location
    Benicia, CA
    Posts
    110
    Rep Power
    1

    Angry Re: Alternator woes

    I have a 1987 Toyota Van 2WD.

    Washed the engine, was stupid, got the alternator wet. Battery drained overnight. Charged it, started it and had the christmas lights. Started to make noise on the road. Lights would disappear when engine had higher RPMs but when idle the lights would come back on. Pulled the alternator and there seem to be some standing water in it.

    Went on rockauto and ordered a replacement, a powerselect 14679N. The one with a heart next to it and the most expensive. I took the old one out and went to replace it with the new one and it wouldn't fit. I pulled it out and it's around a .5mm wider than the old one. I can't push that bearing that's on the bracket in any further, it's pretty much flush and won't budge.

    Did I order the wrong part? How can I make this work? Should I try reinstalling the old alternator and see if draining the water fixed the issue? It's dirty as heck, is there a way to clean it?

    Last edited by bushcat; 11-10-2018 at 12:34 PM.

  16. #16
    Administrator timsrv's Avatar
    My Van(s):
    Lots of them
    Join Date
    Jun 2010
    Location
    SW WA ST
    Posts
    6,202
    Rep Power
    10

    Re: Alternator woes

    bushcat, replacement recommendations were given at the bottom of post #4 of this thread. I can't speak from experience on the brand you chose, but as stated many times in this thread I would only trust a genuine Denso new or rebuilt (actually rebuilt by Denso) alternator. I did a quick internet search using the part numbers at the end of post #4 and came up with several hits. Here's a good one (although they have a $30 core charge): https://www.summitracing.com/parts/d...waAhHPEALw_wcB.

    If it's the right alternator, then it should fit.........although you may need to adjust the sliding bushing discussed in post #19 of this thread. If I had one that was otherwise identical but wouldn't quite fit into the lower bracket, I might be tempted to remove some material from that part of the alternator with a grinder equipped with a course sanding disc.

    Regarding cleaning your old one, if you're going to rework it anyhow, then just use a some solvent and/or some de-greaser, then hit it with a pressure washer. FWIW, I never worry too much about occasionally getting water in the alternator, it's continuous exposure to oil and other similar liquids that take their toll.

    Jbbishop2, Very sorry I missed your post (not sure what happened). I'm sure if you were ordering several hundred of these you could find multiple suppliers. Unfortunately these are not normally sold in small quantities to end consumers, so it would likely be hard to find. I've tried unsuccessfully in the past, but haven't tried lately. I've always just gone to junk yards and removed them from other similar alternators. The van is particularly hard on these Denso alternators, but they hold up pretty well in other applications, so I go for the ones in Camry's or other similar vehicles of the same era (easier to remove as well).

  17. #17
    Van Enthusiast bushcat's Avatar
    My Van(s):
    '85 Toyota 2WD Cargo Van 5 Speed ------------------ '89 Toyota 4WD LE Auto 覧覧覧覧
    Join Date
    Dec 2017
    Location
    Benicia, CA
    Posts
    110
    Rep Power
    1

    Re: Alternator woes

    Hi Tim,
    After reading into a few other posts. I saw the Denso part number of 210-0272. I have an 87 van but read in another post they should work fine. I could only find it offered through Summit as well. I saw the 30 dollar core charge which after shipping back my old one, I should be able to get half of that back. I took off the dust cap of the old one and it doesn't look like an OEM or denso one. It doesnt have that protective plastic on it. I think what I'm going to do is send the one that didn't fit back to rockauto and order this one from Summit. Thanks for your response and I'll update when I receive the new one.

  18. #18
    Van Enthusiast bushcat's Avatar
    My Van(s):
    '85 Toyota 2WD Cargo Van 5 Speed ------------------ '89 Toyota 4WD LE Auto 覧覧覧覧
    Join Date
    Dec 2017
    Location
    Benicia, CA
    Posts
    110
    Rep Power
    1

    Re: Alternator woes

    So, just to add a note. The most expensive part is not always the best part. That's what I'm learning. The powerselect definitely didn't fit correctly and the Denso fit perfectly. I would recommend others not buy the powerselect alternator as a replacement unless they want to make some modifications.

  19. #19
    Van Enthusiast
    My Van(s):
    '88 4x4 5 speed manual
    Join Date
    Dec 2018
    Location
    ME
    Posts
    148
    Rep Power
    1

    Alternator Junction Box (NOT ground)

    Noticed some significant fraying in this cable which led to the alternator. (exhibit A below)
    Disconnected battery.
    loosened the nut to replace cable and the whole bolt assembly popped away from the plastic (Exhibit B/C below)

    Assume this is just an insulated junction box (and NOT a ground) since the bolt the wires connect to lays in the plastic bed and does not seem to have any connection to the body/big nut other than the plastic insulator ????

    Can I just secure the nut back into the plastic (using RTV?) and triple wrap the whole thing in electrical tape until I can find a replacement box - or am I missing something in this setup?


    ***have also read the "Alternator Woes" thread several times for clues (exhibit 4)
    Attached Images Attached Images     
    Last edited by cpginkpt; 04-07-2019 at 04:09 PM.

  20. #20
    Van Obsessed
    My Van(s):
    88 4WD DLX 5spd
    Join Date
    Oct 2010
    Location
    Ontario, Canada
    Posts
    1,073
    Rep Power
    1

    Re: Alternator woes

    I replaced mine with new from dealer a couple of years back, not sure if they're still available but given its role in life, I didn't even think about the cost.

    You could probably rig something, even just as a temporary measure but you want to make sure it is well insulated and secured.

    Its never good to have full battery/alt power flailing around looking for something to short against.

Tags for this Thread

Posting Permissions

  • You may not post new threads
  • You may not post replies
  • You may not post attachments
  • You may not edit your posts
  •