Page 1 of 3 123 LastLast
Results 1 to 20 of 56

Thread: Replacing a Previa head gasket.

  1. #1
    Administrator timsrv's Avatar
    My Van(s):
    Lots of them
    Join Date
    Jun 2010
    Location
    SW WA ST
    Posts
    6,202
    Rep Power
    10

    Replacing a Previa head gasket.

    This is a copy/paste of a thread I posted on TVP a few years ago. Enjoy .

    Okay, so you've got a Toyota Previa with a blown head gasket. No big deal, right? Head gaskets aren't that bad, right? Well, that's what I thought too. I used to work as a flat rate mechanic for Toyota and if I can do a 22R head gasket in under 2 hrs, then I could certainly do a 2TZ head gasket in under 6, right? Wrong!


    It wasn't unit I removed this access panel that I realized it's not going to be so easy. As you can see by this picture, it could almost be possible. Yeah, the access hole would need a little enlarging on the back side, but what about the intake manifold? This thing is huge and spans across the entire top of the engine. Just how the heck is this coming off? Plasma cutter? Well, I'm not that brave, so Darn it, I had to settle for option #2 (pulling the engine). My original goal was to do the job in under 6 hrs. Well forget that. After 8 hrs, here's what I was able to do.


    I got to finally use my Harbor Freight extra large jack stands on the tallest setting!


    The next few pix are taken after dropping the engine out from the bottom using a floor jack and a makeshift 2x10 wood support. The engine was cleaned with solvent and then pressure washed.


    Although a pain to work on, I couldn't help be impressed by the design of this power train. Look at how thin this thing is.


    I had hoped to keep it simple and leave the cams installed. Unfortunately they block access to the head bolts and must be removed before taking off the head.


    After removing the cams, the valve shim assy's must be removed or they will fall out while handling the head. It is very very important to keep these in order. Unless you plan on re-shimming and replacing, they must be reinstalled in the exact location they were taken from. I used a piece of cardboard to keep them in the correct order.


    Well, looks like the diagnostic was correct. A blown head gasket is definitely the problem here. #1 was unintentionally steam cleaned by vaporizing coolant!


    Here is a close-up of the trouble spot. You can see a definite path between the water jacket and the cylinder.


    #3 wasn't much better. It hadn't blown completely yet, but was well on it's way. I believe this was a result of #1 blowing and over pressurizing the cooling system. Notice how the gasket material is pushed toward the cylinder instead of away from it.


    Here's a view of the underside of the head


    A close-up of the trouble spot


    Close-ups of the removed gasket


    New gasket has more metal in it. The new design probably wouldn't have helped much against the type of failure I had. It would however protect against blowing of the gasket between the water jacket and the exterior of the engine.


    For clean-up and prepping of metal surfaces, I use a 2" angled die grinder with scotch brite surface conditioning pads. I prefer this color for head gaskets.


    Grinding should done carefully in patterns parallel to the outside diameter of the cylinders. This type of conditioning pad will allow controlled removal of gasket material without damaging metal surfaces. It will however leave small microscopic grooves in the metal. This is good and will aid in bonding of the new gasket (gives it something to bite into). The reason for keeping patterns parallel to cylinders is done so we don't leave grooves that may promote future leaks. In other words, each parallel groove is like a road block, where-as perpendicular grooves may serve as a potential path. After all old gasket material is removed, both mating surfaces are wiped down several times with lacquer thinner. I typically use a clean paper towel each time I wipe it down, and continue wiping until the paper towel remains clean. This is to ensure no oil or other contamination will prevent a good bonding of the new gasket.


    Engine is re-assembled and prepped for re-installation.


    Due to the age and worth of the vehicle, I took a few short cuts. I purchased this Previa for $150 and it has 187k miles on it. If this had been a nicer vehicle, I probably would have had the head shaved, re-shimmed the valves, and checked a variety of other things. Sure, I'm rolling the dice a little bit, but feel confident this will be a lasting repair. With any luck this head gasket should outlast the rest of the vehicle.
    If it's not raining tomorrow, I'll stuff it back in and let you know how she runs. Tim

  2. #2
    Administrator timsrv's Avatar
    My Van(s):
    Lots of them
    Join Date
    Jun 2010
    Location
    SW WA ST
    Posts
    6,202
    Rep Power
    10

    Re: Replacing a Previa head gasket.

    I got it finished & it runs okay, but something doesn't seem quite right. It idles a little slow and rough, & when I set the timing, I had to rotate the distributor all the way to the stop to get it set. I'm not sure, but judging from this, I think I might have got the exhaust cam one tooth off. I didn't feel like messing with it anymore today, so I hung it up for the night. The motor was too hot anyhow & I'm tired. I'll check it out in the next few days and let you know how it goes. At least I have good access to the cams through the passenger side access hole, so it shouldn't be so bad.

    As far as time, I'll definitely make flat rate. I spent about 7 hrs on it today, so that's only about 15 hrs so far. In addition to the head gasket, I also replaced the heater motor, changed oil, serviced the tranny, replaced belts, changed the differential gear oil, flushed the cooling system and performed several other small maintenance items. I didn't put the passenger side panel back on yet, so I should be able to reposition that cam in under an hr.

    Here are a couple of pix I took of it going back in. Tim


  3. #3
    Administrator timsrv's Avatar
    My Van(s):
    Lots of them
    Join Date
    Jun 2010
    Location
    SW WA ST
    Posts
    6,202
    Rep Power
    10

    Re: Replacing a Previa head gasket.

    Well, that's what it was. I pulled the valve cover back off after work today and sure enough, I somehow managed to get the exhaust cam 1 tooth off. I repositioned it to the correct location and now she purs like a kitten. I set the timing by ear, then checked it with the timing light (it was dead on ). Now all I have left to do is adjust the side sliding door and put the new seat covers on. I can't believe I'm actually starting to run out of things to fix on this van! Tim

  4. #4
    Van Fan Previa dude's Avatar
    My Van(s):
    1991 Toyota Previa le dual sunroof model jdm engine and light conversion , 1995 Toyota Previa le supercharged dual sunroof model jdm light conversion
    Join Date
    Sep 2012
    Location
    Sacramento Ca,
    Posts
    62
    Rep Power
    1

    Re: Replacing a Previa head gasket.

    Do you have to pull the engine to do the gasket. The reason I ask is I have to do it on my 91. I have done headgaskets before but never on a Toyota, let along an mid engine Toyota with twin cams. I guess what I am asking is, is it harder to pull the engine to do the gasket, or just a nightmare to try and do it while the engine is in the van? Also the cams on that van have two alignment marks on them. How do I know witch ones to use when putting it all back together to make sure when I turn it over for the first time that I don't throw a valve threw a piston?

  5. #5
    Administrator timsrv's Avatar
    My Van(s):
    Lots of them
    Join Date
    Jun 2010
    Location
    SW WA ST
    Posts
    6,202
    Rep Power
    10

    Re: Replacing a Previa head gasket.

    There's a guy over on the yahoo Previa group that made a nice write-up on doing the job with the engine "sort of installed". I attached a PDF of his procedure to this post. I say "sort of installed" because you nearly need to remove the engine to get the access you need. IMHO, if you go to that much trouble you're almost there. Get the thing out in the open where you can have ample access to do the job without complications. There will likely be other things that need attention and then there's gasket clean-up etc. Of course I'm a bit lazy and would rather be sitting in a chair in my garage working on the engine than bent over hanging through an access hole. Having room to swing tools without restriction is worth mentioning too. When it comes right down to it I believe the time you save by avoiding complete removal will be lost by the limited access.

    Of course this is all talk based on assumptions (as I never seriously considered doing the job without complete removal). If you're not sure then start doing it his way (everything he outlines has to be done regardless of which way you choose). When you get to the part of removing the intake re-assess the situation and make your final decision then. Tim
    Attached Files Attached Files

  6. #6
    Van Fan Previa dude's Avatar
    My Van(s):
    1991 Toyota Previa le dual sunroof model jdm engine and light conversion , 1995 Toyota Previa le supercharged dual sunroof model jdm light conversion
    Join Date
    Sep 2012
    Location
    Sacramento Ca,
    Posts
    62
    Rep Power
    1

    Re: Replacing a Previa head gasket.

    Thank you Tim. That was good advise, and I will do just that. One more question though sir. when i reinstall the cam shafts what would be the best way to ensure proper alignment. I am unsure of witch marks to follow to make sure everything will be in time. Just curious as to how you did it. if you knowof another thread on the matter and any futher advise would be greatly apprecated.

  7. #7
    Administrator timsrv's Avatar
    My Van(s):
    Lots of them
    Join Date
    Jun 2010
    Location
    SW WA ST
    Posts
    6,202
    Rep Power
    10

    Re: Replacing a Previa head gasket.

    Do you have a factory service manual? If not I would highly recommend getting one before tackling a job like this. There is a procedure for this outlined in the manual. My manual is packed away but here's my best shot from memory. Basically you set the engine at TDC and set the intake cam to the chain (there's a lighter colored chain link that aligns with a mark on the cam sprocket). The exhaust cam gear has a marked tooth that aligns with a mark on the intake cam gear. Tim

  8. #8
    Van Fan Previa dude's Avatar
    My Van(s):
    1991 Toyota Previa le dual sunroof model jdm engine and light conversion , 1995 Toyota Previa le supercharged dual sunroof model jdm light conversion
    Join Date
    Sep 2012
    Location
    Sacramento Ca,
    Posts
    62
    Rep Power
    1

    Re: Replacing a Previa head gasket.

    i ordered one on line and i am just waiting for it to arrive. i know from what i read on the web it sounds like a pain in da butt. i was just woundering of any tricks you may have to tackle it a little bit easier.

  9. #9
    Administrator timsrv's Avatar
    My Van(s):
    Lots of them
    Join Date
    Jun 2010
    Location
    SW WA ST
    Posts
    6,202
    Rep Power
    10

    Re: Replacing a Previa head gasket.

    I would wire-tie the sprocket to the chain so there's no chance of it moving from it's original location. Then when you separate the intake cam from the sprocket leave it sitting in the chain guides. On assembly, another thing worth mentioning is the chain tensioner. The tensioner has a lock feature that only allows it to extend. It should only extend when there's oil pressure, so it probably won't move, but just to be safe I would release the lock and push it back to it's retracted position. This can be a bit tricky if you're not removing the timing cover, but it can be done with a screwdriver and a little patience.

    If I were to do this job again, due to the access issues & other reasons, I'd probably replace the timing set at the same time. I'd definitely go with a genuine Toyota "valve grind gasket kit", but I might go aftermarket on the timing set (depending on price comparison & "perceived" quality). I purchased a timing set from this guy on eBay a few years ago and it seemed to be all high quality components. Here's a link: http://www.ebay.com/itm/90-95-TOYOTA...item53deb67777

  10. #10
    Van Fan Previa dude's Avatar
    My Van(s):
    1991 Toyota Previa le dual sunroof model jdm engine and light conversion , 1995 Toyota Previa le supercharged dual sunroof model jdm light conversion
    Join Date
    Sep 2012
    Location
    Sacramento Ca,
    Posts
    62
    Rep Power
    1

    Re: Replacing a Previa head gasket.

    thank you Tim. good advise like always

  11. #11
    Van Fan Previa dude's Avatar
    My Van(s):
    1991 Toyota Previa le dual sunroof model jdm engine and light conversion , 1995 Toyota Previa le supercharged dual sunroof model jdm light conversion
    Join Date
    Sep 2012
    Location
    Sacramento Ca,
    Posts
    62
    Rep Power
    1

    Re: Replacing a Previa head gasket.

    hey there Tim, i pulled the head out in just under four hours using the link you post. i read you didnt send your head out for service. i have always sent them out for service, and was wondering if i should just clean it myself and put it back in like you did. or should i just send it out like i would normally do. please advise.

  12. #12
    Administrator timsrv's Avatar
    My Van(s):
    Lots of them
    Join Date
    Jun 2010
    Location
    SW WA ST
    Posts
    6,202
    Rep Power
    10

    Re: Replacing a Previa head gasket.

    If everything looks fine when you get the head off, and assuming you can see an obvious flaw in the head gasket, then you might take a chance and just simply replace the gasket. Regardless of how far you go, gasket surface clean-up and prep is critical. Take steps to avoid introducing grit or foreign material inside your engine. After you're done scraping the mating surfaces use a strong solvent like lacquer thinner or carb cleaner to wipe these down. Before final assembly it's a good idea to use brake-clean for the final cleaning (as it won't leave any residue). If you decide to "chance it" you should take the time to check a couple of things before proceeding. You can do a poor man's valve seal inspection by turning the head upside down and filling the chambers with carb cleaner or brake clean. If there is a warped valve or one with a damaged seal surface the cleaning liquid will leak out of the chamber. Sometimes you will get cracks (usually next to valve seats) and if bad enough the fluid will leak through there. If you have a crack, IMO the head is toast. If your test fluid leaks through a valve, if it leaks a lot you'll need to take the head in for repairs. If it leaks a little, then you could probably get by with lapping the valves by hand. If you decide to lap by hand you will need a valve spring removal tool. These can be rented at most of the big auto parts stores or you could purchase one for around $50 or so. If you remove the valves, be sure to keep track of where each one goes as you will want to put them back into the original holes. Removing the valves will also allow you to clean them and inspect the valve guides. You will also be able to replace the valve seals (can't be done with the springs installed). You can check the guides by trying to wiggle the valves side to side in the guides. If you find one with excessive side play then the head will need to go in for repairs. Any time a head is off it should also be checked with a straight-edge. Assuming you have one available to you, it should be laid lengthwise on each side then diagonally (both ways) on the gasket surface. Each time it's in position feeler gauges are used to determine if the head is warped.

    One final thing to consider is head-bolts. I've always re-used the old head bolts, but I've heard of others having trouble doing so (bolts broke during final torque). Perhaps they over-torqued or just weren't smart enough to know how to use a torque wrench, but this is a commonly debated subject. Its something each mechanic should consider and many choose to purchase all new head bolts. Always lube the threads and contact areas of the head bolts (under the heads) with engine oil and follow correct torque values/tightening sequences outlined in the service manual. Tim

  13. #13
    Van Fan Previa dude's Avatar
    My Van(s):
    1991 Toyota Previa le dual sunroof model jdm engine and light conversion , 1995 Toyota Previa le supercharged dual sunroof model jdm light conversion
    Join Date
    Sep 2012
    Location
    Sacramento Ca,
    Posts
    62
    Rep Power
    1

    Re: Replacing a Previa head gasket.

    Hey there Tim. One question for you. How's the head gasket holding up? I was thinking of getting the dealer gasket. Or would that just be a waste of money?

  14. #14
    Administrator timsrv's Avatar
    My Van(s):
    Lots of them
    Join Date
    Jun 2010
    Location
    SW WA ST
    Posts
    6,202
    Rep Power
    10

    Re: Replacing a Previa head gasket.

    I sold that van but last I heard it was doing good. I see it around from time to time. I would definitely spend the extra money and go with the Toyota head gasket. Toyota sells a "valve grind gasket kit" that comes with all the gaskets & seals you will need to complete the job. Tim

  15. #15
    Van Fan Previa dude's Avatar
    My Van(s):
    1991 Toyota Previa le dual sunroof model jdm engine and light conversion , 1995 Toyota Previa le supercharged dual sunroof model jdm light conversion
    Join Date
    Sep 2012
    Location
    Sacramento Ca,
    Posts
    62
    Rep Power
    1

    Re: Replacing a Previa head gasket.

    hey there Tim. i got bad new today from the machine shop. the head has a crack in it on the number 3 cylinder next to an exhaust valve. so i guess i need a new head. are all the heads the same for the n/a 2.4liter previa's ? i was just going to pull a good head at the pick and pull and they have a few different years out there.

  16. #16
    Administrator timsrv's Avatar
    My Van(s):
    Lots of them
    Join Date
    Jun 2010
    Location
    SW WA ST
    Posts
    6,202
    Rep Power
    10

    Re: Replacing a Previa head gasket.

    Here's a quote from a similar thread:

    Quote Originally Posted by timsrv View Post
    There were only 2 heads made for all years of the Previa and as far as I know they are both interchangeable. Even the SC (Super Charged) and NA (Naturally Aspirated) Previas all years use the same casting. The difference between the two heads only affects some of the Previas that were originally sold in California. Other than the "California Spec" head (which I actually think is more common) they should be the same. Even then I believe they can be interchanged, but I'm a little fuzzy on what (if any) things that may (or may not) affect. Good luck. Hopefully somebody with more knowledge with chime in here.

    PS: If you can get me the VIN numbers for both Previas (yours & the donor) I can tell you for sure if they are a match. Tim
    If you end up using a head from an SC on a NA (or visa versa) you'll need to make sure and use your original camshafts. SC & NA are ground differently.

  17. #17
    Van Fan Previa dude's Avatar
    My Van(s):
    1991 Toyota Previa le dual sunroof model jdm engine and light conversion , 1995 Toyota Previa le supercharged dual sunroof model jdm light conversion
    Join Date
    Sep 2012
    Location
    Sacramento Ca,
    Posts
    62
    Rep Power
    1

    Re: Replacing a Previa head gasket.

    hey there Tim, just wanted to give you an update. i found a good head out at a junk yard, and its at tye machine shop now. the leak check i did at the yard showed the exhaust valves were leaking. common problem i heard with these heads. the guy at the shop said i should do a valve job on it. witch sounds right, right? the price is a bit more then what i wanted to spend (345 dollars witch includes a valve adjustment) on the van but then again the van was free.

    So with that being said, is the investment worth the return on the miles i should expect to see. the van has 209000 miles on it( including the bottom half of the engine). i am hoping to get at least another 150000 out of her berfore i have change the hole engine. the automatic transmission is working great so hopfully i should not have any worries there for a long time.

  18. #18
    Administrator timsrv's Avatar
    My Van(s):
    Lots of them
    Join Date
    Jun 2010
    Location
    SW WA ST
    Posts
    6,202
    Rep Power
    10

    Re: Replacing a Previa head gasket.

    If the valves are leaking then it needs attention. As far as "adjustment", unless you are supplying him with the complete head (cams and shims included), he is talking about compensating for what he removes from the valves and valve seats by removing material from the stems. This "adjustment" is approximate and by no means a substitute for final adjustment. If the head is getting machine work, then it will need a final valve adjustment. For best results, this final valve adjustment should be performed AFTER the head is installed, torqued, and cams/old shims are installed. Of course I've never tried to do this with the head on the bench, so I can't say for sure if installing/torquing the head will throw it off . Personally I'd wait until the head is installed (more potential variables removed).

    To check valve lash, the engine should be stone cold and positioned to TDC. Feeler gauges are then used between the cam lobes and the shims to gauge clearance (you can only check half). After measuring and recording, rotate the engine 360 deg and repeat on the other half. Intake valves should have .006 - .010 in clearance, and exhaust valves should be .010 - .014.

    If lash is off (and I'm betting it will be), you will need to adjust. To adjust, remove each shim and use a micrometer to see how thick it is. Then based on your initial measurements, you will need to add or subtract to determine the new shim size. Example: If you measured .018 in. on an exhaust valve, (.006 in. larger than the desired .012 in.), you would take the existing shim thickness (say .114 in.), add the .006 to it, buy a new shim (.120 in.) from Toyota, and install it in place of the old. If the "new" head came with shims, you could possibly mix & match shims to find the sizes you need.

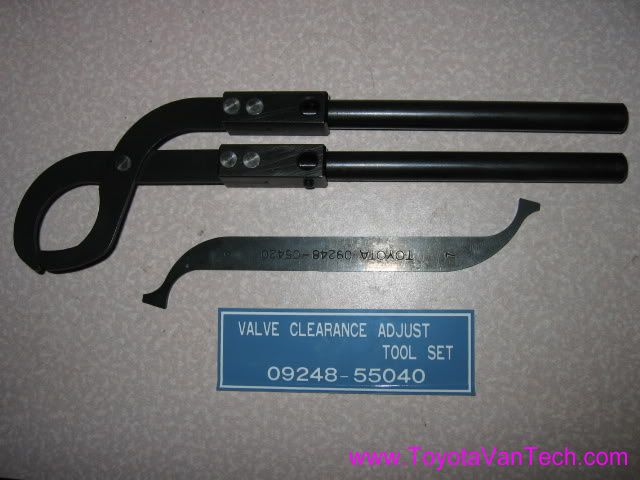
    There is a special tool to remove shims and reinstall. It's Toyota Part number SST 09248-55040 and it's available through Kent-Moore tools at 800-345-2233. Price is about $75. Tim


    PS: I strongly recommend reading that section of the service manual before & during the final valve shimming. Good luck.

    Edit/Update 3/25/16: I've learned the Kent-Moore tool (above) is up to $120 now. Here's a cheapy that will likely do the job just fine: http://www.coastaltoolsupply.com/product/SLY-88250.html. If anybody tries this, please reply to this thread as to how it performs.

  19. #19
    Van Fan Previa dude's Avatar
    My Van(s):
    1991 Toyota Previa le dual sunroof model jdm engine and light conversion , 1995 Toyota Previa le supercharged dual sunroof model jdm light conversion
    Join Date
    Sep 2012
    Location
    Sacramento Ca,
    Posts
    62
    Rep Power
    1

    Re: Replacing a Previa head gasket.

    thank you Tim. I will do just that. you haven't steered me wrong yet.

  20. #20
    Van Fan
    My Van(s):
    93 previa
    Join Date
    May 2013
    Location
    sandpoint idaho
    Posts
    46
    Rep Power
    1

    Re: Replacing a Previa head gasket.

    When I pulled my head off 93 AWD Previa ( engine not removed) the shim I made to hold the chain and sprocket in place came off and the sprocket with it. Any tips on lining everything up. it's close to number 1 at TDC. Both cams have a locating pin placement I think is pretty much at 9 oclock or directly facing you .
    thanks in advance!
    Donny

Tags for this Thread

Posting Permissions

  • You may not post new threads
  • You may not post replies
  • You may not post attachments
  • You may not edit your posts
  •