
Originally Posted by whatvan
 Note: There are only 2 bolts holding that mount to the block, so if you need to "adjust it" it's not that big of deal to remove, adjust, then put it back on. Tim


Note: There are only 2 bolts holding that mount to the block, so if you need to "adjust it" it's not that big of deal to remove, adjust, then put it back on. Tim

I was writing my response at the same time as Tim, but I did want to say that sometimes, even with these bushings all the way cranked in, these alternators still may not fit.
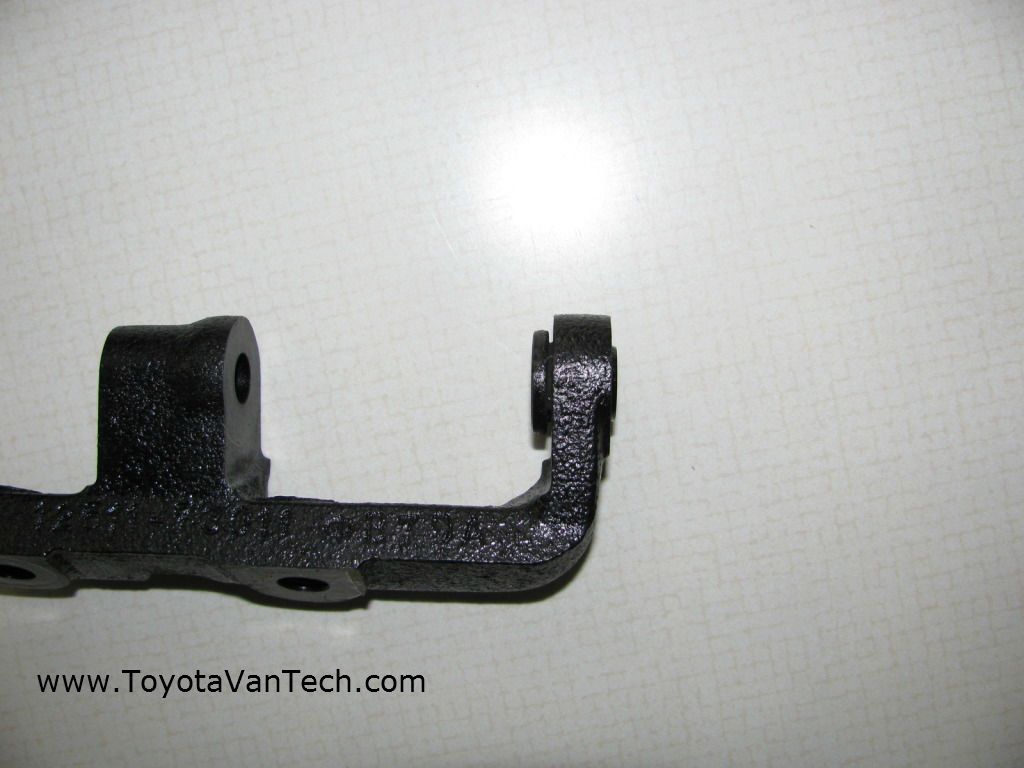
This has been an issue a few of us here (myself included) have ran into with replacement alternators. It's discussed here, but basically if you've been wrestling with this for a couple of hours and it's not falling into the bracket, then it's not going to without a little help. The way I figure, there are 3 ways to get the replacement alternator in. Take a grinder to the new alternator, take a grinder to the metal bushing inside the bracket (I doubt this is even possible without removing said bushing), or simply remove said bushing and replace with a washer.
I personally opted for option 3 and removed the metal bushing inside the alternator bracket as that was the piece holding up the whole job. This was a pain as the bushing is pressed into the bracket. If I remember correctly, I had to use a c-clamp, and a series of sockets and washers to make it work, but it eventually came out. The idea is put a large socket (inner-diameter of the socket has to be bigger than the outer diameter of the bushing) on the "exit" side of the bushing (the side the bushing will be pushed out), and a small socket (smaller than the outer diameter of the bushing) on the "push" side of the bushing. Then you hook a c-clamp up to it and press it out. The end result will be an alternator that easily fits in the bracket. You'll want to put a washer on the side of the bracket where the bushing used to be (much easier than dealing with the bushing) to make sure that alternator goes back on tight.
With all that being said, it's way easier to just take a grinder to the new alternator and call it a day. I did it this way because knowing these vans, I'll have to do this job again sooner than I'd like and this will make future alternator jobs much easier.
EDIT: I didn't realize you could simply remove the bracket from the block, I was worried of borking something up so I did all the above with the bracket still in the van. I imagine removing this bushing is much easier with the whole bracket out of the van. Good luck!
Last edited by AD2101; 10-02-2017 at 12:42 AM.
I went with Tim's strategy of removing the lower mount and adjusting the bushing. After that everything went back together easy peasy. Or as easily as can be hoped for considering...
I know it's a rebuild, but I was a little disappointed in the general construction of the AC Delco alternator (no comment on performance). I had to drill out the hole in the alt. housing for the lower mounting bolt as the two halves (of the housing) didn't line up precisely enough for it to fit through. Always sketched altering parts I just purchased. Just some info for future alternator purchasers to consider.
Thanks for everyone's quick responses and these amazing "how to" threads. Just took her out for a quick test drive and she made it back. Now for some road trips until the next thing goes.
I understand about money being short, but I've also learned you get what you pay for. I hope it lasts. For an extra ~$40 you could have had a genuine Densohttps://www.sparkplugs.com/SearchRes...kw=%23210-0272. At least it's in there & glad we could help. Tim
I ordered a Bosch alternator off RockAuto and it was just EVER so SLIGHTLY wider on the lower mounting bracket as well. I had to lift the van to get some elbow leverage and used a hammer and just smacked the hell out of it... I'm talking, no holds barred, hard as you can go hammering
i finally got it lined up so the bolt could slide through. i think next time ill just take the angle grinder to it and shave it down a hair
I have changed or pulled alternators on 2 wd vans many times and always from underneath . Trying to pull it from above on the 4wd. Oriented as the picture shows and got it stuck good. Went back and looked at the pics closer and realized a line going into the side of the power steering pump on my van is configured differently than in the pictures and blocks the exit hole unlike in the pics of this thread.
Going to try turning the baby around tonight as mentioned in the alernative method. Crossing my fingers.
Because of the configuration of the power steering line blocking the exit hole on my 4wd i am not getting my alternator out without further removal of either the power steering line in the way or possibly removal of the pulley on the power steering pump. Going to try that next. Anyone have any other suggestions?
Pictures would help better visualize what's different about your van but on 4x4 ones I have to pull the alternator from the top as well. Don't get me wrong, it's a real pain to get out, and at some point I always say to myself "there's no way this is going to come out," but it eventually does.
If the configuration of your van is different, then this guide won't be completely applicable to you and you'll have to make changes as necessary. Pulling the power steering pulley would likely be less messy if you have to start tearing out more parts.
I will try to get a pic up but it differs mucho than Gwen's pic of the line going into the drivers side of the power steering pump. Mine takes a different route and crowds the exit room more. Thanks for the input , i will give it one more try before I pull the pulley.
I'm currently trying to replace my alternator and I have all the bolts removed except for the bottom 14mm pivot bolt. Am I understanding correctly that this bolt is not threaded, it just pushes through? I have removed the nut on the backside but cannot remove the bolt it just turn and turns. If it is just supposed to push out any tricks for doing this? Thanks
Actually, if memory serves me I had to lefty loosey mine to get it out. Not threaded necessarily, but it helped.
Take a small rubber mallet and tap it out if you can finagle one down in there.

I just removed one from the junk van and I remember having to put a wrench on the other side of that bolt cause it kept spinning forever!!
Maybe yours is doing the same thing?
JDM
Thread the nut back on until it is flush with the end of the bolt.
Now it is safe to use a hammer to persuade it out.
When the nut is against the bracket, lose the hammer and spin the nut off.
It should be far enough forward that you can get a wrench (10-12mm) in behind the head and carefully lever it forward, turning the bolt at the same time can help, as can penetrating oil.
I spent a solid 6 hours yesterday trying to get that sucker in there. I took a hammer to the bushing on the new alternator. I put a C clamp and socket on the bushing on the bracket trying to move it (didn't budge). Finally I checked the forum here and took your advice of grinding/sanding it down. I ended up taking my orbital sander to the non-bushing side of the alternator. Finally got it in.
At that point it was almost 5:00pm and I had a gig to get to. Will finish up today. What a nightmare!
The last one I put in took me 2 hours. haha
It's worth mentioning the alternator mount bracket is only held to the block with 2 bolts. If you're having an issue you can always drop the bracket then view/understand the problem up close and personal. Also, with the bracket out it would be much easier to adjust the bushing by putting in a vise and/or whacking with a hammer. Even if you end up grinding something down it's nice to have the bracket out for test fitting. Once the bracket slides on/off the alternator with ease, reinstall the bracket then install the alternatorTim
I tried but those bolts were on there pretty solid. I didn't want to open up another can of worms by forcing it.
BUT, I got it back in, tightened the wing nut on top to tighten the belt and then began tightening the other bolt that screws into the top of the alternator and..... I can feel it stripping.So, it's snug, and I don't want to over tighten it but I will need to address that sooner than later. I'm guessing the threads on the alternator went because the bolt is steel but ???. I didn't back the bolt out to look. I'm going to run it like this for now. I'm thinking if I get a thinner bolt that will go through, I can put a locking washer and nut on the backside and and tighten the front as you would normally.

I've been there too, running a longer bolt through the top alternator hole will work fine
Great!! Phew!
Thanks!!!

Was there a thread some where on how to protect the alternator from dripping oil and coolant?
I just replaced an alternator that was at least 10+ years old, if not far older that stopped working. It had a lot of oil in it, not sure if that was why it stopped working or not. Either way I put a new one in. I want to add some kind of cover plate to protect it from any fluids.
After I replaced the alternator and installed new seals on the PS pump it wasn't leaking on the alternator any more, but I took a piece of sheet aluminum and bent it up to sit below the PS pump and divert any runoff away from the alternator. I can't find a post with a photo of it, so I'll try to get one, but it's really kind of a simple dumb piece of metal that doesn't attach to anything, just jams in there. I'm sure there are others on the forum who have done a nicer job of it.
 Posting Permissions


 Reply With Quote

