Page 1 of 2 12 LastLast
Results 1 to 20 of 34

Thread: A twist on Previa engine removal

  1. #1
    Van Enthusiast pdgizwiz's Avatar
    My Van(s):
    '94 LE dual sunroofs "Whistler" -AND- '97 DX SC Alltrac shredder rescue "Elmer"
    Join Date
    Sep 2010
    Location
    WA State
    Posts
    244
    Rep Power
    1

    A twist on Previa engine removal

    The pickup project has taken a back seat since I suddenly found myself with a third Previa AllTrac that needs a new engine. I'm taking the JDM route and dove in. I used to work a lot on air-cooled VWs, so pulling an engine out from below is a concept I'm comfortable with. But those old VW engines are a lot lighter and easier to deal with than the Previa drivetrain.
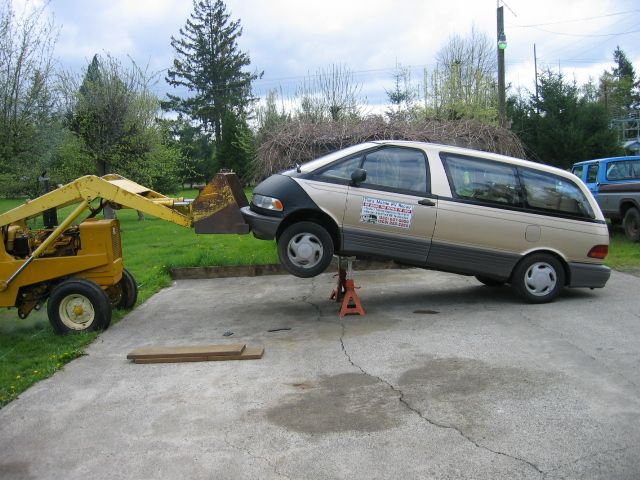
    Looking over other threads I saw the Harbor Freight lift table in use. Something similar is shown in the FSM, but in the context of a shop with a vehicle lift as well. I went to Harbor Freight and studied the two offerings along that line. One has a 500 lb rating, the other double that. Both are rather tall when collapsed, but the bigger one is REALLY tall, plus it's much more expensive. I figure the smaller of the two is more likely to be something that I could use during the 99.99% of my time that I'm NOT exchanging Previa engines.
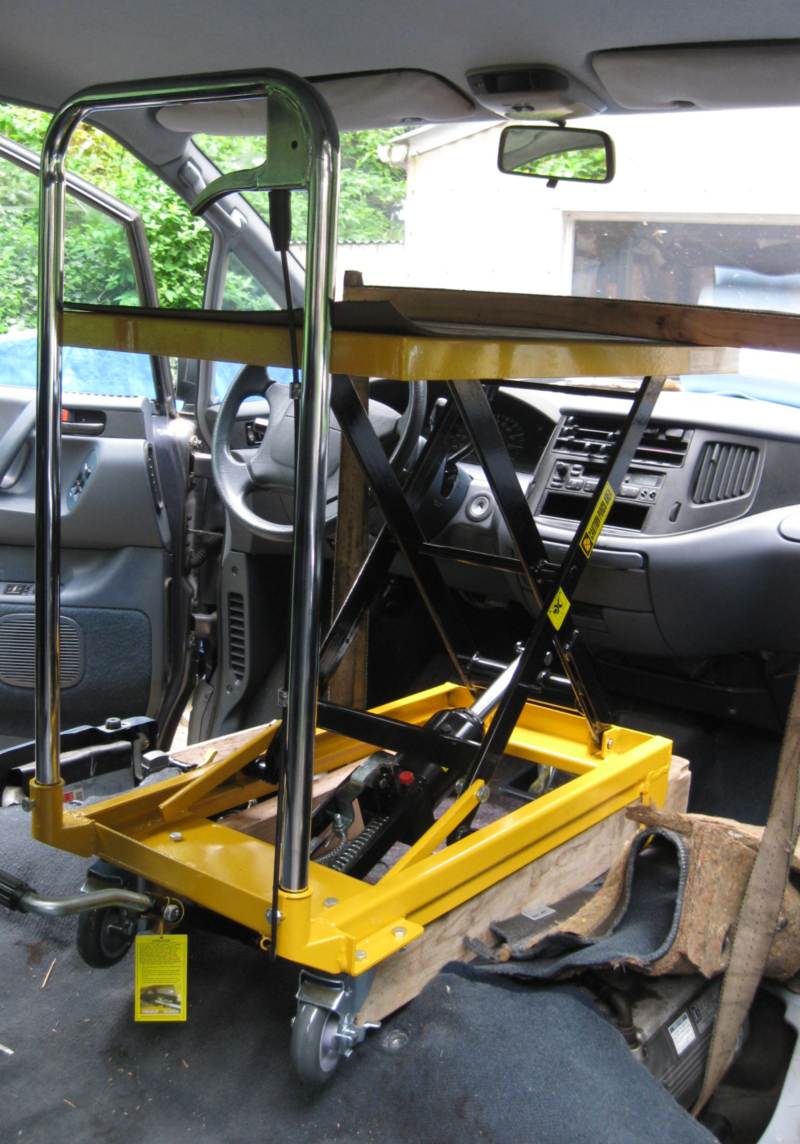
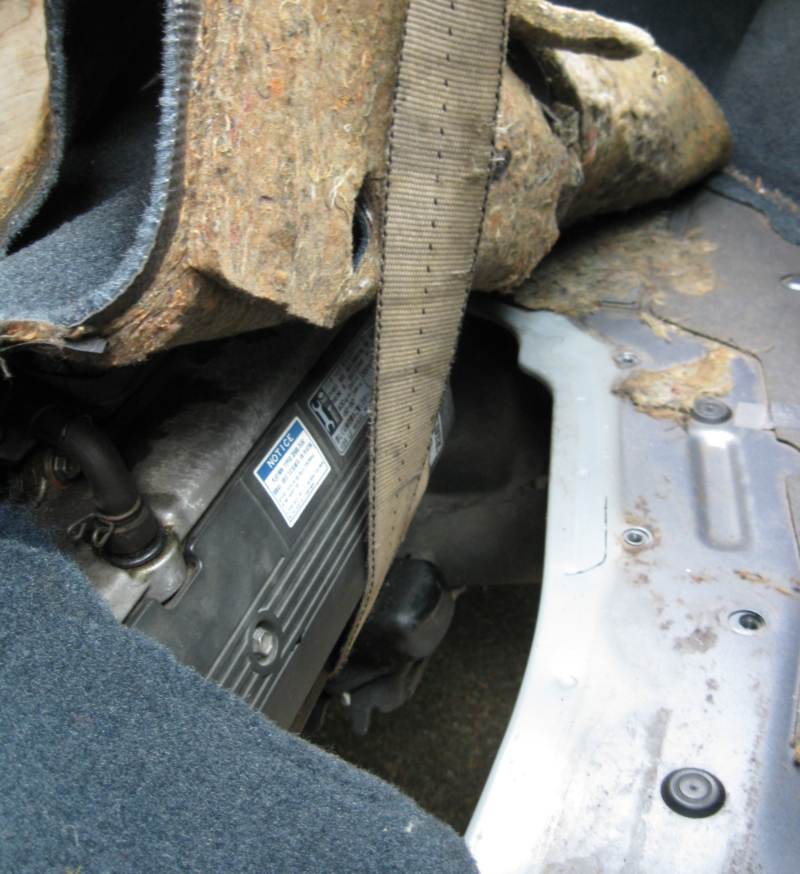
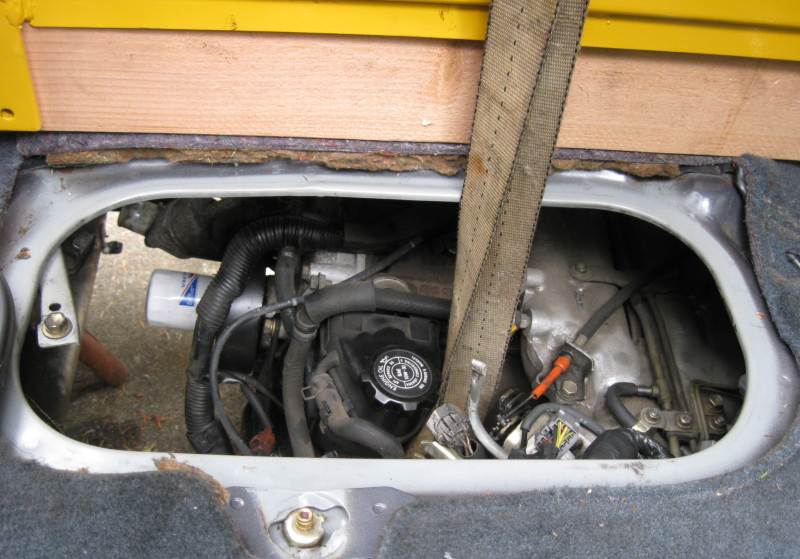
    Anyway, I pondered the height issue, and came up with a way to avoid having to hoist the car a foot higher than I'm comfortable with. I used the lift table inside to lift the engine from above. Here it is holding the engine up, extended near the upper end of its range with an old nylon tow strap wrapped over it, and under the engine below:


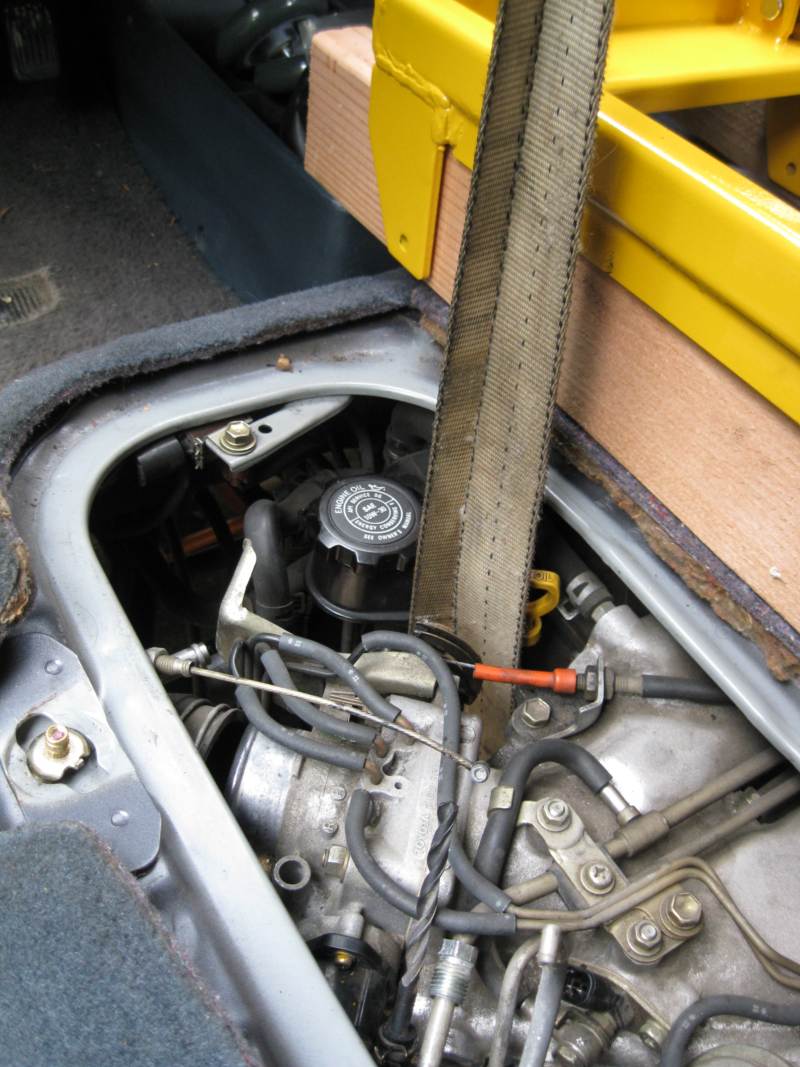
    The strap makes two loops around the engine. On the left, the strap goes down near the oil filler:


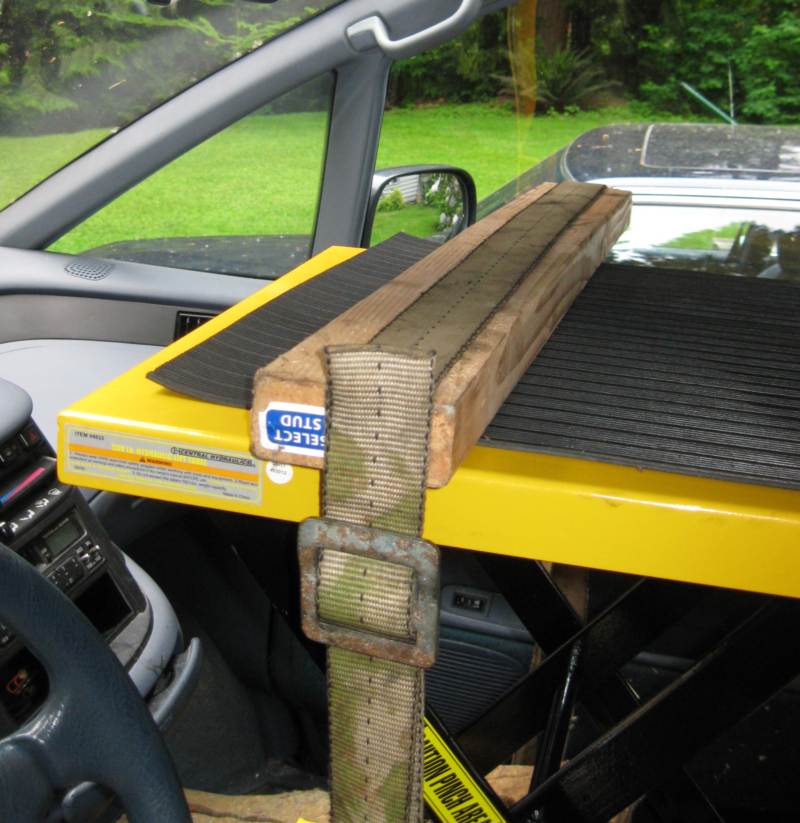
    You can see in the picture above that I removed the front two wheels and placed the table on a pair of 2x4 chunks to stabilize it onto the floor/carpet.

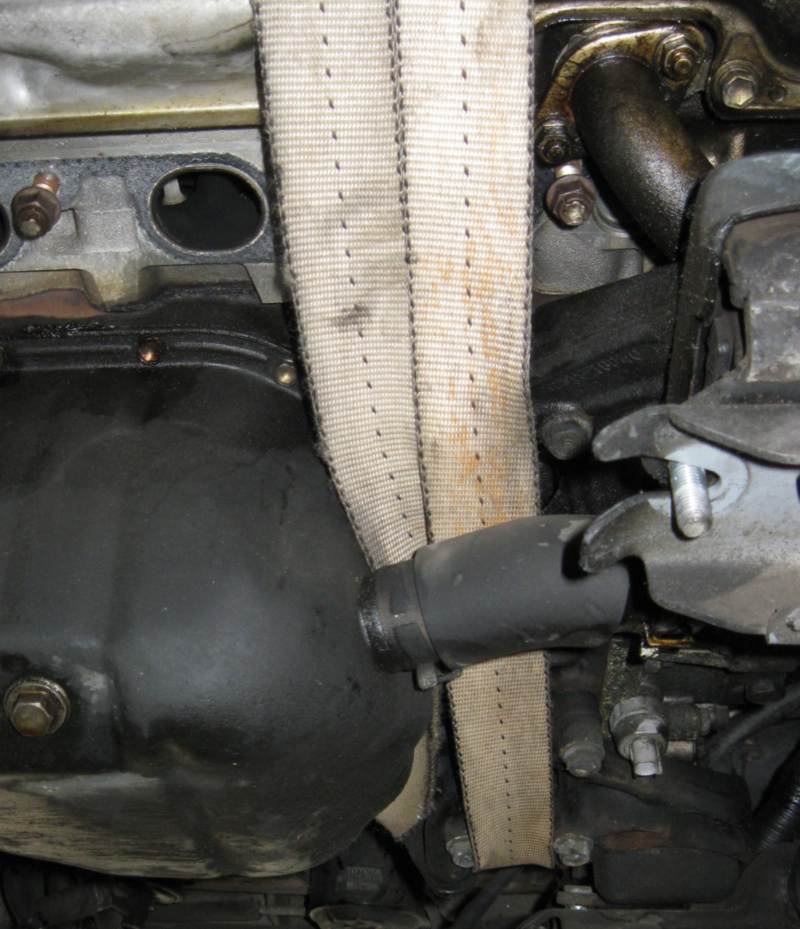
    And on the right, I removed the header so that the strap wraps around the valve cover:


    The strap goes above the oil tube:


    And I put a chunk of 2x4 on top of the lift table to spread the lift points out so that the straps go essentially straight down:


    Next time, I'll take that rubber sheet off of the top, so that it's easier to knock the 2x4 fore and aft to shift lift.

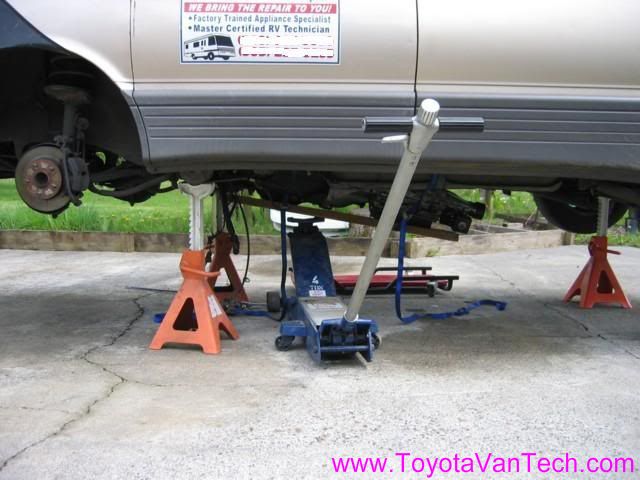
    I put my conventional floor jack under the transmission:


    After hoisting the engine a bit with the lift table, and lowering the trans a ways, it was easy to pull the whole deal back to clear the front motor mounts:


    I lowered the engine onto a sheet of plywood setting on a pair of maple dowels. The lift table has plenty of range:


    I set the trans down on another collection of 2x4 chunks which I broke down to get the trans onto one that it could slide on. So then the whole business was easy to roll out on the dowels:


    This trick involves several dowels, of course, moving the ones that roll out to the other side as needed.

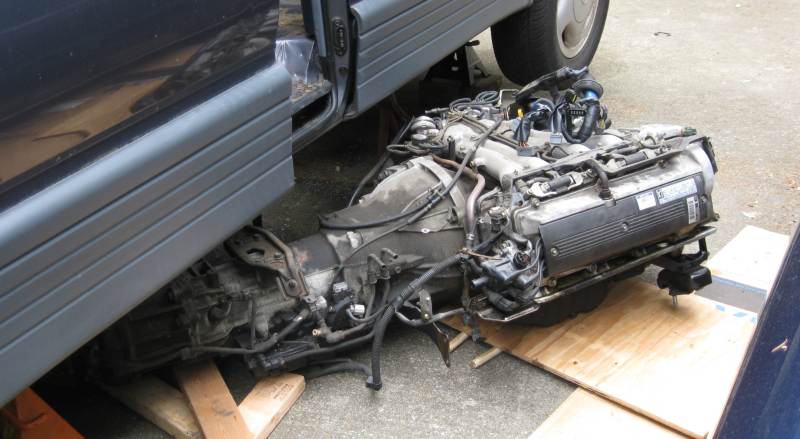
    Once out in the open, I can manage the lump with a conventional hoist. I found that the engine and trans sit nicely on my ramps.


    That was today's project. Putting it back in will be another adventure, I'm sure. Stay tuned.

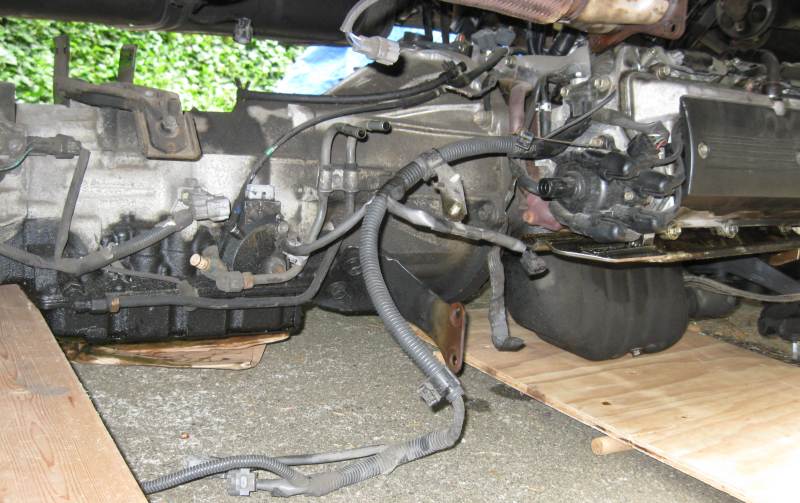
    So far the hardest part of this was finding and disconnecting of all of the hoses and wires and such that tie the engine/trans assembly to the body. Whew! Good thing I have another Previa on hand to use as a guide to get it all back together!
    Last edited by pdgizwiz; 05-20-2013 at 07:22 AM. Reason: delete redundant image

  2. #2
    Van Addict
    My Van(s):
    Blue 1987 4wd 5-speed Hi/Lo Manual Hubs - Sold. Grey 1987 4wd Cargo conversion, automatic in repair mode.
    Join Date
    Nov 2010
    Location
    oregon
    Posts
    410
    Rep Power
    1

    Re: A twist on Previa engine removal

    Good engineering! I think I need a Previa.
    Where will your Jdm engine be from?

  3. #3
    Administrator timsrv's Avatar
    My Van(s):
    Lots of them
    Join Date
    Jun 2010
    Location
    SW WA ST
    Posts
    6,202
    Rep Power
    10

    Re: A twist on Previa engine removal

    Good old back yard engineering! Great job. I love seeing threads like this. Thanks for sharing. Tim

  4. #4
    Van Enthusiast pdgizwiz's Avatar
    My Van(s):
    '94 LE dual sunroofs "Whistler" -AND- '97 DX SC Alltrac shredder rescue "Elmer"
    Join Date
    Sep 2010
    Location
    WA State
    Posts
    244
    Rep Power
    1

    Re: A twist on Previa engine removal

    Quote Originally Posted by djshimon View Post
    Good engineering! I think I need a Previa.
    Where will your Jdm engine be from?
    Of course you do!

    I got it the JDM engine from Foreign Engines in Lynnwood. They're just a few miles from me and delivered it to my door for free. It came to $874, with tax.
    There's a lot to swap from the two. The manifolds are different, so it's essentially a long block. I plan to change out the front and rear seal and several hoses.
    The engine in the van was low in compression, but still ran OK. I'm going to tear it down for a post-mortem, and consider rebuilding it, because, after all, I'm pretty sure there are other Previas in my future!

  5. #5
    Van Enthusiast pdgizwiz's Avatar
    My Van(s):
    '94 LE dual sunroofs "Whistler" -AND- '97 DX SC Alltrac shredder rescue "Elmer"
    Join Date
    Sep 2010
    Location
    WA State
    Posts
    244
    Rep Power
    1

    Re: A twist on Previa engine removal

    I've got the engine back in the van now, and started it up last night. I'll start another post soon about my JDM experience.
    The reverse of the removal process, with the lift table inside the van, worked OK. It wasn't easy though, and without a friend to help guide me while I lifted the front and rear it would have taken a lot longer. Next time (I hope it's not soon) I'll devise a better way of varying the lift from the left side of the engine to the right, as the lift table/2x4/strap method is lacking in this respect. A better way of lifting and supporting the rear would be nice, too.
    All's well that ends well, though. I've just about completed my first Previa engine exchange.

  6. #6
    Van Enthusiast pdgizwiz's Avatar
    My Van(s):
    '94 LE dual sunroofs "Whistler" -AND- '97 DX SC Alltrac shredder rescue "Elmer"
    Join Date
    Sep 2010
    Location
    WA State
    Posts
    244
    Rep Power
    1

    Previa JDM transplant summary

    I wrapped up my transplant yesterday and now have a Previa that runs like new again. The engine I removed still ran OK, but was down to 100 psi on one cylinder. The JDM replacement cost me $870, delivered to my door.
    I had to swap a lot from my old engine to the new. The manifolds are different (intake, exhaust, and water). The right-hand motor mount bracket, the breather tube, and even the oil filter mount is different (my old one had a relief valve in it, the JDM unit did not). So right off the bat there were several gaskets I needed.
    The distributor on the JDM engine was damaged, so I used my old one, with a new O-ring. I replaced both front and rear crankshaft seals, and since the FSM insists that the flex plate bolts be replaced, I did so (10 x $5 each). This seems a little extravagant, but I didn't feel like taking chances here.
    Essentially I replaced every rubber part I could, with priority on those that are difficult or impossible to replace when the engine is in the car. I wanted to replace the big O-ring behind the oil pump, but was intimidated by the pattern of big Philips screws that held it on. If I buggered one....
    The water pump on my old engine was leaking badly, but it wasn't the pump itself. It was corrosion around the O-rings that seal the pump to the timing cover.
    The PVC bits on the JDM engine were brittle as usual, so I replaced them as well even though they are pretty easy any time. I bought a water pump on ebay, and a thermostat from a local parts house, but bought the rest online from from an OEM source. The total for the list below comes to about $190.
    12261-76010 PCV hose
    12204-15022 PVC valve
    90480-18001 PCV Grommet
    17173-76010 Exhaust manifold gasket
    17177-76011 intake manifold gasket
    16341-76010 Water manifold gasket
    90099-14091 Distributor O-ring
    90311-88003 Rear Seal
    90105-10276 flex plate bolts (BOLT, WASHER BASED H)
    90311-48014 Front seal
    12255-76010 Oil breather gasket
    15692-76010 Oil filter housing gasket (a little "8" shaped O-ring kinda thing)
    90917-06039 exhaust header port rings (two of 'em)
    16101-76030 water pump (cam with the three O-ring seals it needs)
    thermostat and seal

    In keeping with my distrust of old rubber parts, I replaced all of the little water hoses that feed the EGR and IAC gizmos. The heater hose that connects to the engine was pretty dodgy, too, so I replace that as well. The total here came to $51:
    16261-76030 HOSE, WATER BY-PASS
    16264-76011 HOSE, WATER BY-PASS, NO.2 was 16264-76010
    16267-76010 HOSE, WATER BY-PASS, NO.3
    16281-76010 HOSE, WATER BY-PASS, NO.4
    99555-10100 HOSE, WATER BY-PASS, NO.6
    87245-95D31 hose, water (heater)
    90460-28001 Heater hose clamp

    One of the rear mounts that that the transmission hangs from was sheared completely through. I figured that the other wasn't far behind, and bit the bullet and replaced the front mounts as well. Each one is around $55, so this was a big chunk.
    I bashed the coolant temperature sensor while maneuvering the engine into place. Oops! Lesson learned: Leave this one off until l the engine is in. This was the only part I drove to my local Toyota dealer to get, and this goof cost me $70. Altogether, the following list of whatthell and ohs@#t parts came to another $300.

    12371-76041 INSULATOR, ENGINE MOUNTING, REAR NO.1
    12372-76011 INSULATOR, ENGINE MOUNTING, REAR NO.2
    12361-76042 right motor mount
    12362-76012 left motor mount
    89422-20010 Engine coolant temperature sensor

    So my costs beyond the engine itself came to around $580. With the engine, the grand total is around $1450.
    Compression measurements of the new engine: 180 - 190 - 190 - 190. Purrs like a kitten, so I'm happy.

    Someday I hope to tear down the engine I removed and decide if it's salvageable. If so, I'll rebuild it and compare the overall cost of doing so to that $870 JDM unit.
    I'm confident that the JDM engine has a lot of life in it, but it isn't new. And the ports and valves are black and rather crusty looking, as if it ran rich all the time or something. I've heard that it's typical for cars in Japan to spend most of their running time sitting in traffic, where a mile produces much more wear an tear than on an American highway. The JDM route is the most expedient way to get a van back on the road, but I wonder if it's really the best way to go if you have the time and resources to do a rebuild.

  7. #7
    Van Fan PrivatePrevia's Avatar
    My Van(s):
    1995 Previa LE SC
    Join Date
    Apr 2012
    Location
    Marietta Georgia
    Posts
    24
    Rep Power
    1

    Re: Previa JDM transplant summary

    Great Job man !! I am setting here buying some things to restore my previa ,so I needed the inspiration . I sold my Sienna this week and the guy asked me why I was keeping the older van ......I just said "I like em " .You did ALOT of work to your ride but think of all the people out there paying a huge car note every month .I am sure this list of what you did will help us all in the future as well . I am at 165k miles on my engine and feel good about it for now.
    I fixed a muffler leak, the valve cover gasket and distributor O ring and will probably do the brakes ,rotors , shocks & struts next.

    Good work and thanks for the details

  8. #8
    Administrator timsrv's Avatar
    My Van(s):
    Lots of them
    Join Date
    Jun 2010
    Location
    SW WA ST
    Posts
    6,202
    Rep Power
    10

    Re: A twist on Previa engine removal

    Thank you for posting. This is a great resource for anybody else contemplating this job. At one point I had ordered an engine & transmission for my All-Trac Previa that was going to cost a little over $1,200. After waiting 6 months I ended up investing money/time in my existing engine (that solved the immediate problem). I still have a vibration in my torque converter, but it's mild & doesn't seem to be getting worse. The Japanese engine place eventually called me saying everything was in. It surprised me actually as I figured they had blown me off. I asked if I was still obligated to follow through they said no. At some point I may look into this again, but for now I'm going to try and get more miles out of my existing set-up. I have a little over 180k hard miles on mine. Tim

    PS: I merged your threads as I thought it was better to keep the swap and your summery together (easier to find both this way).

  9. #9
    Van Fan
    My Van(s):
    1994 sc alltrac
    Join Date
    Jan 2014
    Location
    alaska
    Posts
    30
    Rep Power
    1

    Re: A twist on Previa engine removal

    I will be attempting this soon. I was wondering if you think its possible to do it without the lifting table and perhaps a good floor jack inside the van as you did it. or even a chain hoist to lower it down from the inside. it seems safer and easier to have the engine weight hanging from something opposed to balanced on top of something. i think im going to try it with a big floor jack lowering it down from the inside and a jack under the trans. ive never done a previa engine and honestly it scares me right now.

  10. #10
    Van Enthusiast pdgizwiz's Avatar
    My Van(s):
    '94 LE dual sunroofs "Whistler" -AND- '97 DX SC Alltrac shredder rescue "Elmer"
    Join Date
    Sep 2010
    Location
    WA State
    Posts
    244
    Rep Power
    1

    Re: A twist on Previa engine removal

    Your comment about "hanging" instead of "balancing" is the essence of my thinking leading up to what I did. It's easy to get the seats out, and there's a lot of room to work with inside the van.
    I suppose that had I had two floor jacks I might have tried that instead of investing in the lift table. I didn't, so instead of buying a second floor jack I bought something I didn't already have. I have yet to use that lift table for something else, or stash it where it isn't in my way.
    Whatever you use needs to have a decent range of motion. Of course, you could lower the engine onto a stack of blocks, readjust your jack/straps and go again to get it to the ground. Clearly there are any number of ways to skin this cat.
    As I described, getting the engine in was more difficult than getting it out. Next time I'll devise a better way of bringing up the right more than the left, or vice versa. So you need to keep that in mind as you contrive whatever contraption you can to do the job.
    Don't be scared! Just don't get into a hurry. Rushing is likely to cause damage to your van or -much worse- yourself.
    And if you are contemplating this project, I guess you have a dead van. You can't do it much damage!

  11. #11
    Administrator timsrv's Avatar
    My Van(s):
    Lots of them
    Join Date
    Jun 2010
    Location
    SW WA ST
    Posts
    6,202
    Rep Power
    10

    Re: A twist on Previa engine removal

    When I did mine I lifted it high and then used a chunk of wood (2 X 12 I think) under the engine/transmission assy. I ran a couple of adjustable straps across the bottom of the board (one front and one back) and attached them to both sides under the Previa. Then I used my Jack under the board and adjusted straps/jack in small increments until I met my objective. It was a bit time consuming but very manageable. The straps would hold it in place while I adjusted jack positions. The straps were also insurance in case things got unstable. I removed and installed engine/transmission using this technique.

    The limiting factor with my method is equipment. You will need a big jack and some pretty large jack stands to hold the van this high.


    If you don't have a big jack, here's an alternate way to lift


    It looks bad but I put some thought into it. What you can't see are brackets I bolted to the tractor bucket that contact the frame right behind the tie down loops. No Previas were harmed in the filming of this job .


  12. #12
    Van Addict
    My Van(s):
    1993 Previa 2WD
    Join Date
    Sep 2012
    Location
    Dallas, TX
    Posts
    415
    Rep Power
    1

    Re: Previa JDM transplant summary

    I bet you the JDM motor you got is a 2TZ-FZE... the intake and exhaust manifolds are completely different, as are various other parts.... after looking through the JDM and USDM Toyota parts catalogs, I confirmed that the intake and exhaust manifolds of the 2TZ-FE are the same between markets, and the 2TZ-FZE intake and exhaust manifolds are the same for both markets respectively... so I really think you have the wrong engine in your van, but other than lower compression and different cams, you do have a stronger engine

    I have seen shops do the JDM motor replacement on Previas before and never have I heard/seen of any intake and exhaust manifold differences

  13. #13
    Van Fan
    My Van(s):
    1994 sc alltrac
    Join Date
    Jan 2014
    Location
    alaska
    Posts
    30
    Rep Power
    1

    Re: A twist on Previa engine removal

    so if i get my previa that high in the air and i get a jdm engine, what parts should i change out while i have the oppourtunity.

  14. #14
    Administrator timsrv's Avatar
    My Van(s):
    Lots of them
    Join Date
    Jun 2010
    Location
    SW WA ST
    Posts
    6,202
    Rep Power
    10

    Re: A twist on Previa engine removal

    That will depend on condition of things. When the SADS is separated from the engine you should check the rubber bushings and replace the flex couplers if needed. Also check the engine mounts & replace if separated or torn. You will need an exhaust gasket & if the JDM engine comes without intake manifold you'll need an intake gasket too. Plan on all the basic tune-up stuff like plugs, wires, distributor cap, rotor. Might as well throw a valve cover gasket on it while you're there.

    There will likely be other things to do but I'd wait until you get it on stands to determine what it needs. Tim

  15. #15
    Van Addict
    My Van(s):
    1993 Previa 2WD
    Join Date
    Sep 2012
    Location
    Dallas, TX
    Posts
    415
    Rep Power
    1

    Re: A twist on Previa engine removal

    also just a general rule of thumb for any used engine for any car... if you see rust in the water outlets of the engine.... walk away... engine is going to be full of rust and gunk inside... if you ended up with the engine because you bought it without seeing it first, then you may want to flush the engine and replace the water pump, thermostat, and perhaps even the freeze plugs.... it is very hard to replace many of the freeze plugs of the previa's engine... I've seen one leak once on someone's 95... it wasn't pretty

  16. #16
    Forum Newbie
    My Van(s):
    92 Previa LE AWD
    Join Date
    Aug 2013
    Location
    BC
    Posts
    17
    Rep Power
    1

    Re: A twist on Previa engine removal

    Great info!! thanks OP


    If you don't have a big jack, here's an alternate way to lift
    lol Tim

  17. #17
    Van Enthusiast pdgizwiz's Avatar
    My Van(s):
    '94 LE dual sunroofs "Whistler" -AND- '97 DX SC Alltrac shredder rescue "Elmer"
    Join Date
    Sep 2010
    Location
    WA State
    Posts
    244
    Rep Power
    1

    Re: A twist on Previa engine removal

    Man-
    Nope, it's a 2TZ-FE. The exhaust header had no heat shield, and the intake manifold was lacking a few ports for sensors and such. I imagine it's from a country where pollution regs differ.
    There was nothing wrong with the manifolds on my old engine, so I renewed the gaskets and was ready to roll.
    The engine still runs smooth, gets the mileage would expect, works with the computer and other hardware that were mated to the old engine, etc.


  18. #18
    Van Addict
    My Van(s):
    1993 Previa 2WD
    Join Date
    Sep 2012
    Location
    Dallas, TX
    Posts
    415
    Rep Power
    1

    Re: A twist on Previa engine removal

    perhaps the engine came from the narrow bodied emina/lucida? Just skimming through the major components I looked at, the manifolds were the same part numbers between the estima and previa

  19. #19
    Van Fan
    My Van(s):
    93 previa
    Join Date
    May 2013
    Location
    sandpoint idaho
    Posts
    46
    Rep Power
    1

    Re: A twist on Previa engine removal

    Quote Originally Posted by TheMAN View Post
    perhaps the engine came from the narrow bodied emina/lucida? Just skimming through the major components I looked at, the manifolds were the same part numbers between the estima and previa
    I'm starting my swap out this week, purchased my engine from Matko engines in CA for 700 shipped to my house. It looks barely used, dipstick and oil cap show signs of low mileage and no burn't oil smell.
    Question
    I have the same heavy duty jack stands but did you happen to measure how high you lifted the car? I'm not sure my garage is tall enough.
    thanks Donny

  20. #20
    Administrator timsrv's Avatar
    My Van(s):
    Lots of them
    Join Date
    Jun 2010
    Location
    SW WA ST
    Posts
    6,202
    Rep Power
    10

    Re: A twist on Previa engine removal

    I had my jack stands on the tallest setting (30"). Of course if you do that you'll need a way to get the van that high. Depending on your equipment this can be a bit risky. pdgizwiz's way would be safer. Tim

Tags for this Thread

Posting Permissions

  • You may not post new threads
  • You may not post replies
  • You may not post attachments
  • You may not edit your posts
  •