Page 1 of 3 123 LastLast
Results 1 to 20 of 44

Thread: G53 [2WD manual] Transmission replacement

  1. #1
    Van Enthusiast
    My Van(s):
    1985 Toyota Van 2WD 3YEC Auto Trans. Silver (Toofus) 1987 Toyota Van 4WD 4YEC Manual Trans. White (Doofus)
    Join Date
    Jan 2016
    Location
    Red Bluff, Ca
    Posts
    152
    Rep Power
    1

    G53 [2WD manual] Transmission replacement

    Well I have been pretty busy and this isn't the best writeup and I didn't get pictures all the way through, however my writeups will get better in the future.
    My manual transmission went out on my 1986 2WD van at 228,000 miles. It had towed an unknown amount in its first 170,000 miles and I towed a trailer several times often times over great distances. The transmission was very loud in every gear except for fourth gear. From my reading on TVT it sounds like it was a bad input shaft bearing. Pair that with a bad output shaft seal, high miles, and trailer towing, and you have a recipe for failure.
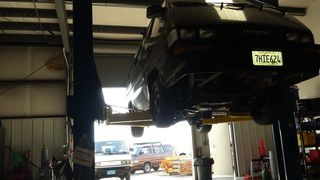
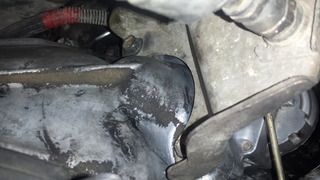
    I brought the van into the shop. This picture was very foretelling of my future without even realizing it at the time...


    I wouldn't attempt this job without having the factory service manual. Having done this once, I would feel comfortable doing most of the job without the manual. HOWEVER, I feel that there are several fasteners that require the use of a torque wrench for this job and I would want to be able to refer to the manual for the proper torque. You don't want a flywheel attachment bolt backing out while you are driving down the freeway.

    Also, make sure the battery ground wire is disconnected so that you don't damage the electrical system during the work to be performed.

    Step one is going to be draining the transmission. Remove the drain plug, check for shavings, and set the plug aside.

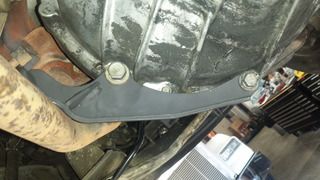
    Step two is to disconnect the driveline. There will be four bolts at the front of the rear differential. Take them out and slip the splined adapter out of the rear of the transmission.

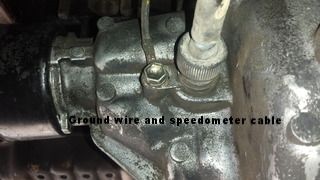
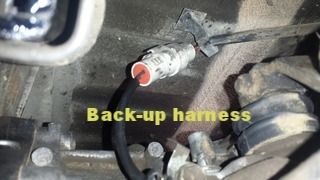
    Step three is to disconnect the speedometer cable, the ground wire, and the back-up light wire plug. They are located on the aft right side of the transmission.


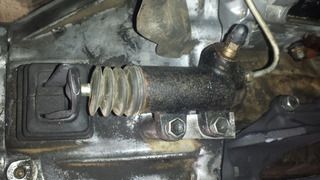
    Step four is to disconnect the clutch slave cylinder from the transmission. There is no need to disconnect the cylinder from the brake line as that would only introduce air into the hydraulic clutch system and create unnecessary work later. There is plenty of room to work with it just moved out of the way after unbolting.


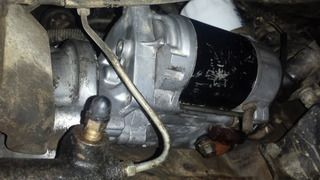
    Step five is to disconnect and remove the starter. Easy.


    While you have the starter out, now is a good time to remove the years of accumulated grease and grime from the starter. Don't put your parts back into the vehicle covered in grease.

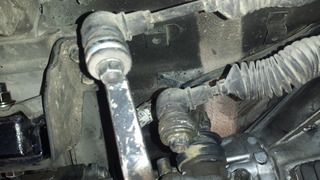
    Step six is to disconnect the shift linkage cables from the shift arms of the transmission.


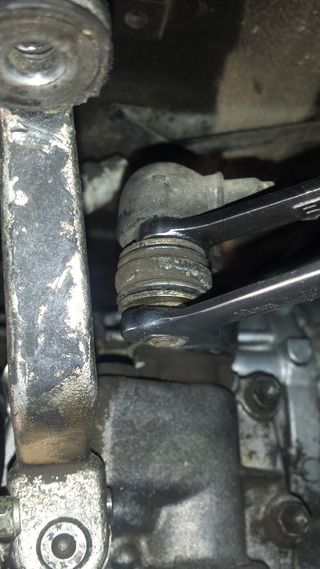
    This requires two open end wrenches! It will be tempting to break the nut loose with one wrench but it won't work. One wrench goes above the boot and into the flat spots on the shank of the bolt, the other one loosens the nut. Like this:


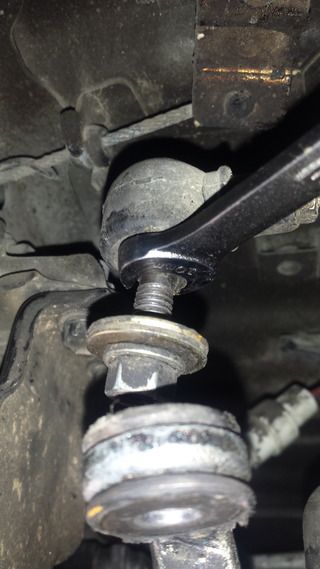
    There are two piece grommets in the eyes of the shift arms that the bolts go through. You can see them pictured above. Be careful to not lose these! They will most likely not fall out or go anywhere but keep an eye on them. If you lose them you will have too much play in your shift linkage and it will not likely shift at all.

    As I recall, when you unbolt the starter, by default you also unbolt the shifter linkage mounting bracket. I love Toyota Engineering. Now that the linkage is completely detached from the transmission, you can set it aside.


    Step 7 is to remove the exhaust bracket. Mine was missing the outer clamp and bolt and I didn't realize that until I took the bracket that attaches to the transmission off. No matter, one less step.


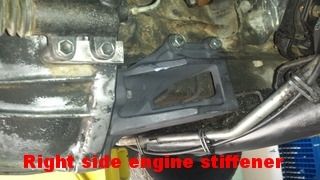
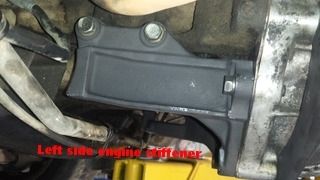
    Step 8 is to remove the engine stiffeners. There is one on the left and one on the right. Initially, I just unbolted them from the transmission and left them attached to the engine but ended up removing them in the end so that I could clean them up and paint them before reinstallation of the transmission.


    Step 9 is to place a stand or jack under the transmission in preparation for removal.

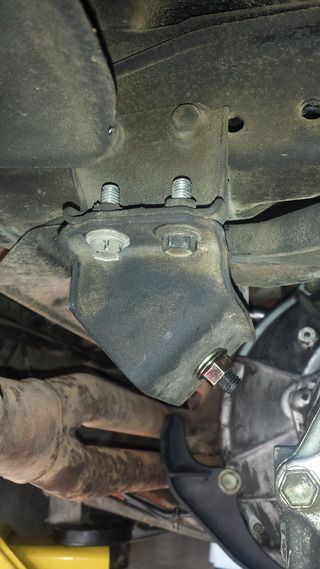
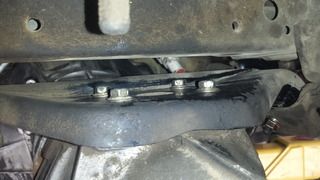
    Step 10 is to disconnect the rear transmission mount from the van or from the transmission. If you want to disconnect it from the van, you unbolt it from the left side and the right side where they attach to the frame.


    If you want to disconnect it from the transmission, the bolts are located above the plate and they thread directly into the transmission case.


    Step 11 is to undo the remaining bolts attaching the transmission to the engine. After unbolting it, you will have to slide it rearward while dropping it down slightly to free the input shaft splines from the clutch friction plate splines. Mine was rather difficult. Partially because I had no help and partially because the splines were dry and cruddy.

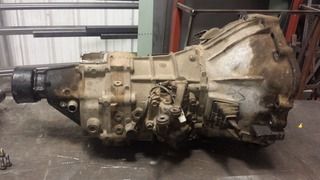
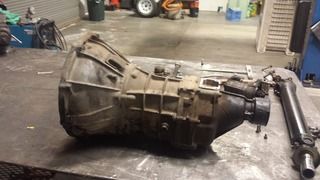
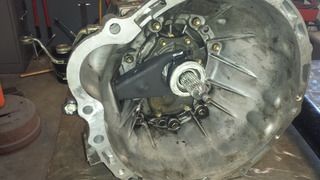
    Set the transmission on a bench and keep going. There is more to do. The transmission will look something like this when it comes out.


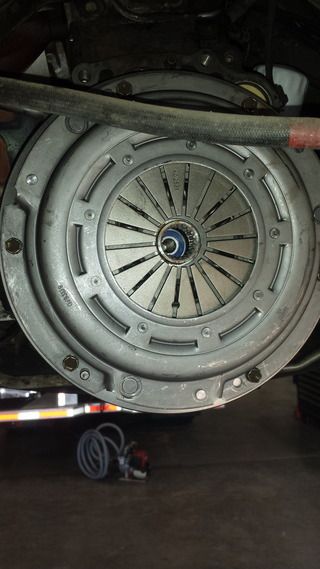
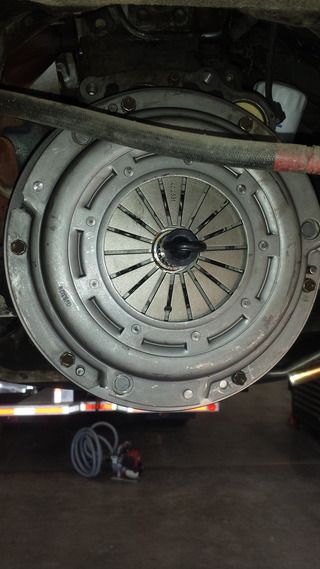
    You will now have access to the clutch. Step 12 is to remove the bolts around the periphery and take the clutch assembly off. Your clutch will look old and dirty and not new like this one.


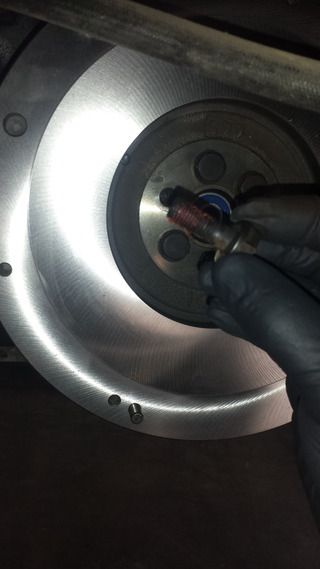
    Step 13 will be to remove the bolts from the flywheel and then remove the flywheel assembly from the crankshaft flange. Remember that when these go back in to use proper torque and locktite! If I remember correctly, these are torqued to 61 ft/lb, so they don't come out easy! (Your flywheel will look like a used brake rotor, not new and shiny like this one.


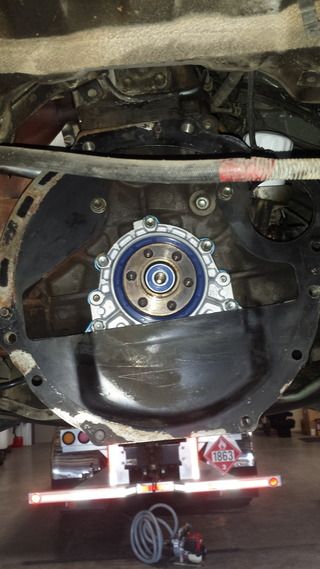
    You will now be here. The rear of your engine will look kind of like this except dirtier. You are looking at the backing plate covering he open areas of the bell housing. Step 14 is to remove the two bolts holding this to the engine and slide it off.


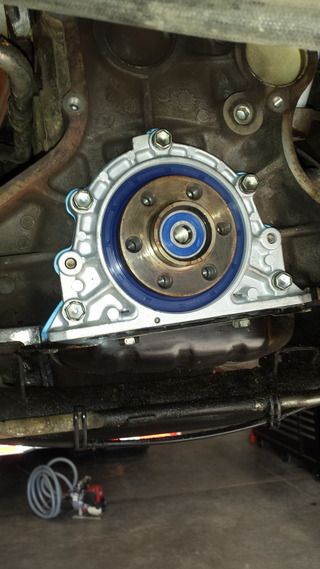
    Now is the time to replace your rear main seal. I think it costs about $14 for the seal and gasket and it is an easy job. I removed the seal housing, media blasted it with plastic media, cleaned up the crankshaft seal mating surface, installed the new seal, and used a small bead of High temp RTV sealant where the bottom of the seal housing mates with the oil pan. My old one wasn't leaking but you do it now anyway because you are here.


    After that you can remove the old pilot bearing and install a new one. It is tiny and hard to find a pilot bearing removal tool that fits. I ended up punching the inner race and bearings out and then using the pulling tool on the outer race. The new one presses in easy enough.

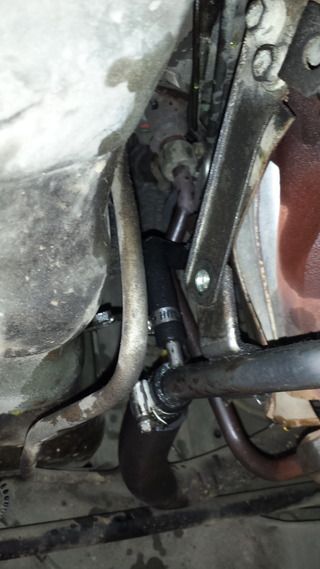
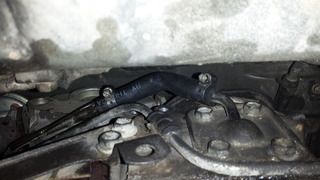
    After that is done, you should replace the hoses of death. They are pretty much impossible to get to without either pulling the engine or transmission. Mine were in pretty good shape but they are dirt cheap and you are there. The first one is at the 10:00 position above your head if under the vehicle and facing forward. The second one is at the 12:00 position. You may need to loosen a couple of bolts to get to the first one.


    Now that the hoses, rear main seal, and pilot bearing are replaced, you should also replace the transmission mount elastomers as they are cheap and the job is simple.

    Have your flywheel resurfaced before you install the new clutch. I paid $35 to have a local shop do it. Sometimes you can even get it back the same day.

    Replace the gear oil in your rear differential when you do this job. It takes the same oil as the transmission and you are already under the van, so why not. Remember to get new gaskets for the drain and filler plugs! I like the OEM crush type that Toyota sells because they don't leak if installed properly! The flat side of the crush washer goes against the bolt head, and the crush side with the split in it goes against the housing.

    Replace your clutch when you do this job! A clutch kit isn't very expensive and you have to drop the transmission to get to it, so why not?

    I installed a used transmission into the van, so before installation I put a new input seal and new output seal into the transmission. I also ran a bunch of gear oil through it before closing the drain and filling it.

    When you have the input shaft bearing retainer off you can clean out the areas around the bearing and make sure that there are no particles getting into the bearings. Remember to install a new gasket!


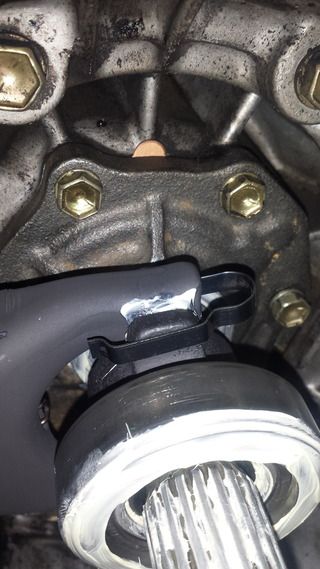
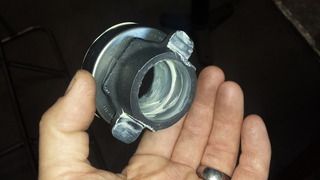
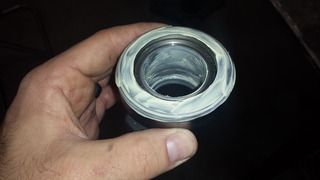
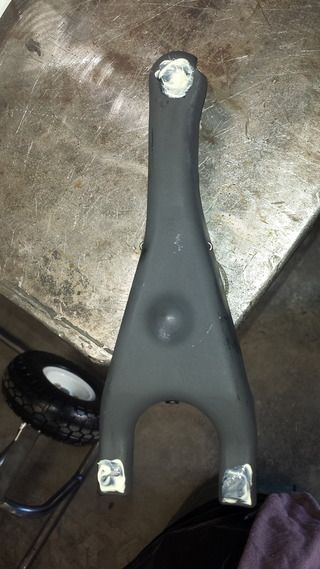
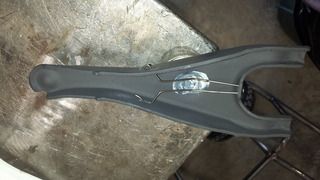
    When you remove your throwout bearing and put a new bearing on the clutch release hub, be sure to grease the surfaces called out in the manual. Also grease the input shaft splines, the clutch splines (lightly), the ball that the release arm pivots on, and the release arm friction surfaces. This will make your clutch feel like butter.


    Next you will put the clutch release arm back into the transmission, install the the throwout bearing and the retaining pins.


    Install the backing plate using the two bolts and being sure to get the plate located properly on the alignment dowels and using a torque wrench and loctite.


    Next install the flywheel using loctite and a torque wrench on the bolts.


    Now you can put the clutch flex plate and friction disc onto the flywheel using the provided alignment tool and the new bolts supplied with the clutch kit. FOLLOW THE INSTALLATION INSTRUCTIONS!


    After the clutch is installed you can bolt the transmission mount back onto the transmission in preparation for installation into the van.


    Next, position the transmission under the van and hoist it into place and slide it forward to mate the splines of the input shaft into the splines of the clutch friction disc and finally into the pilot bearing bore.

    Once the transmission is in place, install the bolts of the transmission mount into the van, and install the top bolts into the engine/transmission attach points.

    After this it is pretty much just the reverse order from removal.

    Don't forget to fill the transmission with oil!

    Reattach all your connections and verify that everything works.

    Since this was a different transmission from what I originally had installed, I verified the rigging of the shifter. The procedure is called out in the manual and you need to remove the cover for the shifter assembly but it is easy and mine was already in rig when I checked so no adjustment was necessary. I would definitely do this every time.

    The only issue I had post-swap was that my speedometer didn't work This was due to the cable shifting in the housing down out of the instrument cluster. I had to remove the instrument cluster and use a pair of needle nose pliers to gently slide the cable back up and into position where it would engage the speedometer gauge.

    Hope this helps, and let me know if I can clarify anything.
    Last edited by Rufus; 03-06-2016 at 11:16 AM.

  2. #2
    Administrator timsrv's Avatar
    My Van(s):
    Lots of them
    Join Date
    Jun 2010
    Location
    SW WA ST
    Posts
    6,202
    Rep Power
    10

    Re: 1986 Toyota G53 Transmission replacement

    Awesome write-up! Thank you for this (and other) contributions to our forum! Tim

  3. #3
    Van Enthusiast
    My Van(s):
    1985 Toyota Van 2WD 3YEC Auto Trans. Silver (Toofus) 1987 Toyota Van 4WD 4YEC Manual Trans. White (Doofus)
    Join Date
    Jan 2016
    Location
    Red Bluff, Ca
    Posts
    152
    Rep Power
    1

    Re: 1986 Toyota G53 Transmission replacement

    Thanks for the compliment! I will be posting more writeups and they will get better. There are some excellent writeups on this forum. It is a very valuable resource for van owners.

  4. #4
    Forum Newbie
    My Van(s):
    1985 2wd
    Join Date
    Nov 2014
    Location
    Berkeley, CA
    Posts
    7
    Rep Power
    0

    Re: 1986 Toyota G53 Transmission replacement

    This may be a good place to ask-

    Any idea if it's possible to replace the output shaft bearing with the transmission installed?

  5. #5
    Van Fan
    My Van(s):
    1984 Toyota Van
    Join Date
    Jul 2016
    Location
    USA
    Posts
    53
    Rep Power
    1

    Re: 1986 Toyota G53 Transmission replacement

    Rufus -

    I am about to put my rear main seal back on, and read that you used RTV around the bottom edge of your RMS housing. I couldn't find this in the manual and wasn't sure exactly where to place the RTV.

    Is this necessary, or can I use just the paper gasket that comes with the RMS housing?

    Thanks!
    Hugh

  6. #6
    Administrator timsrv's Avatar
    My Van(s):
    Lots of them
    Join Date
    Jun 2010
    Location
    SW WA ST
    Posts
    6,202
    Rep Power
    10

    Re: 1986 Toyota G53 Transmission replacement

    Here's a blog entry where this is demonstrated: http://www.toyotavantech.com/forum/e...ebuild-part-12

    I would recommend wiping a very thin layer of the FIPG around the outside periphery of the seal before pressing it into the housing. I started doing that after I had a rear main blow-out (results of that shown on this thread: http://www.toyotavantech.com/forum/s...ngine-Overhaul ). Tim

    PS: I'd highly recommend using Toyota FIPG (shown in those write-ups) rather than RTV.

  7. #7
    Van Fan
    My Van(s):
    1984 Toyota Van
    Join Date
    Jul 2016
    Location
    USA
    Posts
    53
    Rep Power
    1

    Re: 1986 Toyota G53 Transmission replacement

    Awesome stuff! Thank you Tim! I should be doing the new rear main seal & oil pan in the next few weekends...really looking forward to getting this thing up and running!

  8. #8
    Van Fan
    My Van(s):
    None yet
    Join Date
    Mar 2016
    Location
    California
    Posts
    26
    Rep Power
    1

    Re: 1986 Toyota G53 Transmission replacement

    What would be the cost of doing all that if you took it to a shop? I think my van has the same issue and it's at 215,000 miles and started to hear a loud knocking noise when I have the clutch engaged into any gear.

  9. #9
    Van Enthusiast
    My Van(s):
    1988 4WD LE 5 spd mnl
    Join Date
    Oct 2013
    Location
    so cal
    Posts
    168
    Rep Power
    1

    Re: 1986 Toyota G53 Transmission replacement

    I've got a used G53 trans being delivered this week (Thank you to Ian here on the forum for the lead. The transfer from the donor went to his van..I guess we're kind of related now right? ). It's going into my 88 4wd manual. Yes I understand this thread is for the 86 2wd...Correct me if I'm wrong but it's pretty much the same process with exception of the transfer case? I will FINALLY be getting around to swap it with my failing current. Can't wait to have 1st gear back and a quiet trans! About a year ago I removed trans to replace clutch, throw out bearing, rear main seal, input seal, output seal, had flywheel resurfaced etc. Shortly there after the trans continued to go. Most likely input shaft bearing and syncros bad.

    My question is this - would you all think I better replace all this again including a new clutch and clutch kit when the donor trans goes in? Or if no noticeable leaks when I open it up, could I get away with these fairly new seals and bearings? I just want to make sure to get parts I need and have them on hand ready for the swap. I'm slightly concerned driving the failing trans around all this time the past year may have put stress on these components and I aught to start with a clean slate? But I sure would love to save a few bucks if I can.

    Thanks all for any input and I'm stoked for this forum that has helped my van continue to run all these years. Here's the rig -
    Name:  van.jpg
Views: 2404
Size:  82.0 KB

  10. #10
    Administrator timsrv's Avatar
    My Van(s):
    Lots of them
    Join Date
    Jun 2010
    Location
    SW WA ST
    Posts
    6,202
    Rep Power
    10

    Re: 1986 Toyota G53 Transmission replacement

    Unless leaking, I wouldn't consider replacing any of those parts again for at least another 4 or 5 years.

  11. #11
    Van Enthusiast
    My Van(s):
    1988 4WD LE 5 spd mnl
    Join Date
    Oct 2013
    Location
    so cal
    Posts
    168
    Rep Power
    1

    Re: 1986 Toyota G53 Transmission replacement

    Thanks tim. I dropped it by a trans shop to open it up to inspect wear and tear and make sure there wasn't anything catastrophic about it before the swap. Turns out the tip of input shaft if effed up and it wont be exactly centered, but im told by the shop it'll still function and get me down the road better than the one currently in the van. also there's a seal or two that are poo. Syncros and bearings are fine though and no indication it's ever ran dry. So that's good .I'm trying to save as I'm on a tight budget and actually the trans shop is inspecting for me for a trade of services. Right now I'm only out the cost of the trans its self + shipping from the dismantle place. Now I'm on fence whether I ask him to close it back up, or pay him to do the seals while it's still open as it would set me back another 100 or so for him to replace. hmm..

  12. #12
    Forum Newbie
    My Van(s):
    1985 LE 5-spd 1993 Previa AWD
    Join Date
    Sep 2015
    Location
    Portland, OR
    Posts
    15
    Rep Power
    1

    Re: 1986 Toyota G53 Transmission replacement

    Quote Originally Posted by timsrv View Post
    Unless leaking, I wouldn't consider replacing any of those parts again for at least another 4 or 5 years.
    Hey tim,

    About to replace the clutch on my van and thinking about doing a full tranny swap as well. My 85 2wd van had about 281k on it and the current tranny (5sp manual) is starting to make some noise. I have a friend of a friend who has a 5 sp from his old 89 van willing to donate...would this be compatible? If not what would work? Just trying to figure out what years vans had the same tranny.

  13. #13
    Administrator timsrv's Avatar
    My Van(s):
    Lots of them
    Join Date
    Jun 2010
    Location
    SW WA ST
    Posts
    6,202
    Rep Power
    10

    Re: 1986 Toyota G53 Transmission replacement

    I believe the newer manual transmissions (86 - 89) are a bit better than the earlier ones (84 - 85). For the most part they are interchangeable, but the overall length of the transmission is a bit different (don't remember now which is longer/shorter). If you swap one year range for another you will need to swap the drive-shaft too. Everything else should swap over fine. Tim

  14. #14
    Van Enthusiast
    My Van(s):
    1988 4WD LE 5 spd mnl
    Join Date
    Oct 2013
    Location
    so cal
    Posts
    168
    Rep Power
    1

    Re: 1986 Toyota G53 Transmission replacement

    Quote Originally Posted by Canoed_son View Post

    ...... thinking about doing a full tranny swap as well......current tranny (5sp manual) is starting to make some noise.

    Canoed-
    If there's doubt about the current trans, and you have a compatible swap in that will be donated...just going off my own recent experiences, I'd do the trans while it's all open and out. I didn't think my trans had issue when I went in after the clutch and a leaking rear main seal. After clutch, seal & bearing work..my trans went out very soon there after.

  15. #15
    Forum Newbie
    My Van(s):
    1985 LE 5-spd 1993 Previa AWD
    Join Date
    Sep 2015
    Location
    Portland, OR
    Posts
    15
    Rep Power
    1

    Re: 1986 Toyota G53 Transmission replacement

    Yeah I figured I'd just kill two birds with one stone while i have the thing out anyway. Its starting to make some whining/rattling noises and with summer coming up, i want to play it safe.

    Quote Originally Posted by ratatouille View Post
    Canoed-
    If there's doubt about the current trans, and you have a compatible swap in that will be donated...just going off my own recent experiences, I'd do the trans while it's all open and out. I didn't think my trans had issue when I went in after the clutch and a leaking rear main seal. After clutch, seal & bearing work..my trans went out very soon there after.

  16. #16
    Forum Newbie
    My Van(s):
    1985 LE 5-spd 1993 Previa AWD
    Join Date
    Sep 2015
    Location
    Portland, OR
    Posts
    15
    Rep Power
    1

    Re: 1986 Toyota G53 Transmission replacement

    Awesome, Tim! Thank you for the info. In terms of cost, whats a good ballpark price for used trans of this era? What would they charge at a junk yard/pick n pull?


    Quote Originally Posted by timsrv View Post
    I believe the newer manual transmissions (86 - 89) are a bit better than the earlier ones (84 - 85). For the most part they are interchangeable, but the overall length of the transmission is a bit different (don't remember now which is longer/shorter). If you swap one year range for another you will need to swap the drive-shaft too. Everything else should swap over fine. Tim

  17. #17
    Administrator timsrv's Avatar
    My Van(s):
    Lots of them
    Join Date
    Jun 2010
    Location
    SW WA ST
    Posts
    6,202
    Rep Power
    10

    Re: 1986 Toyota G53 Transmission replacement

    I don't know. Seems like every place is different. If you can find one at one of the pick-n-pulls, the price is $130.00. Sometimes they have 50% off sales, so if you can wait, some people will go pull the transmission, then hide it somewhere until a sale, then go back and get it. If you do that, it's a good idea to go to their website and find out the date the vehicle you're hiding it in arrived (newer arrivals have less chance of being crushed before you can come back). Keep in mind they'll hit you for a $30 core charge and sometimes an "environmental fee". You can avoid paying the core if you bring in another transmission (doesn't necessarily need to be the same kind). Sometimes you can haggle them down. I used to be able to successfully do that on bigger parts.......but not so much anymore. Depends on who is at the counter and how many other ears are around. Key statements are "I have cash and don't need a receipt" and "I don't plan on bringing it back even if it has a problem" Good luck. Tim

  18. #18
    Forum Newbie
    My Van(s):
    1985 LE 5-spd 1993 Previa AWD
    Join Date
    Sep 2015
    Location
    Portland, OR
    Posts
    15
    Rep Power
    1

    Re: 1986 Toyota G53 Transmission replacement

    Super helpful stuff here, Tim! Thanks much...I will have to keep this in mind next time I head down to the pick n pull!

  19. #19
    Van Fan
    My Van(s):
    87 4WD CRG : 170K
    Join Date
    Mar 2013
    Location
    Pittsburgh, PA!
    Posts
    73
    Rep Power
    1

    Re: 1986 Toyota G53 Transmission replacement

    A question about re-installing the RMS carrier;

    I picked up a new paper gasket that goes between the rear of the engine and the RMS carrier. I also used some FIPG on the bottom of the carrier where is meets the oil pan. Is any additional FIPG or RTV needed between or around the paper gasket? Or will just the gasket be enough?

  20. #20
    Administrator timsrv's Avatar
    My Van(s):
    Lots of them
    Join Date
    Jun 2010
    Location
    SW WA ST
    Posts
    6,202
    Rep Power
    10

    Re: 1986 Toyota G53 Transmission replacement

    No, just the paper gasket is good between the block and the carrier. Here's a link to my blog where I'm doing it:

    https://www.toyotavantech.com/forum/...ebuild-part-12

Tags for this Thread

Posting Permissions

  • You may not post new threads
  • You may not post replies
  • You may not post attachments
  • You may not edit your posts
  •