-
Forum Newbie

- Rep Power
- 1
3C-T Townace 1993 Denso Injection Pump removal and refit
Hi All,
My van has 100k miles on it . It is leaking diesel from the Denso injection pump. I could see weeping (because its sad) diesel between the distributive head (cast iron where the injector pipes attach ) and the alloy body of the pump. This is likely the big Oring inside and I have been told that you have to have the pump set up on proper analysis equipment after opening it up to replace the O ring . So I am removing the pump and plan to take it to DFIS (Diesel Fuel Injection Service ) in Portland OR. You drop the pump on their counter and they do the technical.
So far, I have removed the gearshift and E-brake controls, removed the big metal access shroud and radiator shroud , main pulley, Alternator, Fan Bracket , etc. to expose the timing belt . I have fabricated pullers for the main pulley and pump pulley. Next is to slack off the timing belt with appropriate marks and notes and break the 19mm nut on the pump cog loose. This is about 6 hrs to this point.
I will add postings to all of this as it progresses.
-
Forum Newbie
- Rep Power
- 1
Re: 3C-T Townace 1993 Denso Injection Pump removal and refit
So with the engine timed up and all appropriate marks on timing belt and sprockets and reference points-- I broke the 19mm nut loose off of the injection pump. I made an aluminum bar with a clearance hole for the socket and smaller holes for two 8mm bolts (sorry, I don't remember the pitch...) that thread into the sprocket . I was going to anchor the lever on one of the big threaded holes in the water pump, but decided not to stress that piece. So I extended the lever and held it with one hand whilst using a big ratchet and socket on the nut. Voila! Then I used the same tool with a block between the lever bar and the sprocket shaft and the block has a nut in it--such that I could anchor the bar with the 8mm bolts and crank a large central bolt against the sprocket shaft--- and pop went the sprocket. So here is a photo of my idea of factory tools ...
Cheers! 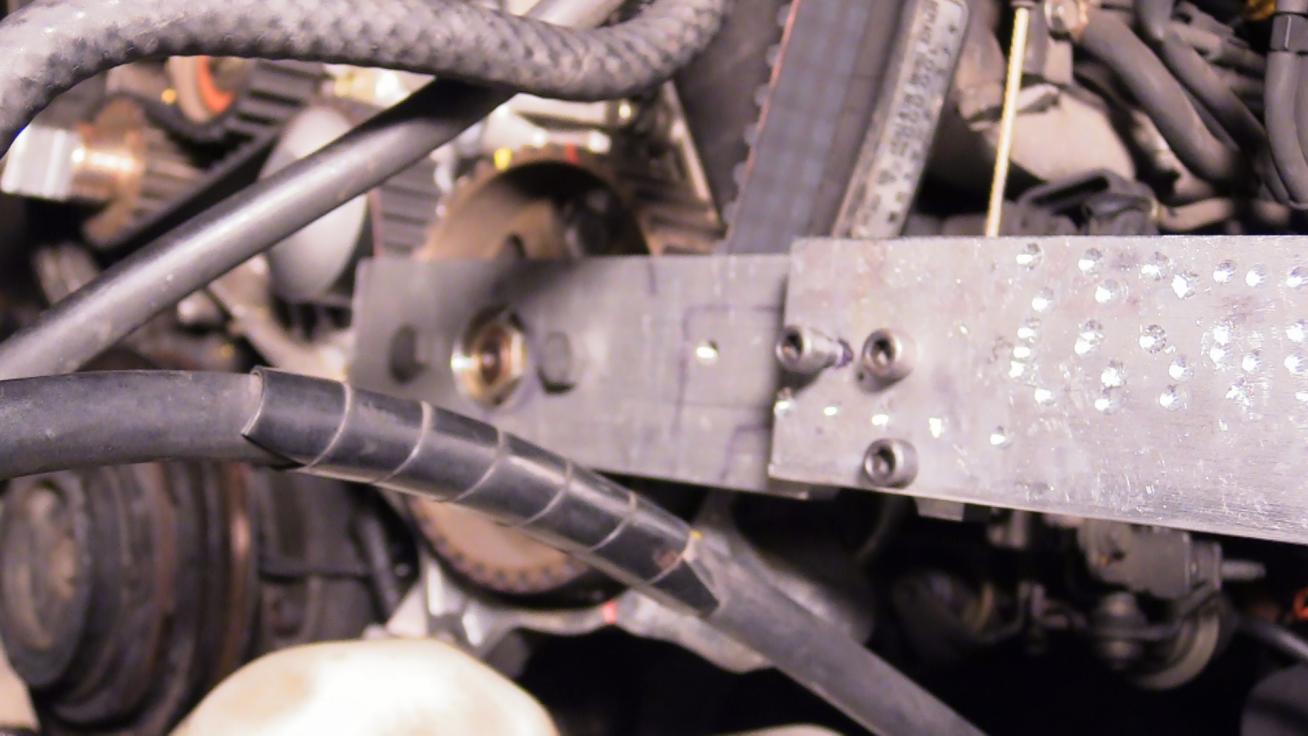
-
Forum Newbie
- Rep Power
- 1
Re: 3C-T Townace 1993 Denso Injection Pump removal and refit
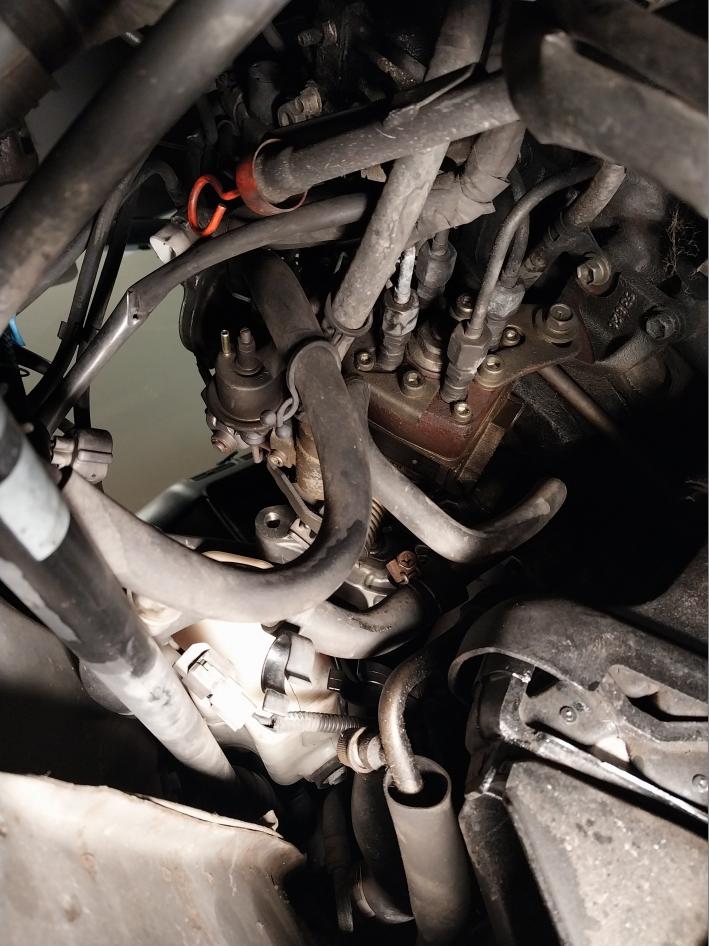
The next big item is to get the starter out . You really cannot get access to the 4 injector pipes and the rear pump bracket while the starter is in place. The starter is not too bad to remove-- there is a big high current nut and the trigger wire is on a connector that you unplug. Two 14mm bolts undoes it and you can qwiggle it out. The 14mm starter bolts are above and below the bump that houses the starter pinion. Each one has a miscellaneous bracket also. See photo of what you see when the starter is removed. I scratched around the washer on the rear bracket as a witness mark and also on the water pump. The orientation of the pump needs to be put back exactly relative to the engine when reinstalling--or you change the injection timing. You also get good access to the hot wax device water lines . I am going to clean the 4 compression fittings well before cracking them open--and put numbers on the pipes... Also I am told to use two wrenches --one to hold the exit spigot still on the pump and one to crack the compression fitting --such that the pipe is not twisted. Good luck trying all this while the starter is in the way. Now that I have seen the access without the starter, I think this job is doable.
-
Forum Newbie
- Rep Power
- 1
Re: 3C-T Townace 1993 Denso Injection Pump removal and refit
So, today I was able to remove the pump proper. I temporarily removed the vacuum throttle dashpot to get at the electrical connector buried behind it. The two thermowax water lines were easily accessible from underneath without the starter in the way.
The 4 high pressure diesel lines are 17mm and connect to four threaded nipples on the distributive head. I tried to steady the nipples with a 14mm wrench, but I needed both hands to crack the 17mm compression nuts loose. Luckily, none spun the 14mm nipples although best practice would hold the 14mm steady so you don't twist the pipe. I only really smacked one finger in the process... Then all that was left was to remove the 14mm bolt on the rear pump bracket.
With all the compression nuts free I popped the pipes out of the nipples and undid the 14mm nuts at the water pump and then the injection pump was free. There is very little give to the pipes even though I had undone the bracket at the manifold. I was able to move the pump downward and outward and qwoggle it free from the 4 pipes , putting minimal strain on them. Then once clear of the pipes at the rear I was able to pull the pump out from the top.
With the pump removed, access to the thermostat is direct and I will replace it (only 30 yrs old) while its available . It is surreal to see this piece on my bench. The only scary part left is to crack the compression fittings at the injector end for bleeding --but that battle is for another day. So now it is time to take the pump to Diesel Fuel Injection Service in Portland OR. , and eat some Hershey's Kisses at their counter. 
-
Forum Newbie
- Rep Power
- 1
Re: 3C-T Townace 1993 Denso Injection Pump removal and refit
3C-T Townace : Since the starter was out , it is a good time to inspect the contactor and brushes. Brushes after 100,000 miles were practically brand new and no grooving in the commutator . The contactor bits were showing wear. The magnetic plunger is available from the Toyota dealer --my starter is the 2.2kW starter
#28100-64290. The mag plunger is #28235-35080, $48 at the dealer. The tricky part are the copper L-shaped contacts. The square one is available from Toyota, but the moon shaped one is not available anywhere--and this is the battery side terminal that takes the wear. The old B contact was about .110" thick originally , but had worn down at least .015" . I bought a kit of contact parts off of Ebay for about $20. The parts are close. The kit is for a 1993-1997 Toyota Land Cruiser and there are several sources. The kit I bought had a part number of 44493GQ. The parts in the rear of the photo are extras and don't fit this starter...
In any case, the new contacts are about .100" thick , but considering the wear on the B terminal, this is still better and not pitted. I had to rework the new part because the moon contour was too far towards the plunger, so I had to file about 1/16 " to deepen the moon shape and match it up with the original . Also I had to sand the back flat on a surface plate and tap one of the corners down to flatten the contact area. The quality is not great , but with this rework I am going to use this part. I took one of the new contacts and clipped the corner off with a pair of diagonals--it is copper all the way through. I was making sure it was not copper plated zinc or some other horrifying ersatz product. In the photo I put the two B-terminals side by side . You can see the parts in the foreground where I had to deepen the moon contour to match the original. A half moon file did the trick .There is a step diameter on the underside of the phenolic part of the plunger that must fit between the curved contours on the L terminals when the plunger is engaged. I will measure its diameter and measure the distance between the terminals in situ before signing off on the repair. 
Last edited by karachaffee; 02-13-2024 at 12:08 PM.
-
Forum Newbie
- Rep Power
- 1
Re: 3C-T Townace 1993 Denso Injection Pump removal and refit
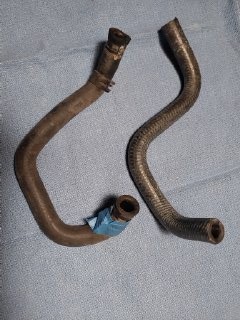
So , intrepid incipient diesel mechanics , now that you have the injection pump out ...why not replace the two hoses that feed the hotwax unit ? One of them showed some softening at the end where it connects to the hotwax unit --perhaps from the diesel leak --which was the proximate cause requiring the journey into this particular swamp...
The straight hose from the rear of the block can be substituted with off-the-roll 3/8" ID (.375") heater hose. Its snug on a 10mm fitting , but that is good . I used a small worm type hose clamp to secure it --the Toyota spring clamps are a bit too small. The lower hotwax hose is a molded piece from Toyota and is unavailable. However there is a molded hose from NAPA auto #11947 that has some of the correct bends in it and I trimmed it to approximate the original . See photo--the original hose is on the left . The NAPA hose is a true 10mm ID and fits the nipple very nicely . I elected to use the Toyota spring clamp because you just can't get to it once everything is re installed. The NAPA hose is about .010" smaller in diameter, but I went with the original spring clamp in any case--time will tell on that idea. There are many 10mm and 3/8" molded hoses available from NAPA, so most of the special shape hoses can probably be made from that source with a little head scratching and a sharp Stanley knife.

-
Forum Newbie
- Rep Power
- 1
-
Forum Newbie
- Rep Power
- 1
-
Forum Newbie
- Rep Power
- 1
Re: 3C-T Townace 1993 Denso Injection Pump removal and refit
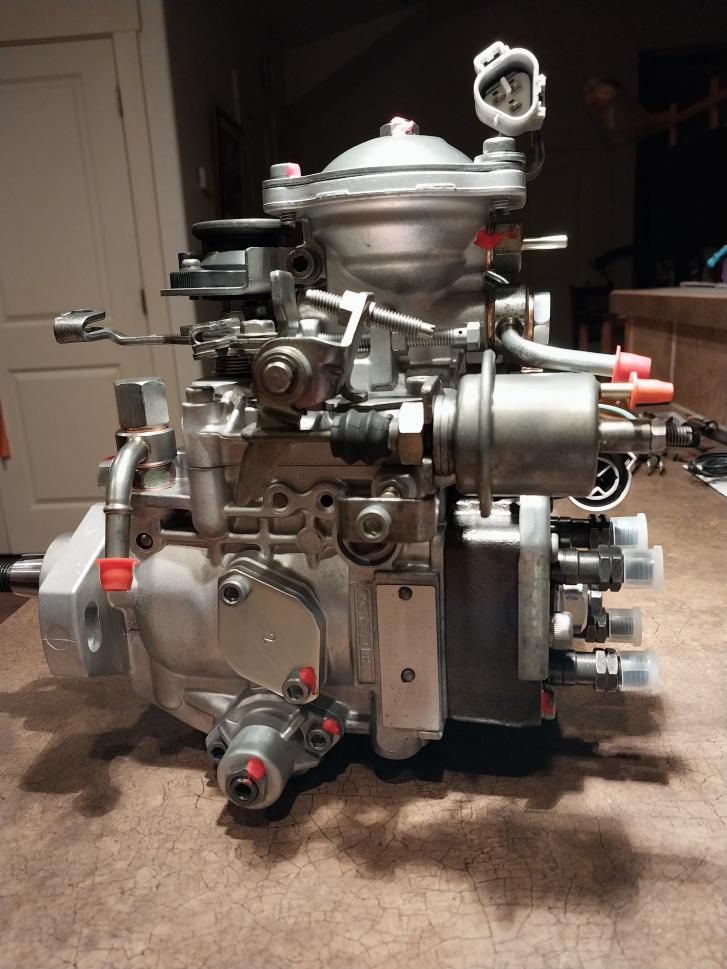
So fellow diesel operators, I just got my Denso pump back from DFIS (Diesel Fuel Injection Service , Portland OR. ) They did a complete overhaul on the pump. It was $1245.00 and I believe they did a beautiful and professional job. They removed and blanked off the "hot wax" module which was non functional and not available as a replacement part.
I was told that only under the most frigid temperatures would I perhaps notice a difference . My reply was , " I don't plan to drive through Montana in January..." I am a fair weather traveler. They said to loop connect the now unneeded water lines together , since there is no hot wax unit in the loop. Here is a photo of the overhauled pump --it has beautiful little red caps on each and every orifice ! You can see the diamond shaped blanking plate where the hot wax unit used to reside ...
-
Forum Newbie

- Rep Power
- 0
Re: 3C-T Townace 1993 Denso Injection Pump removal and refit
Over a month of down time so far, I hope you're like me and have 4 old cars. Thanks for the writeup, looking forward to the re-installation phase. So sad that all this work doesn't lead to a substantial improvement of some sort!
 Posting Permissions
- You may not post new threads
- You may not post replies
- You may not post attachments
- You may not edit your posts
-
Forum Rules


 Reply With Quote