-
Van Enthusiast


- Rep Power
- 1
-
Van Addict


- Rep Power
- 1
 Re: Previa 2TZ-FE Teardown
Great job and great that you posted pictures. I personally always think it is interesting to figure out why something is having issues.
-
Van Addict

- Rep Power
- 1
Re: Previa 2TZ-FE Teardown
more the reason to do a induction cleaning service on these vans periodically to get rid of the carbon... cheap crappy fuel and crap ethanol gas is making engines run so rich, it builds up so much crap inside
besides... it's fun to put on a smoke show 
-
Van Enthusiast


- Rep Power
- 1
Re: Previa 2TZ-FE Teardown
Some updates:
I have the piston/rods out and the timing cover off. The rod bearings show some wear, but not a lot, and very uniform. So far all of the components still measure within spec - the rod journals, piston pins. cam chain, pistons... The timing chain rails show some wear, so they go on the list.
I worried about the countersunk screws holding the oil pump cover on, and had to grind my impact driver bit down to fit the JIS-standard screws better. I had the timing cover off of the engine already, so I was able to lay it on a firm surface, apply a few nervous whacks, and they all came out.
The oil pump looks pretty nice inside:
oil-pump-2TZ-FE.jpg
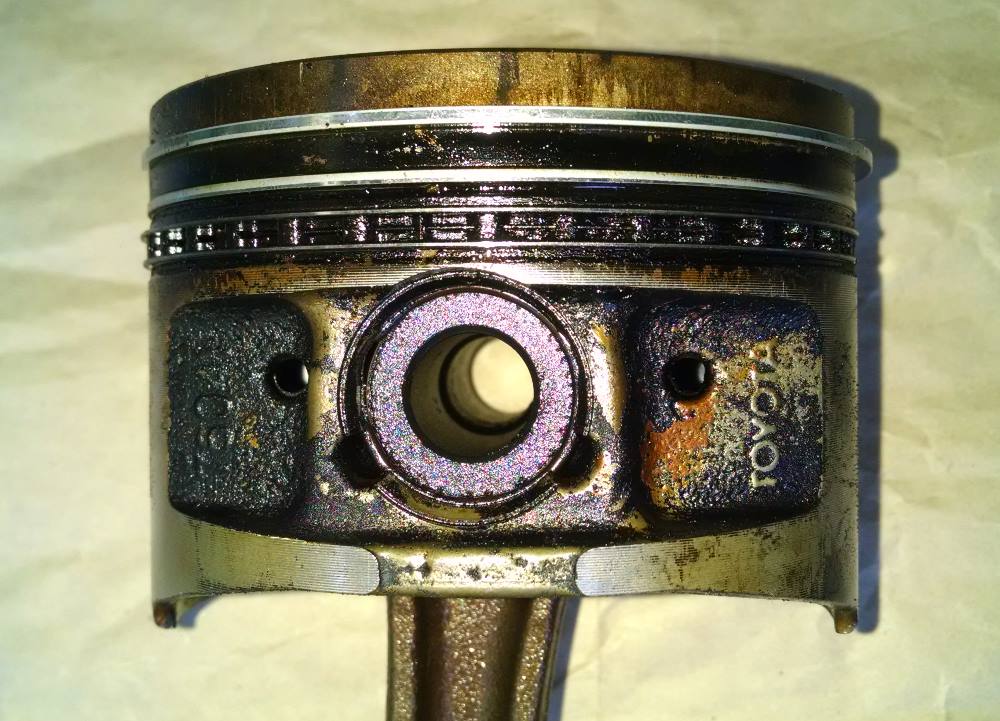
The rings are filthy with carbon deposits, and some are stuck in the pistons. This might be another cause of low compression, I suppose. The pistons are cleaning up nicely soaking in Simple Green, though.
I'm starting to compile a parts list, and the big wild card at this point is the head. If all it needs is a good cleaning and a face-off, I'll get off easy. I'll need to get a few valves off next, and will need to contrive a valve spring compressor.
-
Van Addict


- Rep Power
- 1
Re: Previa 2TZ-FE Teardown
I envy the time and space you have! Since I am rebuilding my motor as well, I blogged (van blog on here) the parts I needed to buy to rebuild the whole motor. Maybe some parts numbers could help? I decided to go all out since this was a high mileage vehicle and even going through the old records (surprised the previoius owner kept everything) and see what he did not change or what was recommended for change (such as SADS).
Anyways, keep the updates coming!
-
Van Enthusiast


- Rep Power
- 1
Re: Previa 2TZ-FE Teardown
The pistons are pretty dirty, but don't show any appreciable wear:
They clean up nicely:
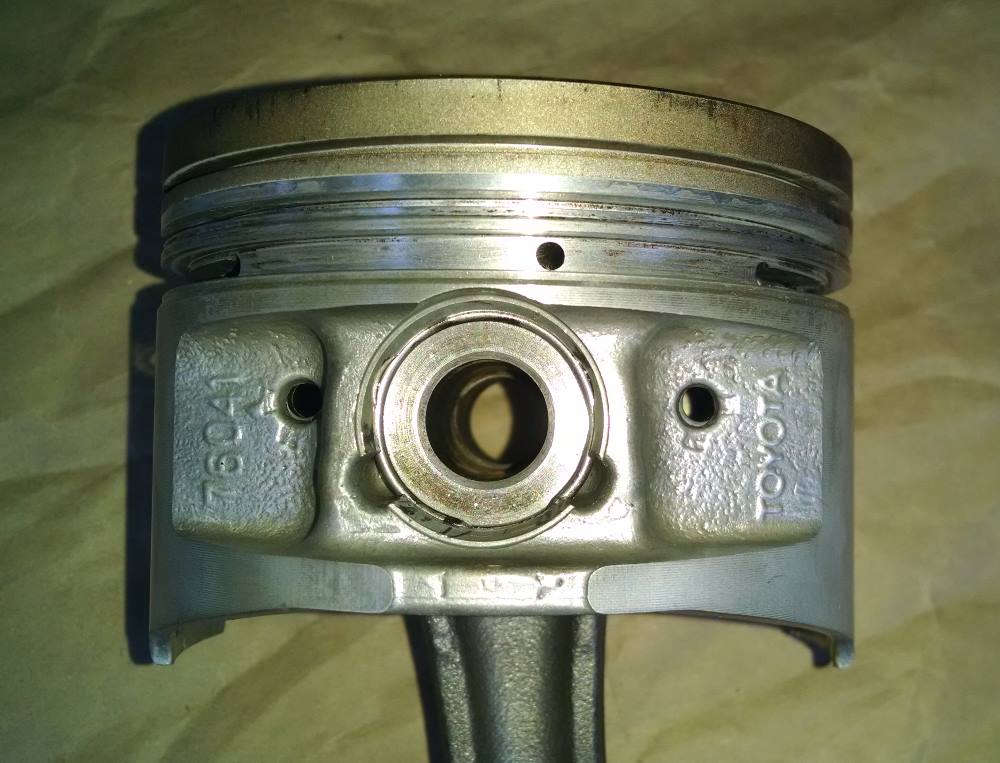
As you can see in the first picture, the second compression ring is stuck in the groove. This had me worried, but after some heat, penetrant, and a day soaking in Simple Green, and some light tapping, one end popped up ever so slightly. This made it possible to tap tangentially, and I was able to remove it. It broke in two, but if I follow through with this rebuild I'd replace all the rings anyway.
I discovered an oil passage that was completely plugged with crud. I cleaned them with drill bits, just twisting them in my fingertips.
There's one on each side of the pistons, connecting the wrist-pin hole to the oil-ring groove. I've drawn some lines on this photo to show how the holes connect:
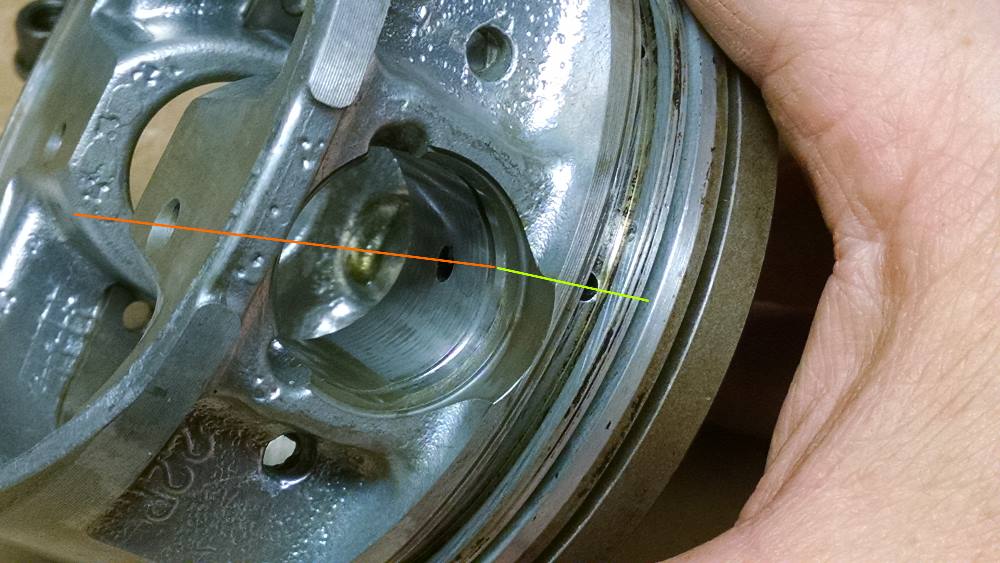
The pistons have a crown made of a different material. You can see the boundary between the compression ring grooves. It looks like steel, but it isn't magnetic, maybe a 300 series stainless? Anyway, pretty impressive construction!
The rod bearings are a little worn, but not much, considering this engine has 230k on it. Here's the upper one that takes the load of the power stroke:
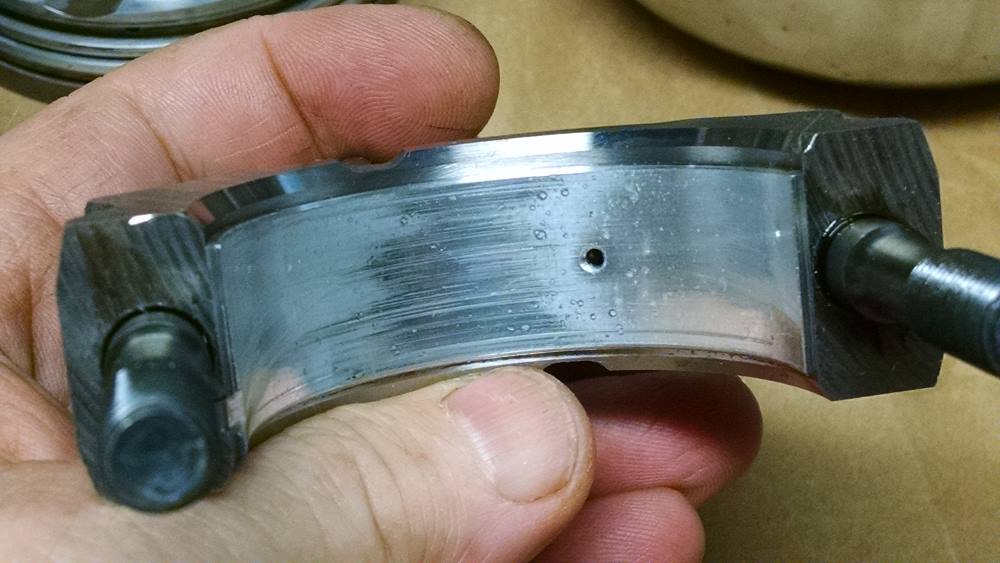
The lower ones all look like this:
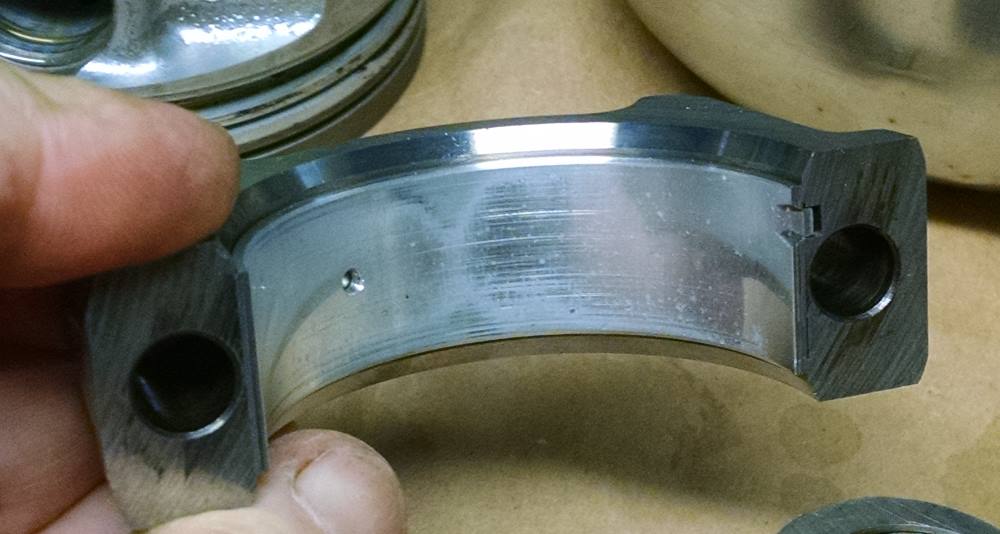
I'd probably replace these bearings, just because I can. But if they weren't, I'd put them all back in and they'd be good for another long while...
The rod journals all measure safely in spec. Here's the grading chart from the FSM, discussed in another thread (ignore the mike reading):
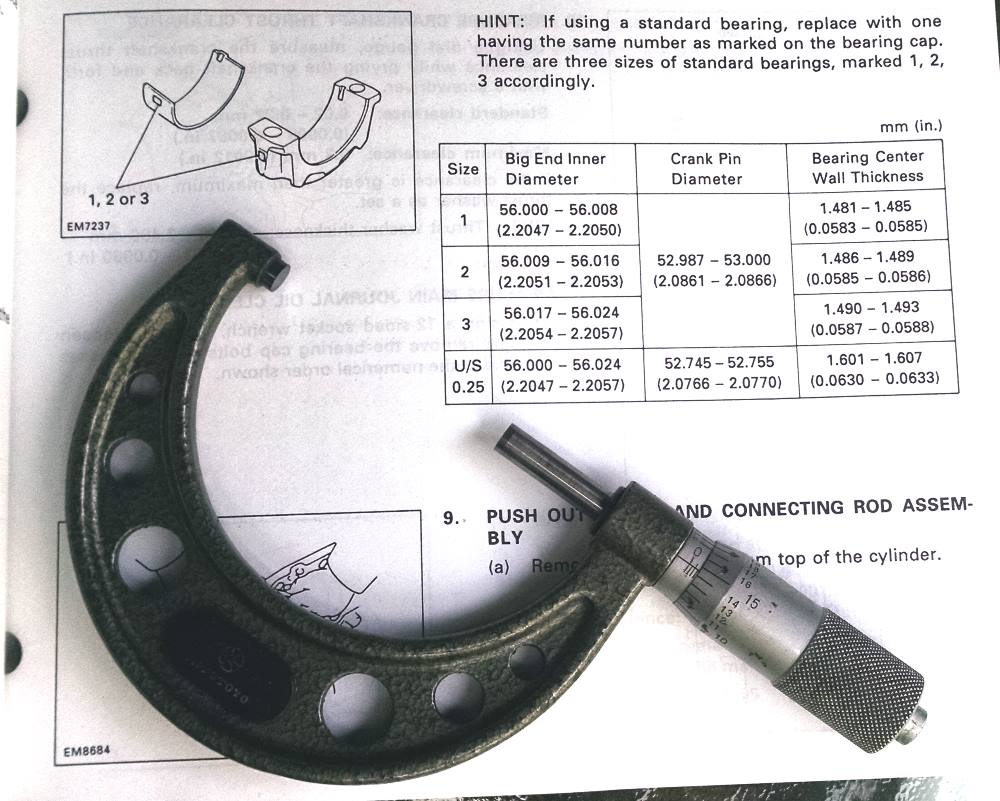
Three of my rods are grade 2, the other 1. The codes can be seen on the sides of the rods. The "2" shown here is the grade mark:
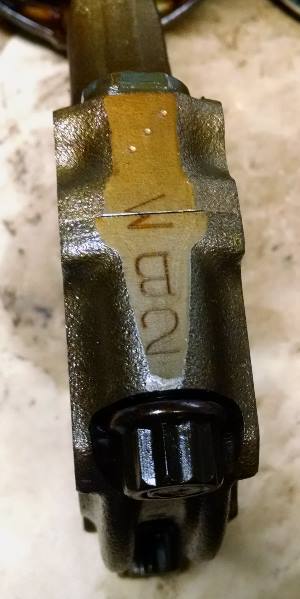
The three dots in a diagonal pattern are mine - I use a center punch to mark rods to make sure I reassemble them in the same place, This is number three.
And the matching grade numbers are ink-stamped on the shells themselves (faintly - the "2" is outlined here):
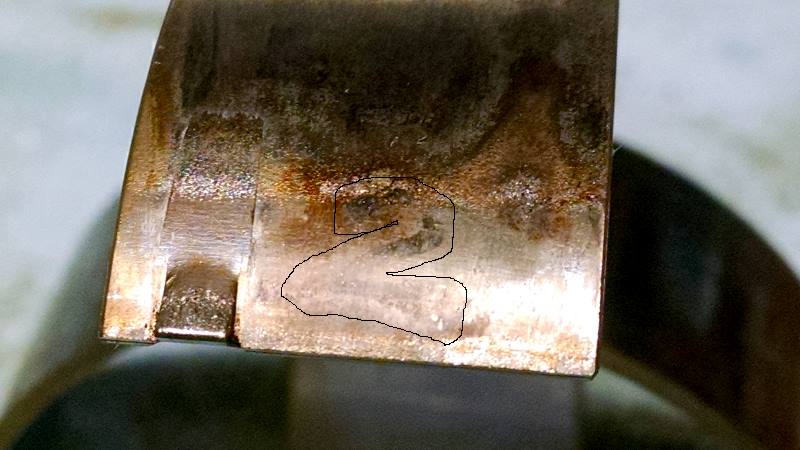
They're more visible on new parts, of course.
The timing chain cover came off easily:
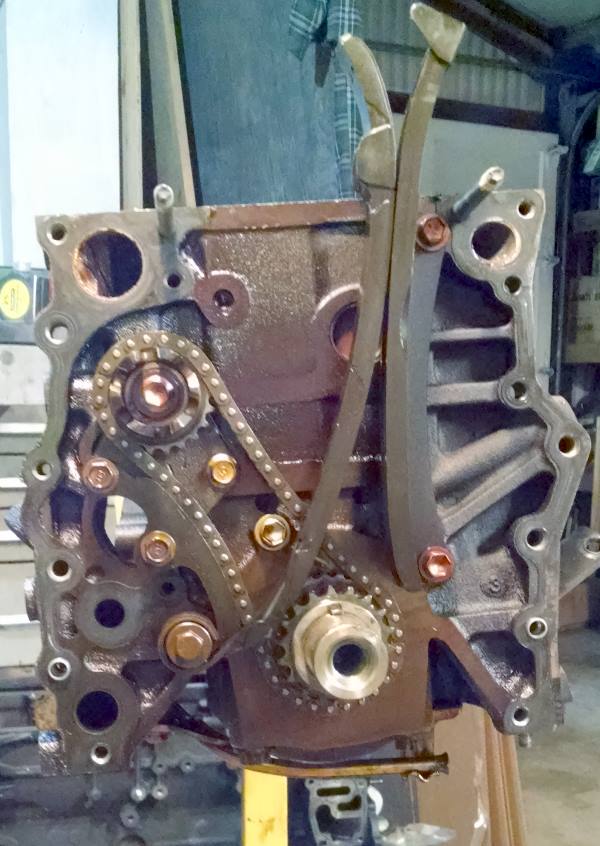
The chain and sprockets are in fine shape, but the plastic guide pieces show some wear.
I still have to pull some valves out. I just wanted to get these pictures up before they got stale.
-
Van Addict


- Rep Power
- 1
Re: Previa 2TZ-FE Teardown
-
Van Enthusiast


- Rep Power
- 1
Re: Previa 2TZ-FE Teardown
This project gained a new emphasis, and then ran into a snag -
A friend's Previa blew a head gasket. That's a story in itself, but not for this thread. At any rate, I know this van didn't overheat. It's failure was sudden and it wasn't run dry.
Then I discovered that the head from this spare engine I had torn down was badly warped. I recall the van it came from leaking water out of the water pump / timing-cover junction (corrosion where the O-ring seals there) so I guess the PO had run it dry. My conclusion that the engine was tired was more correct than I'd thought.
Anyway, I found myself with a donor engine with a bad head and Previa needing a replacement engine. So out came the engine with the recently failed gasket to harvest the head - confirm that it's still flat, and then I ordered up a bunch of parts.
Many other conflicts slow the project down, but it's going to proceed as I carve out time in dribs and drabs. I'll start a new thread with the engine assembly process.
-
Van Enthusiast


- Rep Power
- 1
Re: Previa 2TZ-FE Teardown
Very late update....
I had planned on a more detailed post with photos of the reassembly process, but this project wound up with time pressure that I hadn't planned on. The reasons for that are not worth detailing here. Generally I like to do this kind of thing as my own customer - a very patient customer - but that scenario didn't pan out this time. So no pictures worth sharing. Sorry. Maybe next time?
Anyway, I rebuilt the '93 engine, using the head from the '91. It was flat and cleaned up easily. It had blown a head gasket, but did so while sitting in a parking lot, so it didn't ever overheat. The valves needed nothing but new seals. A light skim cut for a fresh sealing surface, and I was out of the machine shop for less than I'd feared. I bought an OEM gasket kit and new OEM bearings to match the marks on the block and rods, as the crank measured within original specs. New NPR rings from ebay and the pistons were ready. New stretch bolts where needed, the usual batch of new hoses, a transmission mount, H2O pump and thermostat, spark plugs, distributor O-ring, etc., etc.
I repeated my error from last year and busted the temp sensor. I bought a cheapie on ebay and found late in the game that the connector didn't fit. I also busted the transmission cable where it enters the transmission, so that slowed me down and took another bite out of my wallet. When I got it all together, it would run, but not idle. After a lot of fussing around it turned out to be the still-disconnected water temp sensor. Apparently, without a signal there the ECU wouldn't operate the Idle Control Valve. Once I had a good temp sensor hooked up, it ran fine. Lesson learned.
This van went to a friend, and he reports that it is still running like new. My total cost was $1350 for parts and machine work.
Not to be Previaless for long, I found a nice one-owner '94 LE with 270k, still running strong.
Last year I did an JDM swap on my '93, and the total came to $1500. Now that I've done a rebuild from the crank up, I can compare the outcomes.
The JDM swap was faster, but getting an engine out and in again is the hard part, and that labor is the same. My shop is not tall enough to do that in, so I'm outside and dependent on good weather. And I still had to strip the JDM engine down to a long block. So the labor saved was that of rebuilding the engine itself. This happens inside, so it's more comfortable and I don't need clear skies and daylight. Plus I dig re-building engines.
The block of the '93 engine I rebuilt was still in fine shape, other than the fact that it was filthy. The pistons, as shown in an earlier post, were caked with burned on carbon. Oil passages were clogged, and rings were sticky. The ports and valves were caked with deposits, too. But all of the wear surfaces (crank journals, cylinder walls, piston skirts and ring lands) were in great shape. Even the bearings were decent, and had I been broke I'd have put them back in. So when reassembled, it's essentially a new engine. The JDM engine, on the other hand, went back on the road with all that crud still in place. That van is still running fine too, and I expect it will for a long time. But if (more likely when) I do this again I'll probably opt for the rebuild route if I have the extra time.
-
Forum Newbie

- Rep Power
- 0
Re: Previa 2TZ-FE Teardown
Love this thread- wish you were my neighbor- would love to do this to my van!

Originally Posted by
pdgizwiz

Very late update....
-
Van Enthusiast


- Rep Power
- 1
Re: Previa 2TZ-FE Teardown
An even later update to this thread, almost a decade later.
The van that got the JDM engine went to a friend's son, who fell asleep and rolled it on his way to Burning Man... He was OK, but that was the end of the van.
The engine that I rebuilt from scratch went to that same friend, and it is still his daily. I don't know how many miles are on it now, but it's well over 300k.
A few days ago I snagged a JDM 2TZ-FZE from my local engine monger, and have begun to strip it down for the "scratch" treatment for my '97 DX Altrac, which is still running fine but has its original engine with ~270k on it. I want to pull it out and replace it while it's still running. I sense that the JDM 2TZ engines are no longer as readily available as they were ten years ago, and wanted to strike while the iron was still warm.
I'll start a new thread and call it "Previa JDM 2TZ-FZE Teardown and Rebuild" soon.2TZ-FZE_arrives.jpg
Last edited by pdgizwiz; 06-23-2024 at 07:32 AM.
-
Van Fan


- Rep Power
- 1
Re: Previa 2TZ-FE Teardown
Nice! I remember reading through this thread while I was doing my teardown a couple years back. (My head gasket went at about 270k.)
Sorry to hear the JDM swap van went out like that. At the end of the day, at least he made it out of it. Gotta be a nice feeling to know the other one is still out there on the road ten years later though.
Looking forward to hearing about how this new one is holding up in 2034!
Tags for this Thread
 Posting Permissions
- You may not post new threads
- You may not post replies
- You may not post attachments
- You may not edit your posts
-
Forum Rules


 Reply With Quote


