Page 1 of 2 12 LastLast
Results 1 to 20 of 129

Thread: Fuel gauge not working?

Hybrid View

Previous Post Previous Post   Next Post Next Post
  1. #1
    Administrator timsrv's Avatar
    My Van(s):
    Lots of them
    Join Date
    Jun 2010
    Location
    SW WA ST
    Posts
    6,203
    Rep Power
    10

    Fuel gauge not working?

    I've seen this problem on 4 of my vans so far and each time it ended up being the same thing (fuel level sending unit inside the fuel tank). The 1st couple times I fought with it and pulled the entire tank out of the van. The last couple times I left the tank partially installed and was able to complete the job much faster! Doing it this way will save about 1/2 the time and the difficulty level is reduced. Here are some pictures I took while doing the job. Note, this is a 4wd van, but the procedure is the same on a 2wd.

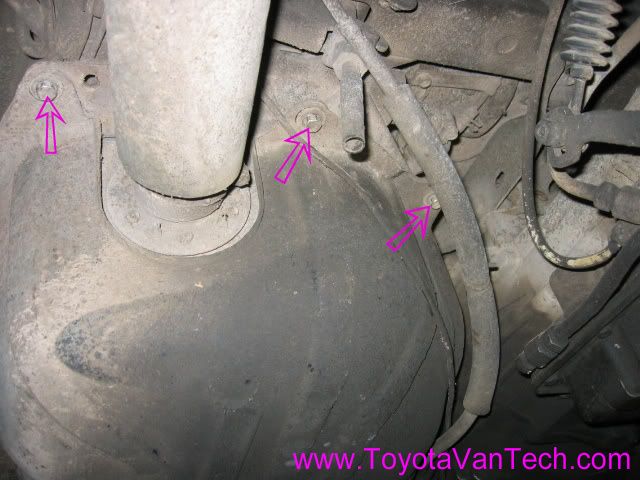
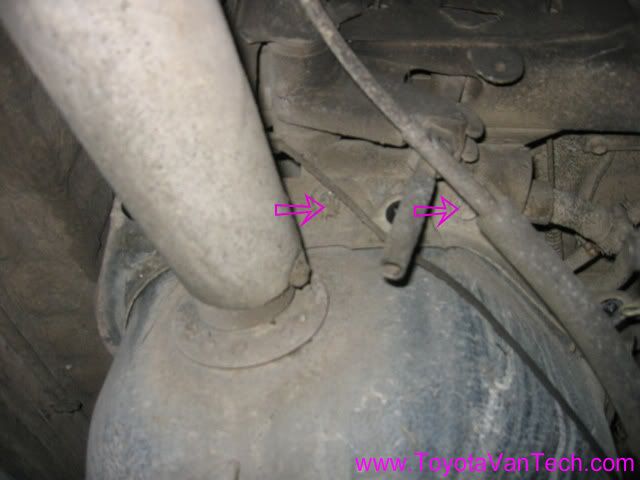
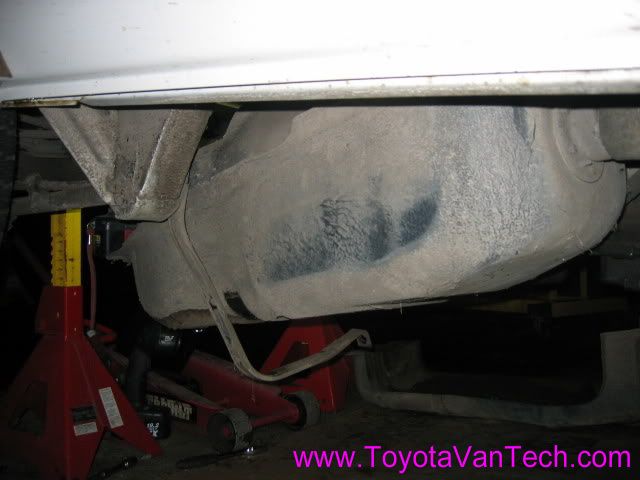
    1st step is to use up or drain most of your gas. In this case I drove the van until the low fuel light came on, then did the job (if you drain gas, familiarize yourself with safe gasoline handling practices before attempting). Jacking the vehicle is required, so safely lift and secure the vehicle for access. In this case, I left the front wheels on the ground, put my jack under the rear differential and jacked it up until the rear wheels were about 1 foot off the ground. I secure the vehicle by placing jack stands under each side of the rear axle. Once you have access underneath, remove the (5) 12mm bolts that secure the plastic tank protector, drop it down and get it out of the way. Note: picture shows front 3 bolts (rear bolts not shown).


    Next loosen the (2) 12mm front tank mounting bolts but don't remove (make them very loose).


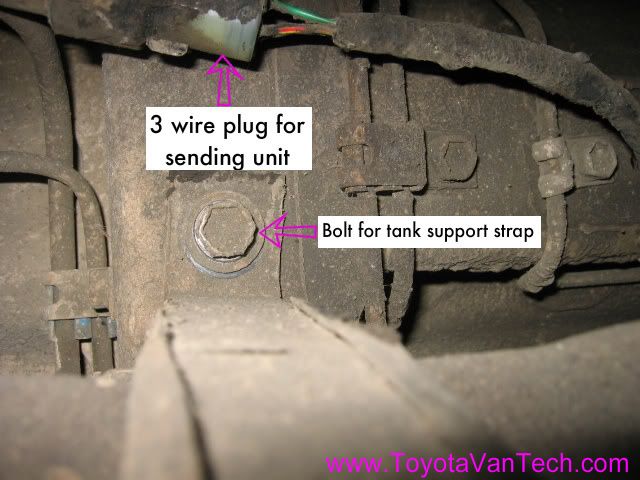
    Next pull the sending unit electrical plug from it's spring clip mount and separate it from the wire harness. Pull the 14mm bolt that secures the tank support strap, and pull the strap down and out of the way.


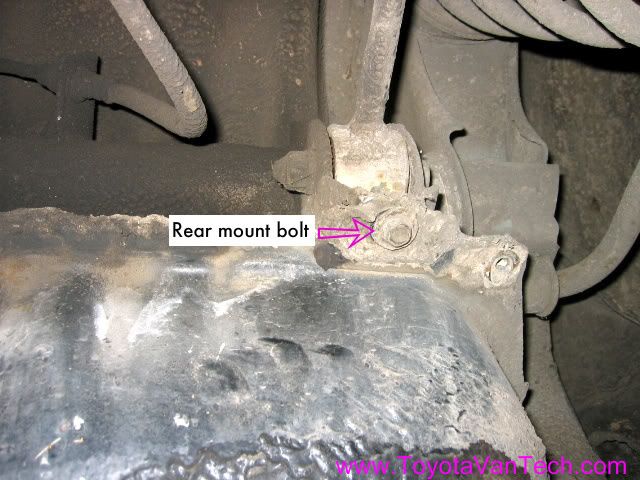
    Now completely remove the rear tank mounting bolt and allow the tank to drop. It will drop about 8" before the fuel hoses pull tight. It's okay to let it hang on on these hoses as long as tank is mostly empty.


    Here's the tank hanging by the hoses.


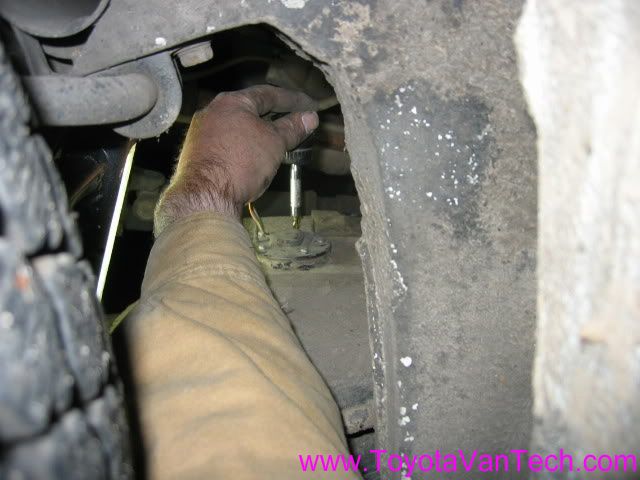
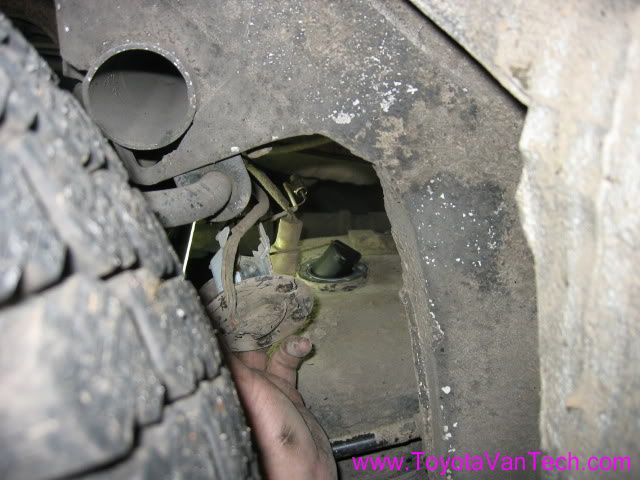
    This is the cool part, as a pure coincidence, the area between the RR tire and the wheel well lines up perfectly with the sending unit on the hanging tank. This is the perfect access tunnel for reaching in and removing the sender! Note: Before removal, it's a very good idea to blow the dust and debris off the top of the tank with compressed air. Focus on in the immediate area of the sending unit flange. A 90 deg scribe followed by more air works well to loosen and disperse the dirt and crud from inside the Phillip's head screw cavities before attempting to remove them. Be sure to wear eye protection and avoid breathing the dust while using compressed air.


    There is the perfect amount of room to pull the sender out and replace. The sender has a long arm with a swinging float. There are several bends in the arm, so it is necessary to rotate and change angles as you lift.


    Once out, you can use an ohm meter to check the range of resistance. This is one of those rare instances that an analog ohm meter will work the best. Once hooked up you can move the float up and down and you can watch the needle on you meter make linear movements with the float position. If there are dead spots (and there likely will be), then you can either replace the entire unit or try to repair. Last I checked Toyota still had these available. Keep in mind that 4wd and 2wd vans use different senders. I'm not exactly sure what the difference is, but they call for different part numbers in the EPC. Toyota Part # 83320-80034 is used for 4wd & Toyota part # 83320-29857 is used for the 2wd. Prices vary from place to place, but you can expect it to cost between $100 - $150.

    IMO, although possible, repair is not probably not your best option. I have done this successfully in the past, but I didn't feel it would be a lasting fix. I guess it depends on the condition of the rheostat and the contact spot on the arm inside. If you choose to go this route, disassemble the little metal box by bending the tabs. Carefully inspect the rheostat and the arm. If the arm and/or the rheostat aren't worn through, then you might get lucky. It's important that these parts be clean and that there is enough tension on the sliding arm to make good electrical contact with the rheostat coil. I found using a pencil eraser is great for cleaning these contacts.

    The rheostat arm can be re-arched by forcing it past it's normal travel and making it slip on it's shaft. Once it's extended beyond it's normal travel and is away from the rheostat you can grab it near the base with a pair of needle nose pliers. Once the base of the arm is held steady, you can carefully bend it (be careful not to go too far). Once you are satisfied with the shape of the arm, rotate it back to it's normal range of travel and retest using the ohm meter. Reassemble in the reverse order of disassembly and you should now have a working fuel gauge. Tim

  2. #2
    Van Fan VanSurfer's Avatar
    My Van(s):
    87 4wd LE auto
    Join Date
    Oct 2010
    Location
    Far Nor Cal
    Posts
    35
    Rep Power
    1

    Re: Fuel gauge not working?

    Thank you for another awesome post Tim!!! I've been putting this off since I bought Sue, relying on my mileage instead. I guess this is now on the list for when it dries up.
    "When the power of love overcomes the love of power, the world will know peace." - Jimi Hendrix

  3. #3
    Van Enthusiast
    My Van(s):
    87 4x4
    Join Date
    Jan 2012
    Location
    Reno, NV
    Posts
    264
    Rep Power
    1

    Re: Fuel gauge not working?

    I've tried a few online vendors. So far 83320-80034 has been discontinued.

  4. #4
    Administrator timsrv's Avatar
    My Van(s):
    Lots of them
    Join Date
    Jun 2010
    Location
    SW WA ST
    Posts
    6,203
    Rep Power
    10

    Re: Fuel gauge not working?

    That sucks. I'm doing a major project on my van right now and finding this "NLA" scenario very familiar. Looks like you'll be stuck repairing the old one or finding one in a salvage yard. Tim

  5. #5
    Van Enthusiast
    My Van(s):
    87 4x4
    Join Date
    Jan 2012
    Location
    Reno, NV
    Posts
    264
    Rep Power
    1

    Re: Fuel gauge not working?

    I'm wondering if the sending unit is the same across multiple applications and only the arm varies.

    Do you know proper resistance values full and empty for a good unit. It would be easy to test against another new part.

    Also, how many inches does then end of the arm travel on the van sending unit?

    It would be easy to weld the end of the van arm onto another sending unit.

    I aim to replace my fuel pump soon. I want to do it all in one shot and be set for the next 100,000 mi. Like you, I value my time over doing the job twice.

    And why no aftermarket support?

  6. #6
    Administrator timsrv's Avatar
    My Van(s):
    Lots of them
    Join Date
    Jun 2010
    Location
    SW WA ST
    Posts
    6,203
    Rep Power
    10

    Re: Fuel gauge not working?

    Aftermarket companies target markets that bring good sales. Parts that fit multiple year, make, model vehicles are typically where they focus. Specialty parts that don't sell well and/or only fit a small range of vehicles are not something they want to waste time with. These sending units would fall into this category. That being said, they do make universal sending units and it's possible one of these could be made to fit. When things get beyond repair and used parts dry up (we're almost there), then such repairs will be required. Until then it just makes more sense to repair or find stuff in salvage yards.

    The range of resistance is ~3 ohms (empty) to ~110 ohms (full). Resistance values for both 4wd & 2wd are the same, so I would speculate the difference in sending units might be with the float arm (4wd tanks are physically different from 2wd tanks).

    I don't have any of these currently laying around so I can't measure arms. If you can still get this for a 2wd, then I'd probably get one and compare when the tank is removed. Then rework/modify as required. Be sure to share what you find out! Thanks. Tim

  7. #7
    Van Fan TheCarolinian's Avatar
    My Van(s):
    1986 Toyota cargo van.
    Join Date
    Jul 2015
    Location
    North Carolina
    Posts
    32
    Rep Power
    1

    Re: Fuel gauge not working?

    Quote Originally Posted by timsrv View Post
    Rawb, sorry but until now I somehow missed your post. I'm sure you've already figured it out but I wanted to reply so the "next guy" could benefit.

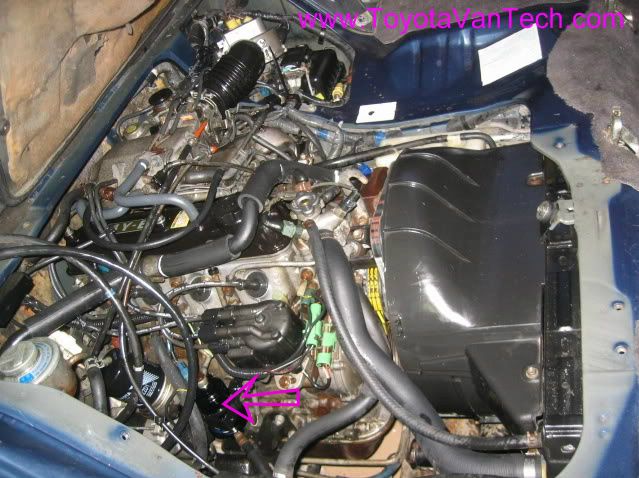
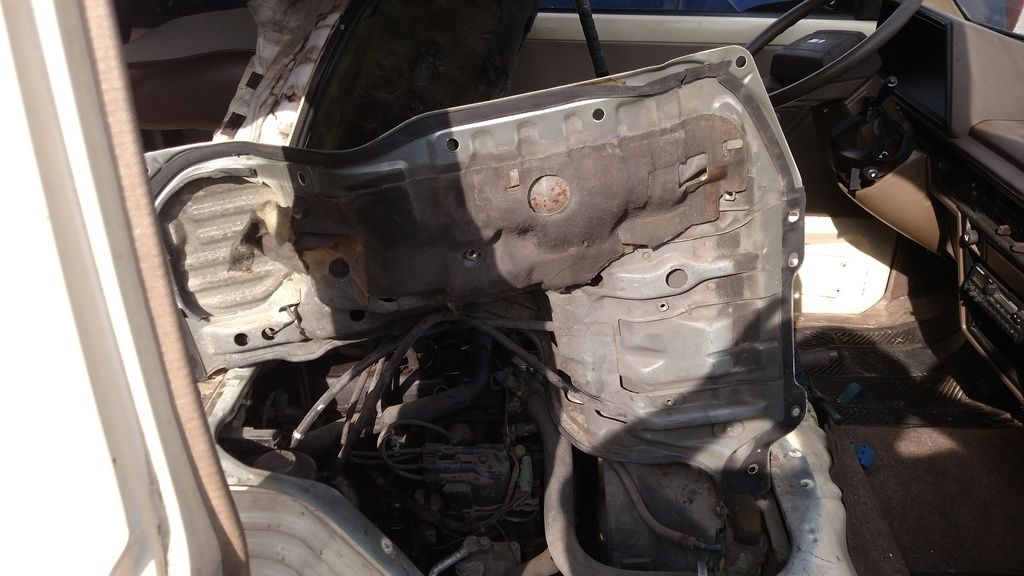
    The fuel filter is on the passenger side of the engine between the distributor and the oil filter (see arrow in picture below):


    This is a big filter so unless you have a contaminated fuel system it should only need to be replaced at 60,000 mile intervals. To access and replace you must 1st remove the passenger side seat, center console and engine access panel. Before you remove any lines, loosen the fuel cap enough to release pressure from the system. When pressure is gone use a 6 point 17mm socket on the top banjo bolt and remove. After that's off use a 12mm socket with an extension to remove the 2 bolts holding the bracket to the block. The lower fuel line is flexible, so once the bracket bolts are removed the filter can be maneuvered to a position favorable to access the lower fitting. Again, a 6 point 17mm socket will fit the banjo bolt, but since the filter is loose you'll also need a 19mm open end wrench to back things up (counter torque). Tim
    I just wanted to say thank you Tim.I'm not a mechanic and without the valuable information on this site I would have been so damned lost I might have just sold the van and been done with it.
    I got my 86 Toyota cargo van on the road.My friend is a mechanic and after a brief look over he advised me to just drive it on short trips to shake things up and see what happens.I had been doing that for three days just puttering around and having a blast mind you,when after 175 miles I went to accelerate from a stop sign and she just bogged down hard.No stall but you could tell it was starved for fuel or air.I feathered the pedal and got her home just fine but I knew I had a problem.I had just recently replaced the fuel pump and the tank was horrible.On the advice of a mechanic I cleaned it thoroughly with white vinegar several times after removing the huge amount of rust that was in it,even with 6 gal. fuel.
    Van ran fine after thatbut I knew I should replace the filter.Whether it's after market or not the van does have an inline filter on drivers side underneath it.I thought that that was the only filter I had to replace but after searching TVT forums I found out where the real filter was.So thank you very much.
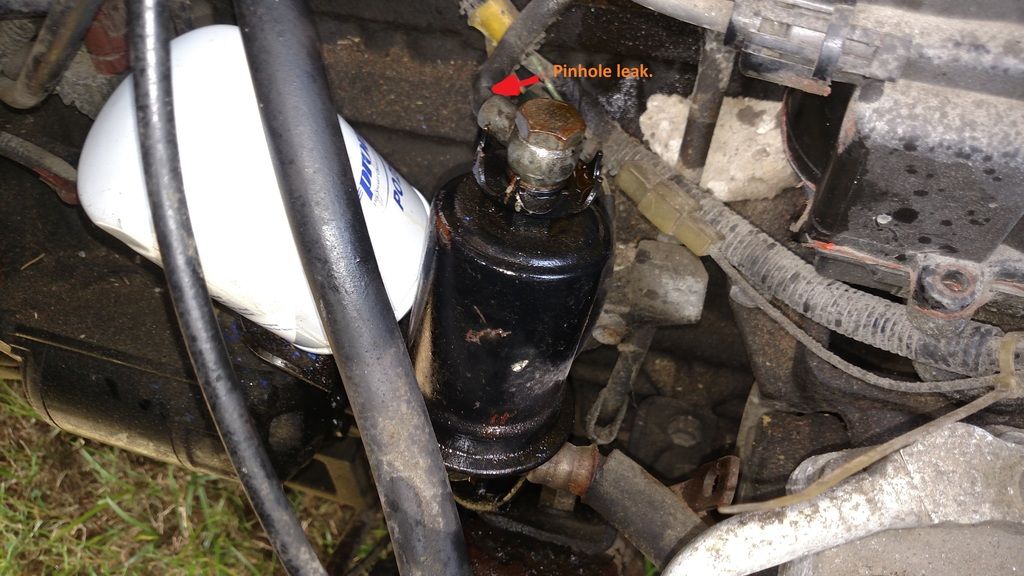
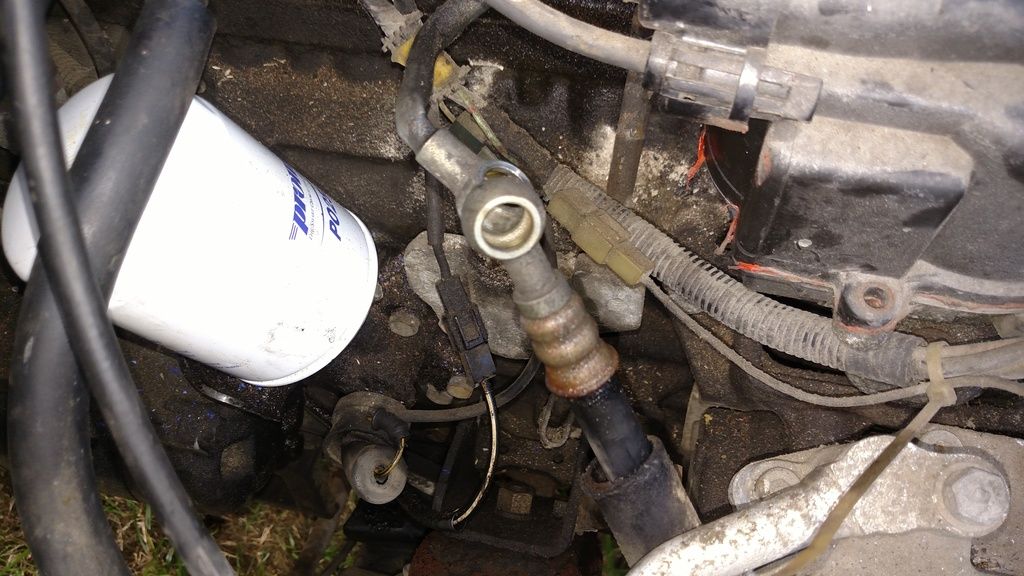
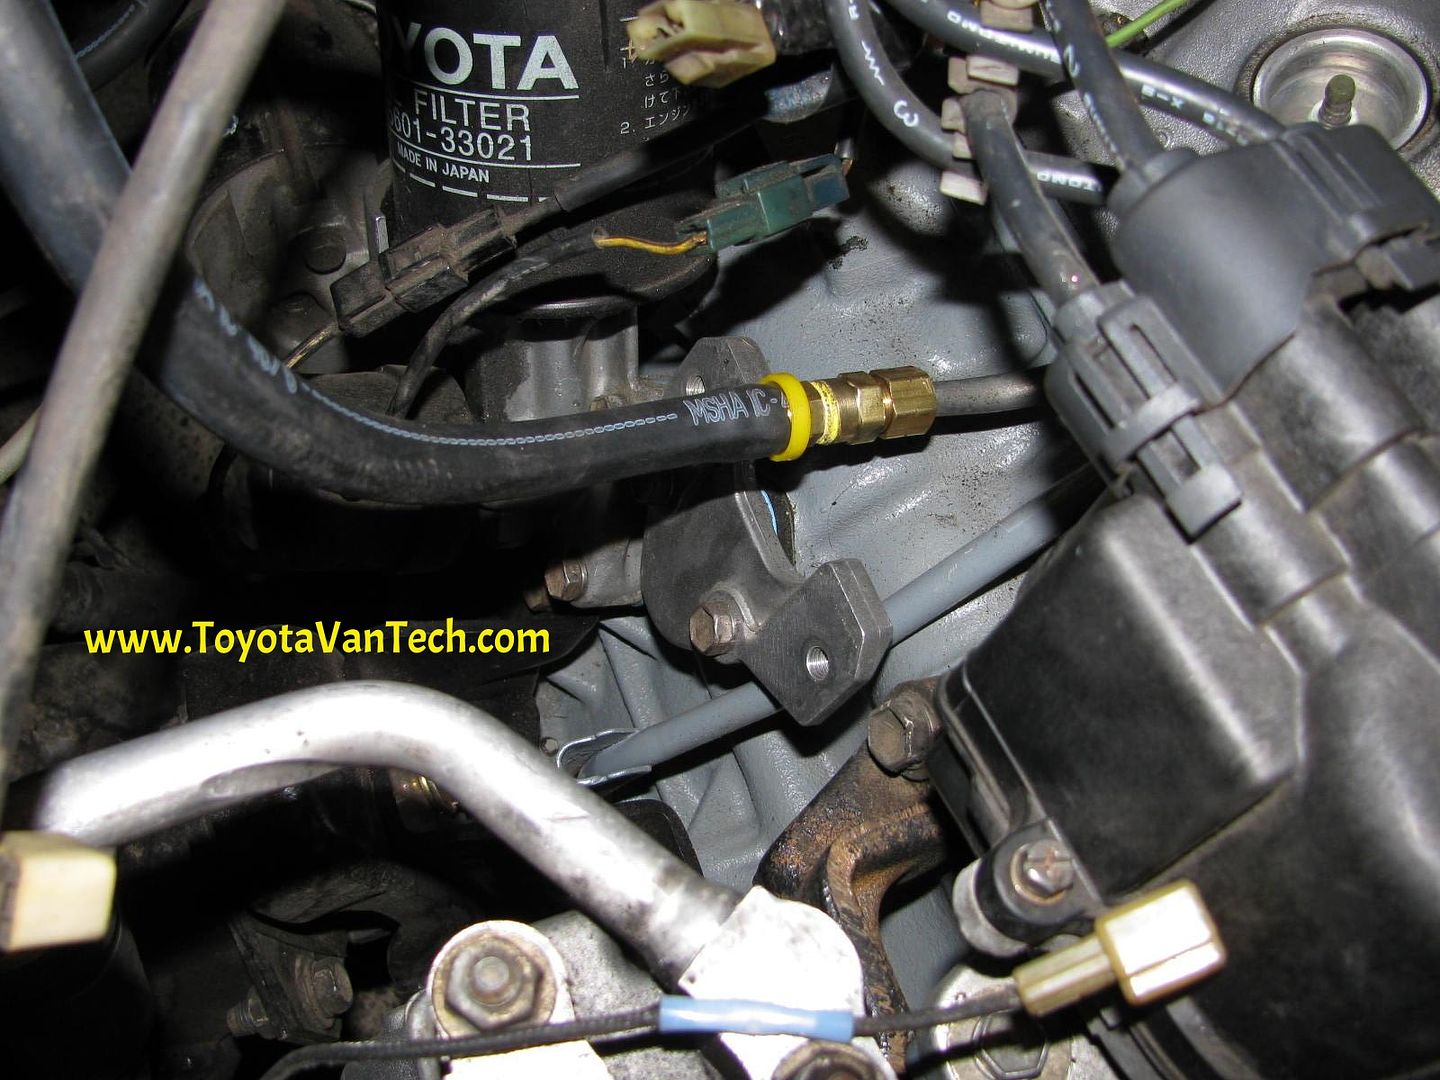
    I followed the procedure to replace step by step,no problems until I had to remove the filter.I think someone had impact ratcheted those banjo bolts.Anyway,I knew I was going to have a problem with the fuel line to the rail because it was bent at almost 90% and constricted a bit.Sure enough,when I replaced the filter I have a pinhole leak on the line at the top...
    My question is,"would I be better off having a custom line built,maybe braided?"I'd really like some feedback on this.Thank you very much!


    The splatter you see is PB Blaster,I got a bit messy with it because I didn't have the nozzle.

  8. #8
    Administrator timsrv's Avatar
    My Van(s):
    Lots of them
    Join Date
    Jun 2010
    Location
    SW WA ST
    Posts
    6,203
    Rep Power
    10

    Re: Fuel gauge not working?

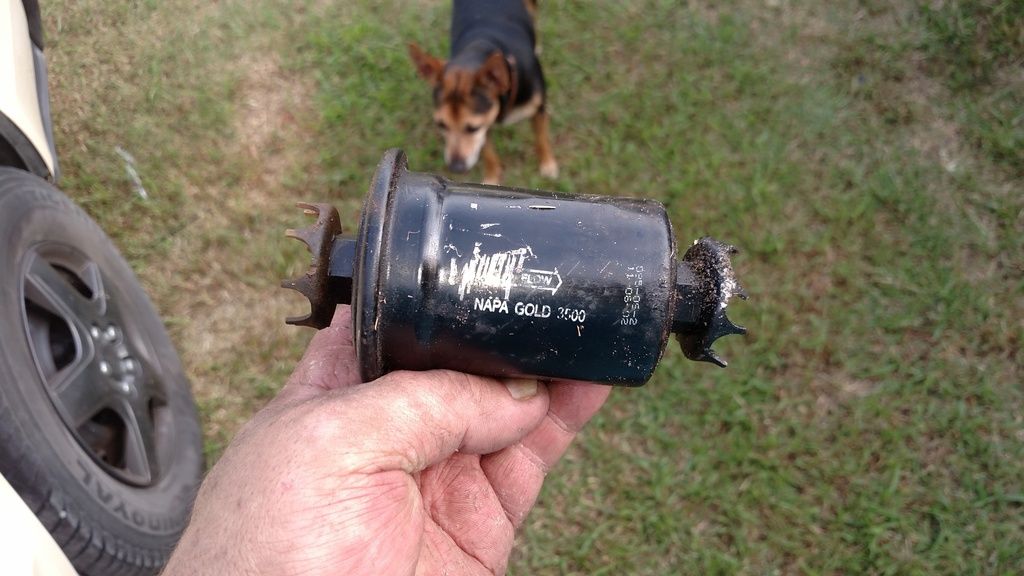
    The factory filter is worthless anyhow. After my tank was contaminated I kept clogging injectors (factory filter was not effective). I finally solved the issue with an aftermarket filter installation. Your crimped line will not matter, just cut it off at the crimp and splice it like I did here (page 2 this thread).


    As for the 2nd filter, that does not belong. There is only the sock in the tank and the filter shown in your picture above. I would be concerned of anything down stream of this due to the pressure and heat in this area. If you leave it there, at the very least make sure it and the fuel line they used is rated for at least 50 psi. Personally I would get rid of it and rely only on the canister type filter I'm using. It completely solved all my contamination issues. I've been running it for over 15k miles now with no issues. Tim

  9. #9
    Van Fan TheCarolinian's Avatar
    My Van(s):
    1986 Toyota cargo van.
    Join Date
    Jul 2015
    Location
    North Carolina
    Posts
    32
    Rep Power
    1

    Re: Fuel gauge not working?

    Understood.Good info Tim,thank you.Let me ask you this though.Is there a way to do a "quick" fix in the meantime?

  10. #10
    Administrator timsrv's Avatar
    My Van(s):
    Lots of them
    Join Date
    Jun 2010
    Location
    SW WA ST
    Posts
    6,203
    Rep Power
    10

    Re: Fuel gauge not working?

    With high pressure fuel lines there's really no such thing as a "quick fix". If you want to keep it all stock, then try to find a van in a salvage yard and steal the metal fuel line off of it. This may also be available new from Toyota, but these type parts are getting pretty scarce. It's Toyota part #23801-73010 and will cost you $40 - $50 depending on where you purchase (if it's even still available). Tim

    PS: Since this is an uninterrupted steel line all the way to the fuel rail, if there's another filter, then they must have cut the line down stream of here anyhow. I'd get another steel line (new or used) regardless of what else you may decide to do. Tim

  11. #11
    Van Fan TheCarolinian's Avatar
    My Van(s):
    1986 Toyota cargo van.
    Join Date
    Jul 2015
    Location
    North Carolina
    Posts
    32
    Rep Power
    1

    Re: Fuel gauge not working?

    Quote Originally Posted by timsrv View Post
    With high pressure fuel lines there's really no such thing as a "quick fix". If you want to keep it all stock, then try to find a van in a salvage yard and steal the metal fuel line off of it. This may also be available new from Toyota, but these type parts are getting pretty scarce. It's Toyota part #23801-73010 and will cost you $40 - $50 depending on where you purchase (if it's even still available). Tim

    PS: Since this is an uninterrupted steel line all the way to the fuel rail, if there's another filter, then they must have cut the line down stream of here anyhow. I'd get another steel line (new or used) regardless of what else you may decide to do. Tim
    The inline filter is on the underside of van just forward of fuel tank.I'll be removing it if it's uneccessary.
    Thank you on that part#,that's exactly what I need.Found it here for right at $42 after shipping costs.
    http://www.toyotaonlineparts.com/oe-toyota/2380173010


  12. #12
    Van Fan
    My Van(s):
    1986 TV 2WD
    Join Date
    Mar 2016
    Location
    Arkansas
    Posts
    39
    Rep Power
    1

    Fuel Tank Replacement

    Hey guys , I have a 89 4WD Auto , I dropped the tank and found a crap load of rust in it and it seems to be pitted up pretty good inside . I thought about cleaning it but honestly don't think it will do any good . I have a clean tank from a 2WD 5speed and they look identical but tried putting it in last night and it seemed to be snug but it was dark so I might not have slid it in right .....? Can you still find new tanks for the 4WD Vans ?

  13. #13
    Administrator timsrv's Avatar
    My Van(s):
    Lots of them
    Join Date
    Jun 2010
    Location
    SW WA ST
    Posts
    6,203
    Rep Power
    10

    Re: Fuel gauge not working?

    From what I understand, 4wd tanks will fit okay on 2wd's but 2wd tanks don't fit well on 4wds. The 4wd tank has a relieved area formed into it so it won't interfere with the transfer case. Since the 2wd tanks are not relieved, there will likely be an interference issue if you put one on a 4wd. Since you got it up there, I'd take a good look to see where (if anywhere) it's hitting. Depending on the spot you might be able to mark it, take it back down, and strategically put a dent in it???

    The Toyota part number for the tank you need is 77001-28300. If it's available, it's MSRP is around $600, but a brief search revealed it may be available on some discount sites for as low as $430 (which to me means NLA). Tanks can get pretty nasty inside, but IMO they can be cleaned and put back into service. Take a look at the one on page 2 of this thread. After cleaning I have put about 25k miles on it. If you go this route, I would also recommend an aftermarket filter set-up like I documented here on this thread.

    There's also products like POR-15 that can work well in some instances. I've used this on old tractors with small simple tanks (with good results), but never on larger modern tanks with baffles, flappers and/or hard to reach areas..........not sure I would recommend that here. Tim

  14. #14
    Van Fan
    My Van(s):
    1986 TV 2WD
    Join Date
    Mar 2016
    Location
    Arkansas
    Posts
    39
    Rep Power
    1

    Re: Fuel gauge not working?

    Quote Originally Posted by timsrv View Post
    From what I understand, 4wd tanks will fit okay on 2wd's but 2wd tanks don't fit well on 4wds. The 4wd tank has a relieved area formed into it so it won't interfere with the transfer case. Since the 2wd tanks are not relieved, there will likely be an interference issue if you put one on a 4wd. Since you got it up there, I'd take a good look to see where (if anywhere) it's hitting. Depending on the spot you might be able to mark it, take it back down, and strategically put a dent in it???

    The Toyota part number for the tank you need is 77001-28300. If it's available, it's MSRP is around $600, but a brief search revealed it may be available on some discount sites for as low as $430 (which to me means NLA). Tanks can get pretty nasty inside, but IMO they can be cleaned and put back into service. Take a look at the one on page 2 of this thread. After cleaning I have put about 25k miles on it. If you go this route, I would also recommend an aftermarket filter set-up like I documented here on this thread.

    There's also products like POR-15 that can work well in some instances. I've used this on old tractors with small simple tanks (with good results), but never on larger modern tanks with baffles, flappers and/or hard to reach areas..........not sure I would recommend that here. Tim
    Lk here's the deal , I got the 2wd tank in but it was too snug on the T-case so that was a no go . I ended up taking my 4wd tank to a radiator shop owned by a family friend , he said he could clean it but to save me some $$$ he told me how they do it and have done it for years . Pour 3 bottles of 100% Lye Grandules into tank fill will water , seal it up and leave in the sun for 2-3 days , pour it out , take a pressure washer and spray the inside really well , fill with enough gas to rinse it out and install it back on the vehicle and fill it to full , he said try and keep the tank as full as possible so condensation doesn't set in . Also take extreme caution to not get any Lye water on bare skin because it will eat flesh to the bone . I did exactly what he recommended and my tank came out clean as new inside !!!!!

  15. #15
    Administrator timsrv's Avatar
    My Van(s):
    Lots of them
    Join Date
    Jun 2010
    Location
    SW WA ST
    Posts
    6,203
    Rep Power
    10

    Re: Fuel gauge not working?

    Awesome! Got any pics? I would like to know how it compares to my tank (after I cleaned it page 2 of this thread). If it's clean/shiny metal, then it sounds like it came out better than mine. When you say 3 bottles, how big were the bottles and where did you get them? I have a "van bone yard" here and have a feeling I'll eventually be doing this again. Tim

  16. #16
    Van Fan
    My Van(s):
    1986 TV 2WD
    Join Date
    Mar 2016
    Location
    Arkansas
    Posts
    39
    Rep Power
    1

    Re: Fuel gauge not working?

    Quote Originally Posted by timsrv View Post
    Awesome! Got any pics? I would like to know how it compares to my tank (after I cleaned it page 2 of this thread). If it's clean/shiny metal, then it sounds like it came out better than mine. When you say 3 bottles, how big were the bottles and where did you get them? I have a "van bone yard" here and have a feeling I'll eventually be doing this again. Tim
    Sorry I did not get any pics , I know I should have !!! I believe the granule bottles only come in one size . You can find them at most Hardware Stores , I tried Lowes but they did not have any so your best bet would be
    A small local hardware store . http://www.idealtruevalue.com/store/...FQsPaQodN7AHxw .

  17. #17
    Forum Newbie
    My Van(s):
    1987 Auto Vanwagon
    Join Date
    Mar 2018
    Location
    West Coast
    Posts
    10
    Rep Power
    1

    Fuel Gauge Sending Unit Question

    Hi! Having issue passing the smog check vapor test.
    Smog Check mechanic said there is a vapor leak coming from the fuel gauge sending unit. Mechanic covered it with silicone and said there is still a leak from the unit.

    Is it possible that these units can leak from anything more than a gasket? If so I'm thinking of repairing the unit (especially since they are not being made anymore) Does anybody have any experience with these? Anyone have one for sale?

    Cheers!

    Name:  fuel guage sender.jpg
Views: 1713
Size:  11.5 KB

  18. #18
    Van Obsessed
    My Van(s):
    88 4WD DLX 5spd
    Join Date
    Oct 2010
    Location
    Ontario, Canada
    Posts
    1,073
    Rep Power
    1

    Re: Fuel Gauge Sending Unit Question

    Vana - Generally speaking they don't leak, but when gaskets fail or rust sets in, anything can happen.
    Gooping a product on, is at best a stop gap measure, it needs to be properly diagnosed and corrected.
    Until you drop the tank down and find out WHY its leaking we are all just making WAG's

    It has been my experience that when something on top of the tank starts to leak, there is no magic goop that will solve the issue, at least for any length of time.
    It may need a new sending unit or it could be the tank or it could be vapour lines or maybe something else.

  19. #19
    Van Fan
    My Van(s):
    1986 Toyota van
    Join Date
    Sep 2016
    Location
    Tucson,Az
    Posts
    57
    Rep Power
    1

    2wd vs. 4wd sending unit for gas gauge

    Quick question I cannot find the answer to. Is the fuel sending unit the same in a 2wd as the 4wd? Thanks

  20. #20
    Van Addict AD2101's Avatar
    My Van(s):
    1988 4x4 Van Formerly: 1986 Cargo Van Parted Out: 1989 4x4 Van, 1987 4x4 Van, 1986 Van
    Join Date
    Mar 2014
    Location
    Tucson, AZ
    Posts
    419
    Rep Power
    1

    Re: 2wd vs. 4wd sending unit for gas gauge

    I found this thread useful. 4wd and 2wd senders have two different part numbers, the 4wd part number is 83320-80034, and the 2wd one is 83320-29857. As for the actual difference between the two, I'll just quote Tim instead of trying to blatantly plagiarize him:

    Quote Originally Posted by timsrv View Post
    I would speculate the difference in sending units might be with the float arm (4wd tanks are physically different from 2wd tanks).
    These sending units *may* be serviceable, it appears to be the rheostat on these senders that is usually the culprit. I briefly looked into what would go into a fix previously and quickly deemed it was easier to just fill up every 200 miles and use my trip odometer as a poor man's gas gauge instead.

Tags for this Thread

Posting Permissions

  • You may not post new threads
  • You may not post replies
  • You may not post attachments
  • You may not edit your posts
  •