No biggie. Probably doesn't matter anyhow as I don't think that TSB affected the vans anyhow. Glad you got the thumping and bumping straightened out. TimOriginally Posted by Harbilly


No biggie. Probably doesn't matter anyhow as I don't think that TSB affected the vans anyhow. Glad you got the thumping and bumping straightened out. Tim
Tim - The new style bushing/bearing is currently installed in my ride (88) they fit like a glove and eliminated several horrid noises and the play.
Haven't heard back from my guy but I suspect it is all the same bulletin, because they weren't totally sure I would need the bearings.
They actually said "you can return them if you don't need them", I made them repeat that just to be sure I had heard it correctly.
BB
Okay, so being an 88 and having the TSB apply is interesting. If that's the case it should work on all 4wd vans. I wonder why the TSB says it only applies to vehicles manufactured after 8/89???
None the less, this is good information. Next time I order parts I'll add a couple of these bearings. Tim

The plot thickens!!Thanks BB I'll order the 4 parts as well so both sides can be 'upgraded'. Bill
Arghhh. Har Har Har. It's a pirate's life for me!
86 2wd cargo
89 4wd (now a crumpled mound of parts in the front yard)
96 (3rd Gen) 4Runner Limited
TSB received but I have not the technology to upload, that and it is spread over 3 emails.
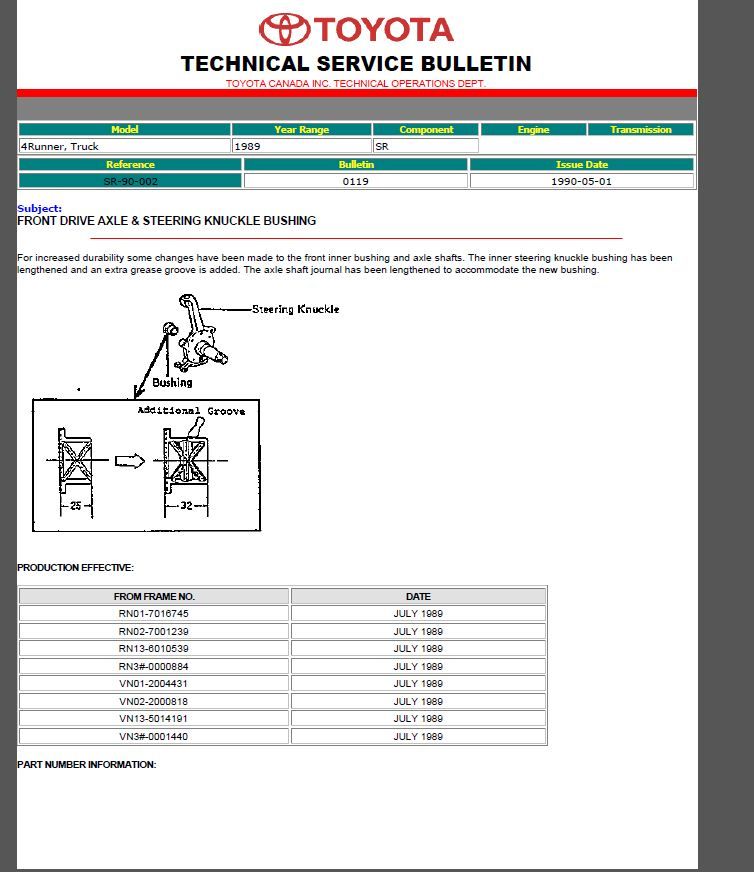
Looks to be a different bulletin (SR-90-002, bulletin #0119, issued 1990-05-01) applies to forerunner/truck, however when he queried the part it noted the supersession and the appropriate bulletin.
Interestingly enough, they don't state a cold weather issue, just for "increased durability".
I suspect that Canada has a different TSB numbering system so it may be the same...
If someone wants it I am happy to forward it to a less "technology challenged" member.
BB
PM sent
Ya, lets get this sorted. I just ordered the part numbers according to the other TSB so I really want to see the Canadian TSB and compare.
Arghhh. Har Har Har. It's a pirate's life for me!
86 2wd cargo
89 4wd (now a crumpled mound of parts in the front yard)
96 (3rd Gen) 4Runner Limited
There are 2 seals on the in-board side (one on the spindle, one on the axle) didn't change them because I didn't have at the time but might be worth doing as it will keep the dirt out. Also have new spacers (2 thicknesses available) so that once you're done you can set the thrust clearance to spec.
0.075-0.690 mm (0.0030-0.0272 in), 2 spacers are available 1.80mm & 2.25mm. New lock rings are a good plan too.
BB
As far as the doing goes: here is what I did.
Drive it up on ramps (vehicle weight must be on the fr wheels in order to pull the axles), pull the hubs and the axles.
There is just enough room to get a drift in from behind and knock out the outer bush, then drop the inner.
(be careful of the seals on the inner side of the spindle)
I made up a piece of 3/4in threaded rod with a nylock on the inboard side, cobble it together with washers and the old bushings as dies and "pressed" the assembly together, The threads were taped to avoid damage.
I put the outer bush in first, then the new inner bearing, then the inner bushing last.
Liberal amounts of synthetic grease were sacrificed during this operation.
I polished the axles with 400 grit paper to remove some ridges but they cleaned up nicely.
Install the axles and check the thrust play, once done, reinstall the hubs and go for a test drive.
(no pictures were taken - sorry)
BB
and did the part numbers come from the tsb we have from 94 or the one you have from 90? Can you post the part numbers you used?
.....and, thanks!!!!
Arghhh. Har Har Har. It's a pirate's life for me!
86 2wd cargo
89 4wd (now a crumpled mound of parts in the front yard)
96 (3rd Gen) 4Runner Limited
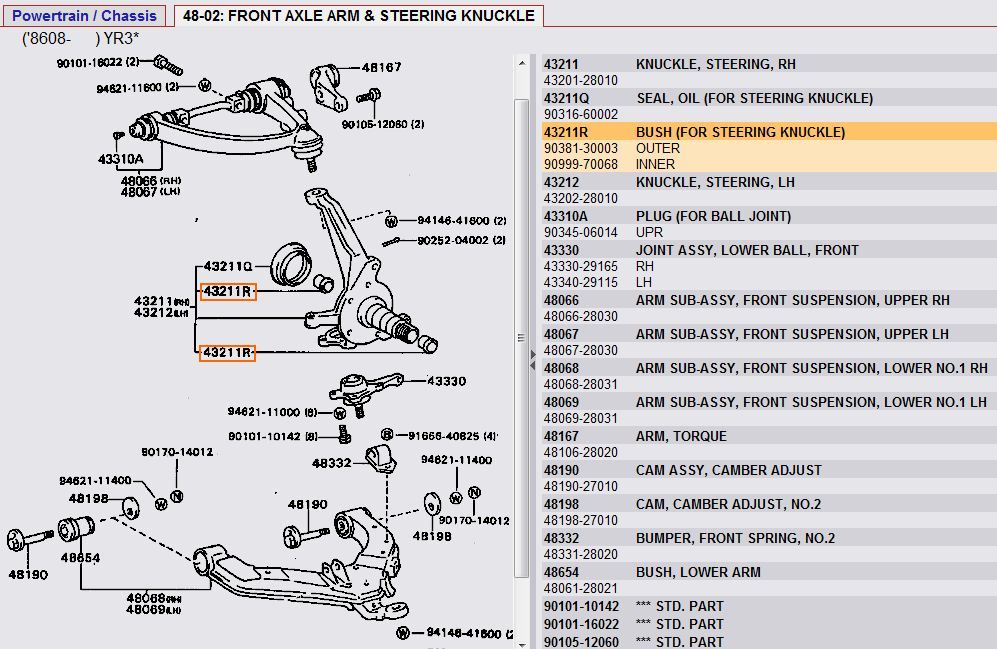
Okay, here's what I found out. Burntboot emailed me the service bulletin information (posted below) and I researched the EPC. I checked all years and flavors of 4wd vans and found the bushings called for are the same for all years (inner & outer). The 1st picture is the EPC breakdown of our steering knuckles along with the original part numbers:
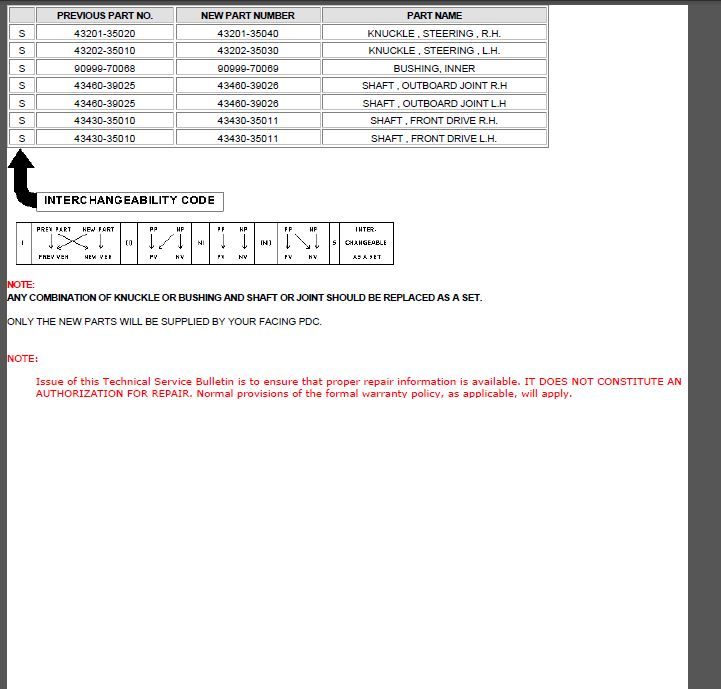
Here is a jpg of the TSB as it was sent to me (2 pages):
I'm not completely clear on a couple of issues, but it appears to me that only the inner bushing (old number 90999-70068) is changed to new bushing #90999-70069 (and based on everything I see here it looks like they will interchange). The only difference I see in the bushings is the new one is a little longer (more surface area for the axle) and it has another grease groove inside of it. That's it! No roller bearings or any drastic changes here.
The only part that had me a bit confused is the statement "any combination of knuckle or bushing and shaft or joint should be replaced as a set". Huh? Maybe somebody with a higher IQ could explain that too me. Regardless, I don't think this applies to us because this TSB was for 4 runners and the part numbers for everything except the bushings are different. Looks like we can benefit by swapping to these new inner bushings regardless of manufacture date. Tim
Update. I received new information and have checked into this further. The service bulletin above was dated 5/1/1990 and has been superseded by TSB DL94-001 dated 10/14/94 (previously posted on page 1 of this thread). I'm not sure why TSB DL94-001 says it's only for vehicles manufactured after 8/89, but Burntboot sent me an email last night with pictures verifying that TSB DL94001 does indeed apply to our vans. I had previously verified Toyota made no steering knuckle changes throughout the years of 4wd van production, so if it works for Burtboot, it should work for us all. For the sake of convenience I have attached a PDF of the current TSB DL94-001 to this post.
It's unfortunate that Toyota made this so confusing but hopefully the confusion is behind us. Here's a parts list for anybody doing this job:
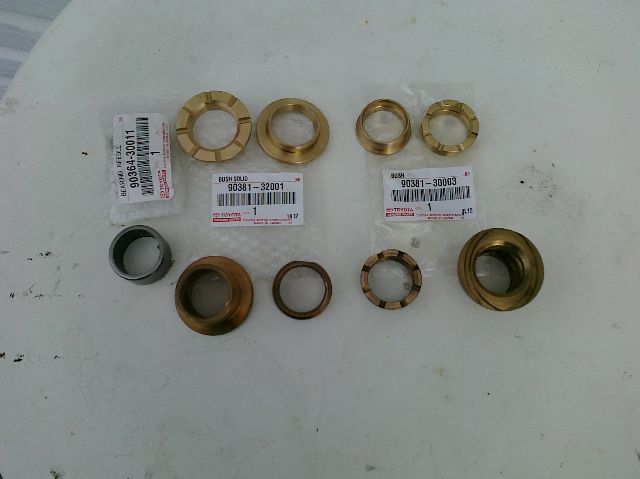
(qty:2) 90364-30011 Bearing, Needle (goes into inner bushing bore)
(qty:2) 90381-32001 Bushing, Inner (acts more like a bearing retainer now)
(qty:2) 90381-30003 Bushing, Outer (still the same as original)
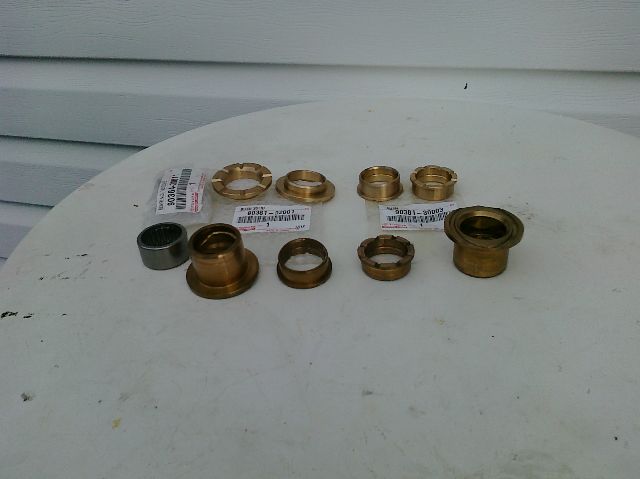
Here are some pics of the parts (provided by Burntboot) Note: the darker colored bushings closest to the camera are his old bushings.
The parts work. My machinist made bushing had gone sloppy so my mechanic Greg at Calver Auto (Abbotsford Canada- but I don't think Cdn vans are different) replaced the oem style big bushings with the little bushings and the needle beating and reports it all went together fine. We are chasing a periodic high speed 4wd knock under the driver at sub zero temps on washboard. FWIWBikk
Arghhh. Har Har Har. It's a pirate's life for me!
86 2wd cargo
89 4wd (now a crumpled mound of parts in the front yard)
96 (3rd Gen) 4Runner Limited
Ps the machinist made replacement big bushing on the passenger side was still good but the driver side one had begun to spin (the way a race spins) and showed some signs of beginning to oval. I am hopeful we got the noise. I'll find out next winter, I guess.
Arghhh. Har Har Har. It's a pirate's life for me!
86 2wd cargo
89 4wd (now a crumpled mound of parts in the front yard)
96 (3rd Gen) 4Runner Limited
I'm looking for the spindle seal you referred to - Toyota Part number 90316-60002. I can find a Toyota branded seal for ~$14, but was hoping to find an aftermarket seal for less $$. The axle seal you referred to is 90311-66002 and, here, Tim suggests BECK/ARNLEY Part # 0523500. Those are $2.69/ea at the time of this writing. Does somebody know the BECK/ARNLEY or similar aftermarket version of the spindle seal? I failed to find it at RockAuto.
Update: The steering knuckle dust cover / oil seal, 90316-60002, is NLA and has (according to toyotapartsdeal) been replaced by 90304-76005. I paid ~$19.50 ea.
For me, I started down this path of replacing steering knuckle bushings because I had an annoying and troublesome clanking over even small bumps. With the help of this and related threads, I isolated it to the front axles slopping around in the steering knuckle. Though the TSB mentions noise at very cold temps, that didn't matter. My axles clanked no matter what the temp. Locking the hubs stopped the clanking. This is contrary to symptoms reported by other van owners.
Anyway, I thought I would post some notes from my repair. I am a novice mechanic who learns as he goes and has a very basic set of tools.
I also suspected that my rotors were bad (front end pulse with high speed braking) and had no idea when my bearings were last regreased, so I wanted to do that too.
After doing one side with under the tutelage of an airplane mechanic friend, I learned that I like to do the most difficult bits first. Below are some notes on how I tackled the more challenging aspects of this repair.
Remove axles: For this I needed a breaker bar with a swiveling head. I set a long-ish 14mm wrench on the inside bolt to prevent the axle from turning and broke the nut loose with the breaker bar on the outside. I used chalk to mark the bolts that had been broken loose. Note that due to 'righty-tighty, lefty-loosey' the driver side was easier to break loose than the passenger side, and that had to do with the way the 14mm wrench was used as a brace.
For some reason, I imagined that the inside of the axle would have a part pointing in toward the differential, with that picture in mind I did not understand how it I would finagle the axle out without removing the steering knuckle (definitely didn't want to do that). Turns out that the axle is flat where it meets the diff/axle housing and it simply falls down after the six bolts are removed. With that done I found it helpful to place the jack under the lower control arm and lift it as high as possible without lifting the van off the jack stand - this helped to facilitate the removal of the axle and the passage of the axle's front boot through/over the lower control arm.
Breaking hubs loose from rotors: I followed advice read elsewhere (TVP?) and lay my wheel face-up, then put the rotor/hub assembly face down into the lug nut holes. Then used the breaker bar to remove rusted bolts holding the hub and the rotor together. I put paper towel into the hub to prevent crud/dust/rust from getting into the bearings. Next I used a hammer and block of wood to pound the hub through the back of the rotor. Note that not using wood can chip off the edge of the back of the hub, as I found out (lucky it was minor damage). When putting new rotors onto hubs, I wire brushed the area where hub and rotor meet, and used wood & hammer combo to set the rotor flush against the hub. Then I tightened the hub down.
Removing and installing steering knuckle bushings: I did this in-line as did Burnboot and Rat. Somewhere in the recent past I found a ~6 inch drift, and this came in handy. With hammer and drift I pounded out the old bushings. It helped to have a second person place an object into the steering knuckle shaft to hold the drift into [diagonal] place against the inside of the bushing. I pounded (Tim's method) rather than squashed & screwed (Burnboot's method) bushings into place.
The new front-side bushing went in easily with a small block of wood and a hammer. Careful to have the flat side up - in line with the groove in the spindle. Patience is key here! Don't rush it. I used a small hammer because I didn't want anything getting jammed crooked. The following pics are upside down.
front_bush_in1.jpg
Here you can see dark marks on the underside of the spindle. Similar dark marks were found on the inside edge of the bearing that makes contact with the spindle. Anybody know what that's from?
spindle_underside_marks.jpg
The inner needle bearing and bushing were much more difficult to install than the outer bushing. I ended up commandeering the wooden handle from large screwdriver for this task. The needle bearing slipped over the front end of the handle perfectly, and that is what i hammered on to press it in.
bushing_press2.jpg
I also used some ratchet extenders held against the screwdriver handle. Easy does it! Still, it takes some force (and fatigue sets in) when you are lying upside down and don't have much room to swing the hammer. With the front bushing I could look to see if I was hammering the bushing in straight, but on the back side it's much more difficult to tell. I created a measuring device by putting masking tape over the end of a pick and a fine-tipped marker with which I marked distance. Placing the marked pick around the bearing I could tell if I was tapping it in straight.
marked pick.jpg
measure_bearing1.jpg
After the needle bearing was inset sufficiently (according to the TSB) ....
bearing_in1.jpg
I slipped the new inner bushing over the conveniently sized wooden screwdriver handle (now taped to keep it together from the force of the hammer) and pounded it in. This was difficult because at this point you are pushing both the bushing and the bearing inward. It was particularly difficult to get it flush against the steering knuckle. I used a 90 degree pick to feel for space between the new inner bushing and the steering knuckle.
bushing_press3.jpg
And once I had that inner bushing in semi-securely, I placed the old inner bushing on the screw driver handle and used as a surface to hammer the new inner bushing into place. Here is a shot of the screwdriver handle bushing-driver sporting the original inner bushing and some serious cracks from the force of the hammer.
bushing_press4.jpg
rear_bush_in1.jpg
I intended to replace the inner dust seal, which is now apparently part number 90304-76005, as noted in my previous post in this thread, however I did not understand how it would go in, so I didn't replace it. In the process of fiddling and attempting to remove the old dust seal I extracted (and failed to reinsert) springs which appear to help the dust seal hold it's shape. I hope they are not vital. At first I thought the original dust seal was the rubber inner circle, but now I realize that it must also include the metal ring around that rubber inner circle. The new dust seal has a different shaped outer lip and the rubber ring is of much larger diameter than the original.
This is a picture of me holding the new dust seal up against the old dust seal.
dust_seal2.jpg
Ps. I still have a very minor rattle or clank from the axles. The noise is only about 5% of what it used to be, but I can hear it perhaps only because I became so highly sensitized to the nature of that sound. Maybe if I had changed my inner dust seals that would have altered the play in the axle and reduced my clanking 100%. I don't know. ...don't really feel like pulling the axles again.
Last edited by fuquan; 10-02-2015 at 10:12 AM.
What's curious to me about this repair is that the brass bushings are loose around the axle. Two seconds of thought tells me that "of course the bushings should not be in contact with the axle". Still, I was surprised at the difference in diameter between the new bushings and the axle. The inner bushing is looser fitting than the outer bushing, if I recall correctly. The diameter of the needle bearing is such that it makes contact with the axle. So, what is to stop the axle from bouncing around in the spindle? My answer is: 1) the needle bearing and 2) proper thrust clearance (i.e. not much). Since I still have a bit of axle chatter after the repair, I am left wondering if there is a third component, that being the hubs. I have superwinch hubs and these seem very uncommon in the TV community. Could it be that other hubs fit the end of the axle more snugly and help to hold the axle in a suspended position within the spindle, preventing it form contacting the spindle bushings when driving over bumps?
Anybody have thoughts on this?
As I understand it, the original setup relied upon brass bushings only and were/are subject to excessive wear.
The upgrade puts the rotational load onto a hard steel bearing, the brass only takes side (thrust) loads.
Getting the end clearance within spec is important, failure to do so, could cause damage.
If you have excessive clearance it might explain your noises.
SW hubs are fine, lots of people have them, like all hubs though, its good to service them occasionally.
Finally following up on this, as the axle chatter/clanks annoy me. I made a video that demonstrates how the axle moves when I manually push the axle up/down. Is this normal?
https://www.youtube.com/watch?v=6gdtfAC0Kjc


 Reply With Quote